How to make polyester, polyester-elastane and CVC lab dips that repeat in bulk: the right substrate, safe HT pots, disperse recipe and profile, reduction clearing, two-bath CVC matching and assessment after heat-setting.
At a glance
130°CHold 30–45 min for polyester
pH 4.5–5.5Disperse bath, acid or acetate buffer
≤ 80°CBefore opening any HT lab pot
2 bathsCVC: disperse + clear, then reactive
Polyester lab dips look like reactive lab dips from the outside: weigh a small piece of fabric, pipette dye, run a pot, rinse, dry, compare. Inside the pot, everything is different. Disperse dyes do not dissolve, polyester only opens up near the boiling point and above it, the pot runs under pressure at 130°C, and the shade you see straight out of the pot is not the shade the buyer will see after finishing. When the fabric is a cotton-polyester blend such as CVC, you also have two fibres, two dye classes and two baths to control, and each part has to be matched on its own.
This article walks a new lab technician through the whole job step by step: choosing and preparing the substrate, handling high-temperature lab pots safely, building the disperse recipe, running the temperature profile, reduction clearing, the CVC two-bath method, how to judge each fibre separately, the one-bath shortcuts and their risks, and how to assess the result after a heat-setting simulation. The theory of why disperse dyes enter polyester is covered in how disperse dyes work on polyester, and the reactive side of a CVC dip follows the reactive lab dip method for cotton knit, so here we stay with the practical lab work.
Why polyester lab dips need their own method
Polyester is a compact, hydrophobic fibre. Below about 80°C its molecular chains are tightly packed and almost no disperse dye can get in. As the temperature rises past the glass transition region, the chains start to move and small gaps open. Disperse dye molecules, which are small and only slightly water-soluble, leave the dispersion, adsorb on the fibre surface and diffuse inside. At 130°C this happens fast enough to give full depth in a reasonable time. That is why polyester is dyed in sealed high-temperature (HT) equipment and why the lab must copy the same temperature, pH and time as bulk.
Polyester work is a large share of the lab’s load. In our own dye-house records, about a quarter of all batches contain polyester, either alone or blended, and about 37% contain elastane. So a lab officer will run disperse dips almost every day, and many of them will be on blends with cotton or elastane.
Step 1: prepare the right substrate
The single most common reason a polyester lab dip does not repeat in bulk is that the lab dyed a different fabric. Polyester dye uptake depends strongly on the fibre’s heat history. Heat-setting changes the crystallinity and orientation of the polymer, and that changes how fast and how much dye goes in. A greige piece, a piece heat-set at a different temperature, and the production piece can give clearly different depths with the same recipe.
- Use fabric from the same lot as bulk, after the same preparation: scoured (or washed) to remove knitting oils, and heat-set if bulk will be heat-set before dyeing.
- Ask the finishing section for a piece from the actual pre-setting run rather than heat-setting a sample yourself on a different machine. If you must set it in the lab, copy the bulk temperature and dwell time.
- For polyester-elastane, the fabric is normally pre-set before dyeing to fix the width and stop curling and shrinkage. Take the lab sample after that pre-set. Elastane cannot take the same high temperature as plain polyester, which affects both the setting and the dyeing temperature, as explained below.
- For CVC, scour and, if bulk is bleached or peroxide-treated, give the lab piece the same treatment, because the cotton part must be as absorbent and as white as bulk cotton will be.
- Condition and weigh accurately. Let the fabric stand in room air before weighing. A typical lab sample is 5 g or 10 g; 10 g is easier for CVC because it leaves enough fabric to cut and examine.
Common mistake: Dyeing a lab dip on greige or unset polyester because the pre-set fabric is not ready yet. The dip may look perfect, but bulk on heat-set fabric comes out lighter or a different tone, and the lab blames the machine. Wait for the right fabric or clearly mark the dip as provisional.
Step 2: use high-temperature lab pots safely
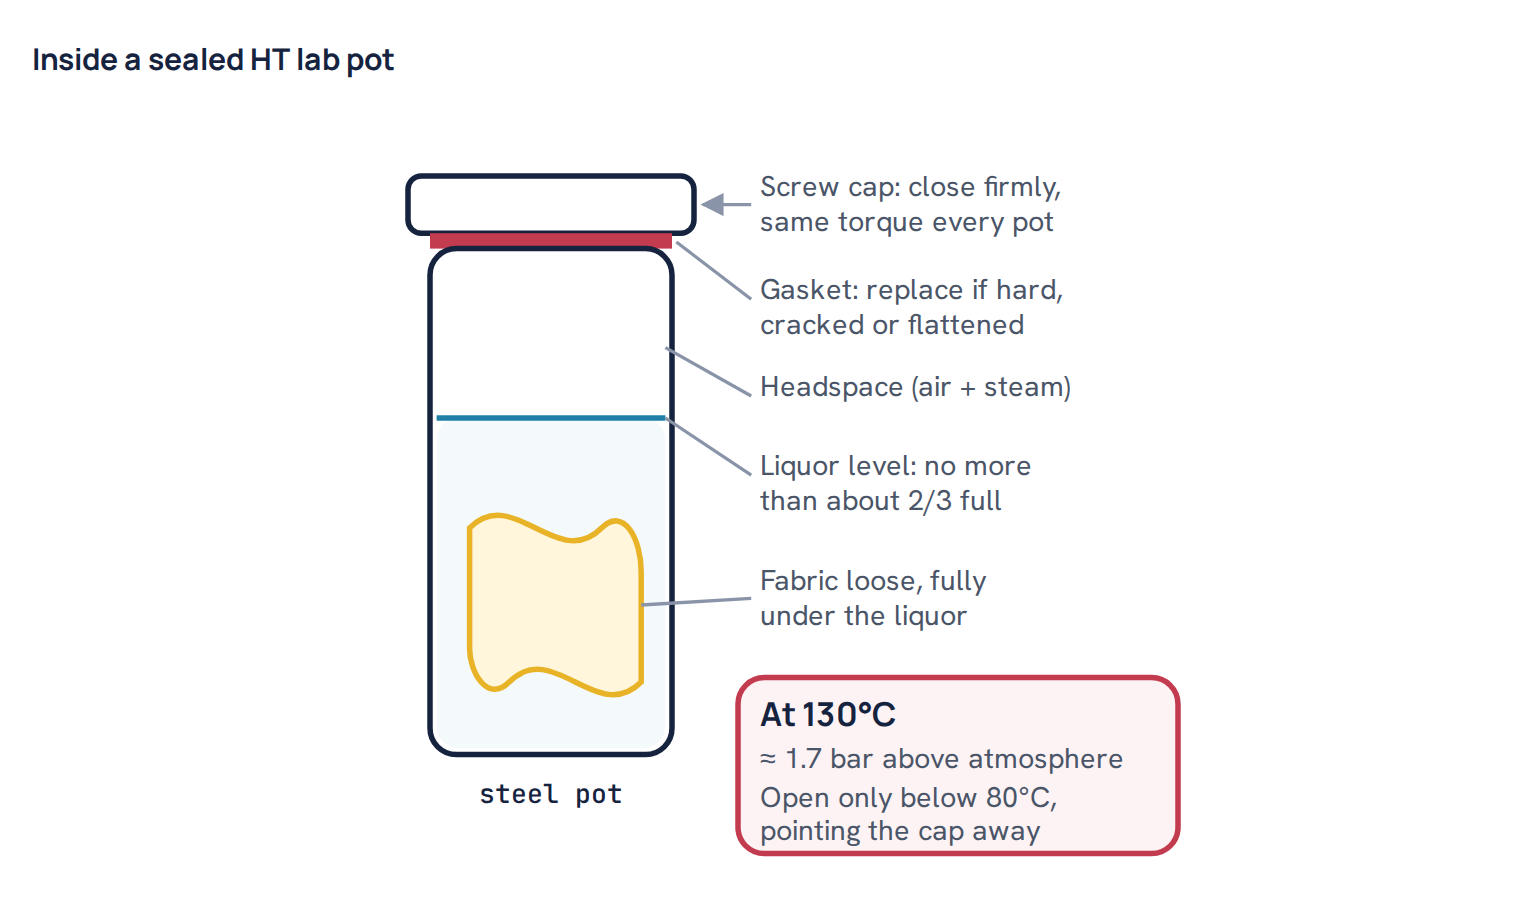
Disperse lab dips are run in stainless-steel pots that are sealed and heated in an HT lab dyeing machine, usually with infrared heating or a heated glycerine bath, while the pots rotate so the liquor moves through the fabric. At 130°C, the water in a sealed pot is well above its normal boiling point. Saturated steam at 130°C is about 2.7 bar absolute, which is roughly 1.7 bar above atmospheric pressure. A small pot holds that pressure easily if it is closed properly. It becomes dangerous only when someone handles it wrongly.
Follow the same routine every time:
- Check the pot and gasket before filling. The gasket should be soft and whole. A hard or cut gasket leaks; the pot loses liquor, the liquor ratio changes and the shade goes off. Replace gaskets on a schedule, not only when they fail.
- Fill to the correct level. Do not fill more than about two-thirds of the pot volume (the machine maker’s maximum may be lower). Water expands as it is heated, and the headspace is needed for that expansion and for pressure. All pots in one run should have the same liquor volume so they heat at the same rate.
- Load the fabric loosely. Roll or fold it so liquor can flow through it. A tightly packed piece dyes unevenly and can show marks, the same way a tight rope does in a jet machine.
- Close firmly and evenly. Use the pot key or holder, not your hand, and tighten every cap to the same feel.
- Never open a hot pot. Wait until the machine has cooled the pots to 80°C or lower. Below this the pressure has fallen and polyester has stiffened again, so the dye will not move. Open slowly with the cap pointing away from your face and wear heat-resistant gloves and eye protection. A pot opened at 100°C or above can throw out boiling liquor.
Step 3: build the disperse recipe
A basic disperse lab recipe has four parts: dyes, a dispersing or levelling agent, a pH controller, and water to the set liquor ratio. Lab liquor ratios of about 1:10 to 1:20 are common; what matters most is that every dip in a series uses the same ratio. How to turn percentages into milligrams and millilitres is covered in dyeing recipe calculation.
Disperse dye stock dispersions
Disperse dyes are fine powders or liquids that are meant to stay dispersed, not dissolved. A disperse “stock solution” is really a stock dispersion, typically 0.1% to 1% (1 to 10 g/L) depending on the depths you dye. Paste the weighed powder with a little dispersing agent and lukewarm water (not hot, often no more than about 40–50°C, check the dye’s data), then dilute to volume. The particles slowly settle, so the stock must be stirred, ideally on a magnetic stirrer, while you pipette. Pipette from the middle of the liquid, not from the top or bottom. Make disperse stocks fresh and keep them for only a short time; old stocks can agglomerate and give weak or spotty dips. General stock and pipetting technique is in dye stock solutions and pipetting.
Common mistake: Pipetting from a disperse stock that has been standing for ten minutes without stirring. The top of the bottle is weaker than the label says and the bottom is stronger, so two dips with the same recipe come out different and the lab chases a “correction” that is really a sampling error.
Auxiliaries and pH
- Dispersing or levelling agent, typically 0.5–2 g/L, keeps the dye particles fine at high temperature and slows the strike in the critical range so the shade builds evenly. Use the same product and amount as bulk.
- pH 4.5–5.5, set with acetic acid or, better, an acetate buffer. Many disperse dyes are most stable in weak acid. In neutral or alkaline liquor at 130°C some of them hydrolyse or reduce, and the shade goes duller or weaker. Polyester itself is also more stable at this pH. Check the pH of the blank liquor with a meter, not only by adding a fixed volume of acid, because the fabric can carry alkali from scouring.
- Water should be the same quality as the bulk water or deionised water with a known correction. Hard water and metals affect some disperse dyes and dispersions.
Step 4: run the temperature profile
A typical disperse profile for 100% polyester starts cool, rises at a controlled rate, holds at the top temperature, and cools before opening. Lab machines can usually be programmed exactly, so program the same profile you would expect in bulk, scaled where needed.
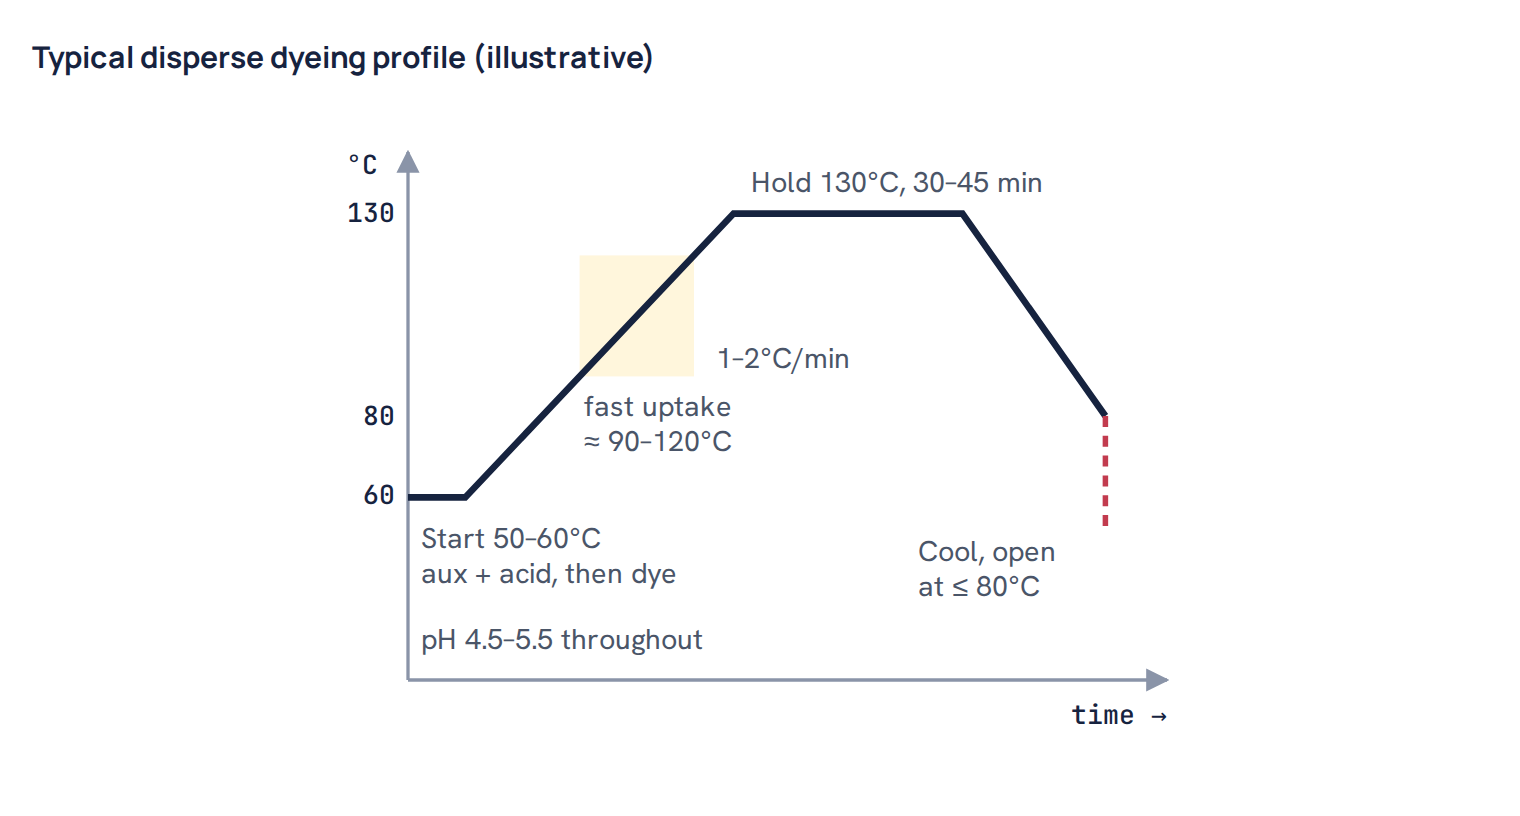
- Start at 50–60°C. Add the fabric, the dispersing or levelling agent and the acid or buffer. Run for 5–10 minutes so the fabric wets out and the pH settles. Then add the dye dispersion. In a closed lab machine you often add everything before sealing, which is fine as long as the start temperature is low.
- Ramp at about 1–2°C per minute to 130°C. The rate is most important between roughly 90°C and 120°C, where most dye goes on. Pale and sensitive shades, and dyes with a fast strike, need the slower end of the range.
- Hold at 130°C for 30–45 minutes. Pale shades may need only 20–30 minutes; very dark shades and navies or blacks may need 45–60 minutes for full build-up and levelling. The best hold time depends on the dyes and the shade, so follow your dye supplier’s guidance and your bulk practice.
- Cool to 80°C before opening. Cool at a moderate rate. Cooling too fast in bulk can set crease marks in polyester; in the lab the main reason to wait is safety and stopping dye movement.
- Rinse hot, then cold. Then either reduction clear (medium and dark shades) or simply rinse and dry (pale shades).
Lower temperature options for polyester-elastane
Elastane loses strength and elasticity if it is held too long at 130°C. For polyester-elastane fabrics many dye houses dye at about 120–125°C, sometimes lower, with a shorter hold, and choose disperse dyes that build up well at that temperature. Some use a lower-temperature profile with a longer hold to compensate. Whatever the bulk plan is, the lab must run the same top temperature and hold time, because a dip at 130°C will look deeper and be more level than the bulk at 120°C. Elastane also takes up some disperse dye, and that dye on elastane has poor wash fastness, so clearing becomes more important. The bulk process is described in polyester-elastane knit dyeing.
Step 5: reduction clearing for medium and dark shades
At the end of the hold some disperse dye is still sitting loosely on the fibre surface instead of inside the fibre. This surface dye rubs off and bleeds in washing. Reduction clearing destroys it with a hot alkaline reducing bath. A common lab recipe is sodium hydrosulphite about 1.5–2 g/L plus caustic soda about 1.5–2 g/L, at 70–80°C for 15–20 minutes, followed by a hot rinse, a cold rinse and neutralisation with a little acetic acid. Exact amounts vary with depth and dye selection.
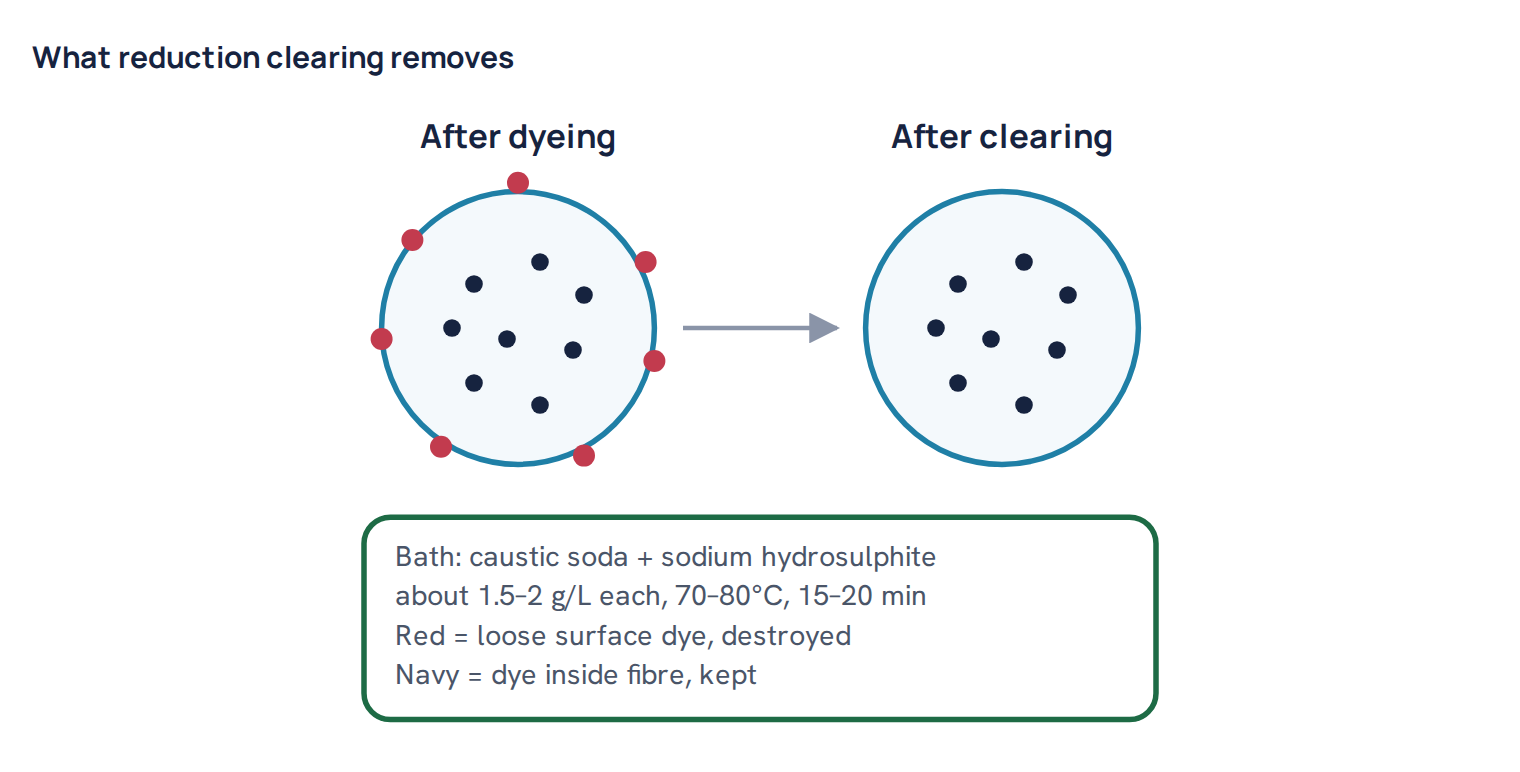
As a rule of thumb, shades above roughly 0.5–1% total disperse dye are reduction cleared, and pale shades are only rinsed or given a light soaping. The threshold varies by buyer requirement and dye selection. Two points matter for the lab:
- Assess only after clearing. Reduction clearing changes the shade. A dark navy may lose a little depth and become slightly redder or bluer as surface dye is removed. A dip judged before clearing will be wrong after it.
- Clear in the lab the same way bulk will. If bulk uses an acid-side reduction-clearing agent instead of the caustic-hydrosulphite bath (common for elastane blends and to save a rinse), use the same product and conditions in the lab.
Common mistake: Submitting a dark polyester dip that was only rinsed, then reduction clearing in bulk. The bulk is lighter and cleaner than the approved dip, and the customer sees a mismatch even though the recipe was followed exactly.
Step 6: CVC lab dips with the two-bath method
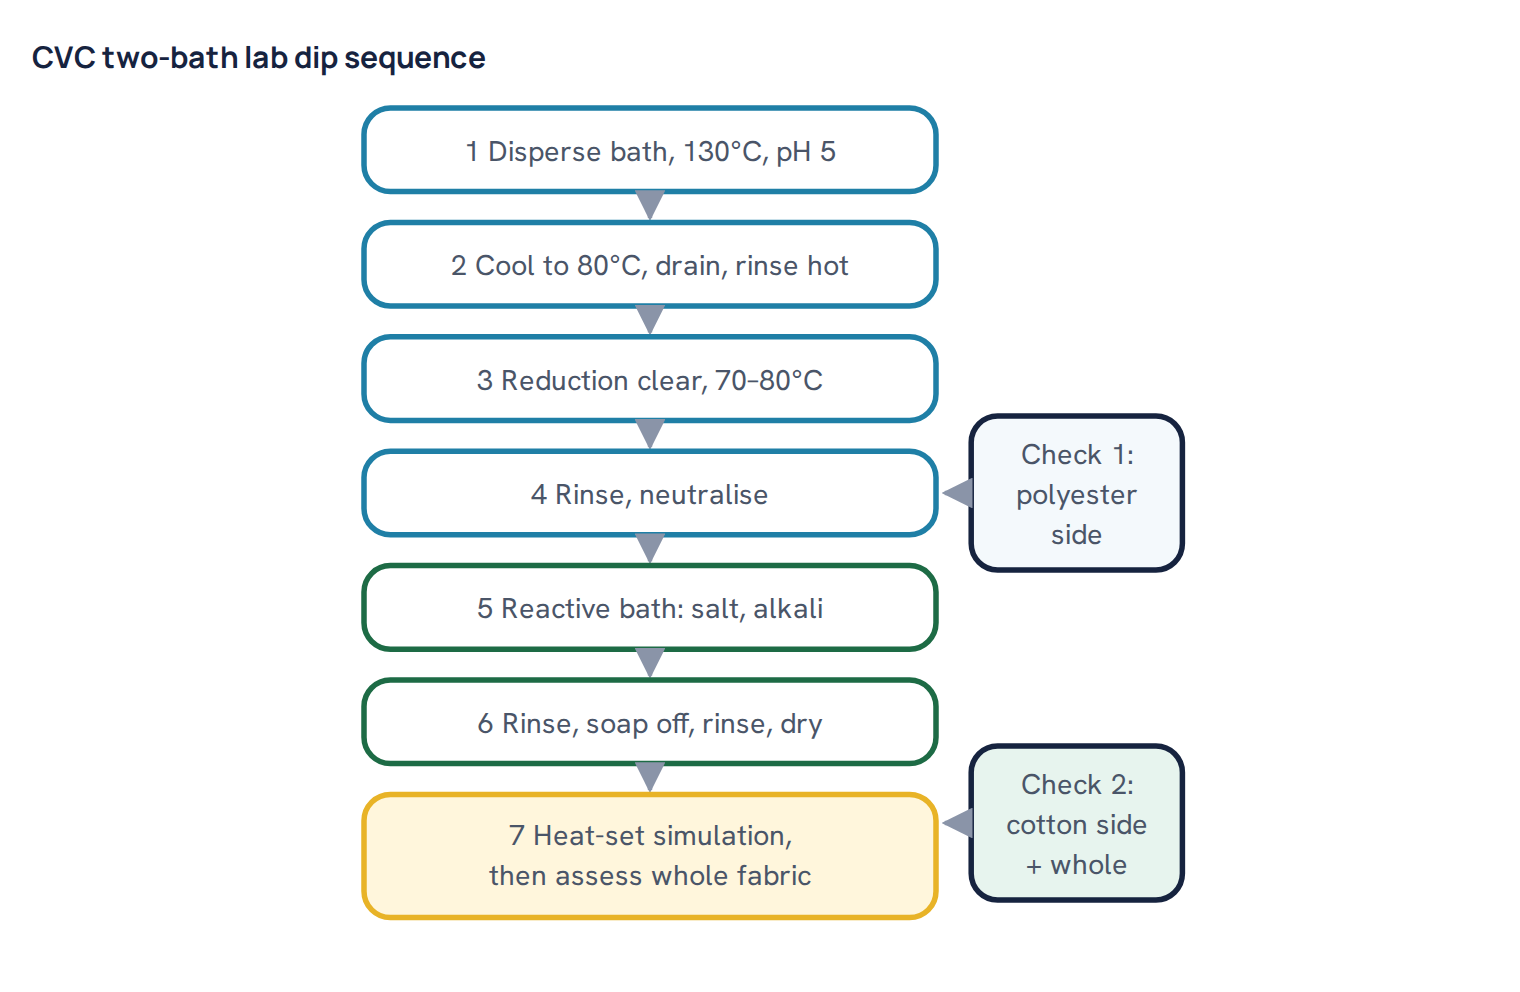
CVC (chief value cotton) is a cotton-rich blend, often 60% cotton and 40% polyester, sometimes 80/20 or similar. The polyester must be dyed with disperse dyes at high temperature and the cotton with reactive dyes in alkali. The safest and most common route, in the lab and in bulk, is two baths: polyester first, cotton second. The bulk process is covered in CVC fabric dyeing process; here is how the lab does it.
Why disperse first
The order is not arbitrary. Reduction clearing uses alkali and a strong reducing agent. If the cotton were already dyed with reactive dyes, the clearing bath would attack many of them and change or strip the cotton shade. Also, during the disperse bath some disperse dye stains the cotton. This stain is only loosely held, has poor wash fastness and makes the cotton look dull. Reduction clearing removes most of it, so the cotton enters the reactive bath clean. Doing the polyester first, then clearing, then dyeing the cotton, gives both parts their best fastness.
Running the two baths in the lab
- Bath 1 (disperse): the same recipe, pH and profile as for 100% polyester, but with dyes chosen to stain cotton as little as possible and to clear easily. For CVC, many labs hold at 130°C for 30–40 minutes; cotton does not mind the temperature at pH 5.
- Clearing: as described above. In CVC the clearing also cleans the cotton, so it is used for most shades except the palest.
- Bath 2 (reactive): after neutralising, dye the cotton with a normal reactive lab method: salt, dye, then alkali at the dye’s fixation temperature (often 60°C for warm-dyeing types), followed by thorough soaping. The fabric is the same weight as at the start, so use the same liquor ratio.
Because the cotton part is a different weight from the whole fabric, decide how you express each recipe. Many dye houses write both recipes as a percentage of the total fabric weight, because the bulk batch is weighed as a whole. Others write the disperse recipe on the polyester part and the reactive recipe on the cotton part. Either works if it is written clearly on the lab card and used the same way in bulk. The worked example below shows the difference.
Step 7: match each part separately
A CVC dip has two colours sitting side by side in the same yarn. If you only look at the final fabric and adjust “the shade”, you will chase your tail, because a change that fixes the hue may come from the wrong fibre. Judge and correct each part on its own.
Check 1: the polyester side
After the disperse bath and clearing, dry a small cut of the fabric before dyeing the cotton. Now the polyester is coloured and the cotton should be close to white. Look at it under a magnifier or a counting glass in the light cabinet. You are checking three things:
- Hue of the polyester part: does it lean the same way as the target? A navy target needs navy polyester fibres, not purple or green ones.
- Depth of the polyester part: the fibres should look as deep as the target fabric. The whole cut will look much paler than the standard, because the cotton is still white; do not judge depth from the overall look at this stage.
- Cotton staining: the cotton should be clean or only faintly tinted. Heavy staining after clearing means the clearing was weak or the dye selection stains cotton too much, and the stain will show in wash fastness tests later.
Some labs also run a small piece of 100% polyester fabric of similar yarn in the same disperse pot. It shows the polyester colour clearly and can be measured on the spectrophotometer, which makes correction easier. It is a guide only, because the polyester inside the blend can dye slightly differently.
Check 2: the cotton side and the whole fabric
After the reactive bath and soaping, dry the fabric and look again. Now compare the whole fabric with the standard in the light cabinet, and use the magnifier to see which fibre is off.
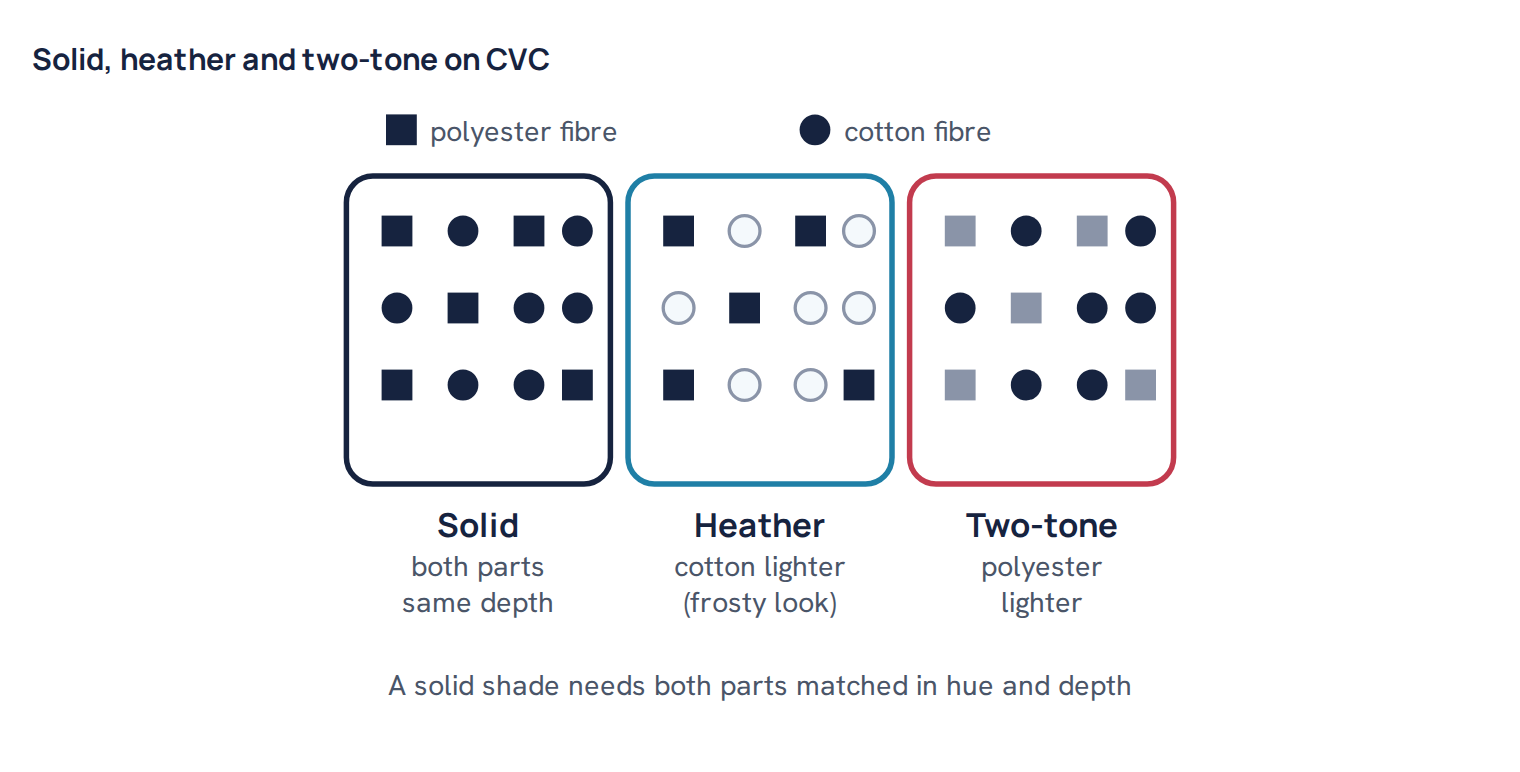
- Solid target, fabric looks frosty or has white specks: the cotton is lighter than the polyester. Increase the reactive recipe, keeping its hue.
- Solid target, fabric looks speckled with light polyester: the polyester is lighter than the cotton. Correct the disperse recipe in the next dip; you cannot fix polyester in the reactive bath.
- Hue wrong but both fibres look the same: both recipes lean the same way, so correct both by the same small step.
- Heather or two-tone design: the buyer approves a specific contrast, so match each part to its own reference. Often the buyer supplies or approves a standard for each component.
Correct one part at a time where possible. A change in the disperse recipe needs a full new dip from the start, because you cannot redo the polyester after the cotton is dyed. General correction logic, such as fixing hue before depth, is in shade matching from lab dip to bulk.
One-bath methods: brief notes and risks
Two-bath CVC dyeing takes a long time and uses a lot of water. To save time, some dye houses use one-bath methods, and the lab must then copy that method exactly.
- One-bath, two-step: the disperse dye runs at 130°C in weak acid, the bath is cooled, then salt and reactive dye are added, and finally alkali. There is no reduction clearing between the steps, so the disperse stain on cotton and the surface dye on polyester stay until the final soaping. Wash and rub fastness are usually lower, especially in dark shades. Disperse dyes must tolerate salt and alkali without the dispersion breaking.
- One-bath, one-step: special alkali-stable disperse dyes and reactive dyes that can survive high temperature are applied together, often near neutral pH. The dye choice is narrow, the process window is small, and the shade is sensitive to pH and temperature, so reproducibility is harder.
These methods can work well for pale and medium shades with a carefully tested dye range. For dark shades, strict fastness requirements, or a new dye combination, the two-bath route is safer. A lab dip made by two-bath and then dyed one-bath in bulk will not match.
Worked example: 10 g CVC 60/40 recipe split
The diagram and the example below show how the two recipes divide between the fibres.
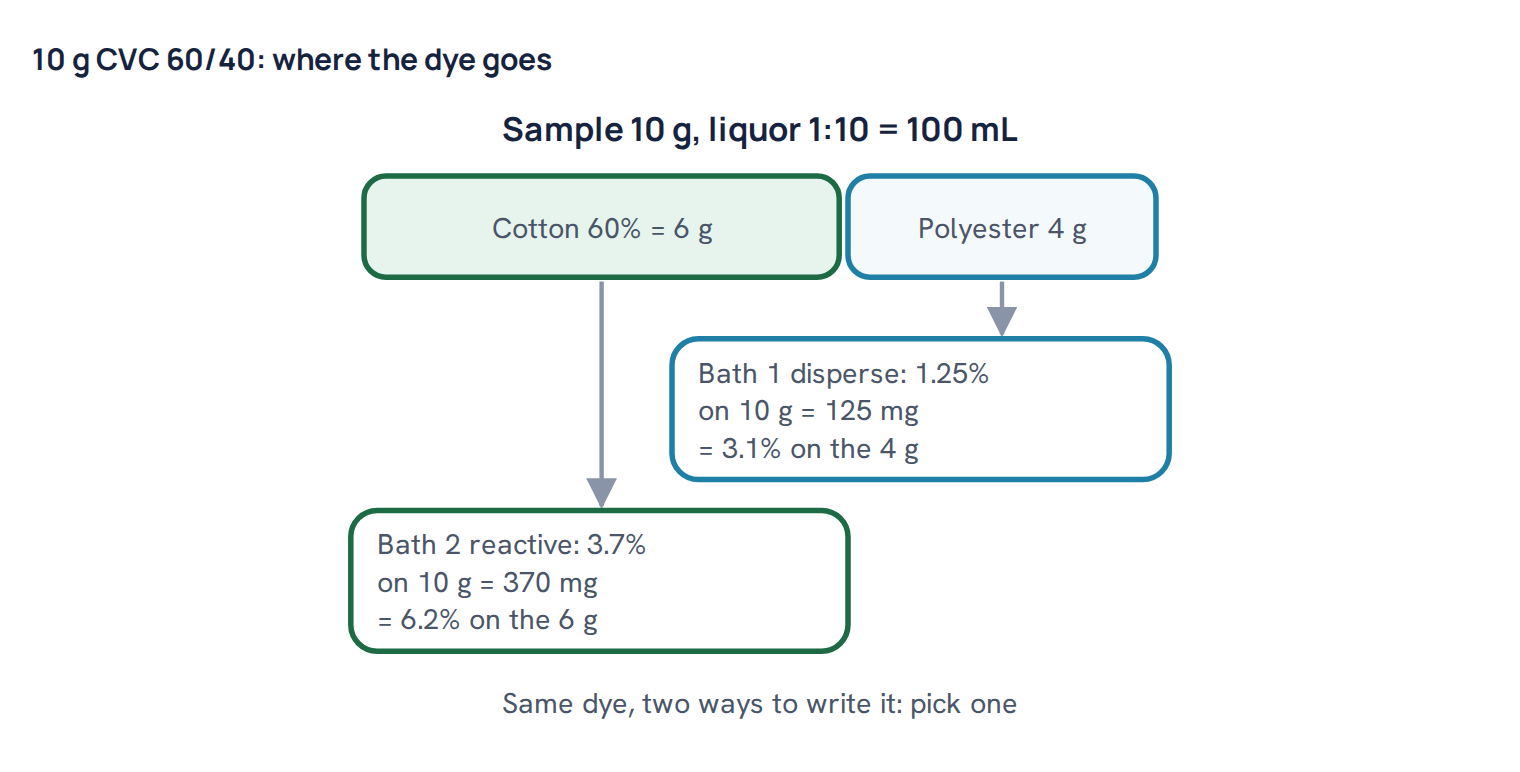
Worked example. A navy on CVC 60/40. Sample weight 10 g, so cotton is 6 g and polyester is 4 g. Liquor ratio 1:10, so each bath is 100 mL. Both recipes are written on the total fabric weight. Bath 1 (disperse): navy 1.00%, red 0.15%, yellow 0.10%, total 1.25%. On 10 g that is 100 mg + 15 mg + 10 mg = 125 mg of dye. From a freshly stirred 0.5% stock (5 mg per mL) you pipette 100 ÷ 5 = 20 mL navy, 15 ÷ 5 = 3 mL red and 10 ÷ 5 = 2 mL yellow. Dispersing agent 1 g/L = 0.1 g in 100 mL, which is 10 mL of a 1% (10 g/L) stock. Add acetate buffer to pH 5 and water to 100 mL. Measured on the polyester alone, 125 mg on 4 g is 3.1%. Clearing: caustic soda 2 g/L and sodium hydrosulphite 2 g/L in 100 mL = 0.2 g of each, 80°C for 20 minutes. Bath 2 (reactive): navy 3.00%, red 0.40%, yellow 0.30%, total 3.70% = 370 mg. From a 1% stock (10 mg per mL): 30 mL, 4 mL and 3 mL, 37 mL in all. For this depth a typical warm-dyeing recipe might use about 60 g/L salt (6 g) and 20 g/L soda ash (2 g), but salt and alkali depend on the dye range. On the cotton alone, 370 mg on 6 g is 6.2%. If the bulk card is read “on the cotton part” by mistake, bulk gets 6.2% on the whole batch, about 1.7 times too much reactive dye.
Common mistake: Not writing the weight basis on the lab card. One shift writes the CVC reactive recipe on the cotton part, the next reads it as on the whole fabric, and the bulk comes out far too dark or too light. Always write “owf total” or “on cotton part” next to every recipe.
Step 8: assess after heat-setting and finishing simulation
A disperse shade straight from the dyeing pot is not the final shade. Polyester and CVC fabrics usually pass through a stenter for drying, heat-setting or finishing at high temperature, often around 150–190°C depending on the fabric and the finish (lower for elastane blends). Two effects change the colour there:
- Thermomigration. At high temperature, especially with softeners and other finishes on the fabric, some disperse dye moves from inside the fibre back to the surface and into the finish film. The shade often becomes slightly deeper or duller, and wash and rubbing fastness drop.
- Sublimation. Some disperse dyes, mainly small low-energy types, turn to vapour at high temperature. The fabric can become lighter, the hue can shift if one dye in the mix sublimes more than the others, and the vapour can stain neighbouring fabrics or the machine.
So the lab should simulate finishing before final assessment. Pad or dip the dip in the bulk finish recipe if a finish is used, then heat it at the bulk stenter temperature and time, for example in a lab stenter or a heat press set to the same temperature for a similar dwell time (often 30–60 seconds). Let it cool and condition in room air for at least 30 minutes before measuring, because hot fabric reads differently. Then compare with the standard in the light cabinet and on the spectrophotometer. If the shade shifts a lot, consider dyes with higher sublimation fastness or a lower finishing temperature.
Checking staining and fastness
- Cotton staining in CVC: after clearing and after the full dip, look at the cotton under the magnifier. Any dull tint on the cotton is disperse stain that will bleed.
- Wash fastness with multifibre: a quick wash test with a multifibre strip shows staining on nylon and acetate, which are very sensitive to loose disperse dye. Staining there points to poor clearing or thermomigration.
- Sublimation check: heat the dyed piece in contact with white polyester at the finishing temperature and look for staining on the white.
A short checklist before you submit
- Fabric from the bulk lot, scoured and heat-set the same way as bulk.
- Pots checked, filled to the same level, closed tightly; opened only at 80°C or below.
- Disperse stock fresh and stirred while pipetting; pH 4.5–5.5 checked on the liquor.
- Profile the same as bulk: start temperature, ramp rate, top temperature (lower for elastane), hold time.
- Reduction cleared if bulk will be; assessed only after clearing.
- For CVC: polyester checked after bath 1, cotton and the whole fabric after bath 2; weight basis written on the card.
- Finishing simulated; shade, staining and sublimation checked after conditioning.
Polyester and CVC dips take longer than a cotton dip, and there are more places for an error to hide. When every step above is copied from bulk, the lab dip becomes a reliable preview of the production batch, and corrections become small and predictable instead of repeated guesses.
Questions
Why must a polyester lab dip use heat-set fabric?
Heat-setting changes the structure of polyester and so changes how much disperse dye it takes up. A dip on greige or differently set fabric can give a different depth from bulk with the same recipe.
Why should an HT lab pot not be opened hot?
At 130°C a sealed pot is about 1.7 bar above atmospheric pressure, and opening it can throw out boiling liquor. Cool to 80°C or lower first, then open slowly with the cap pointing away.
When is reduction clearing needed in a polyester lab dip?
It is normally used for medium and dark shades, roughly above 0.5–1% disperse dye, to remove loose surface dye and improve fastness. Assess the dip only after clearing, because the shade changes.
Why is the polyester dyed first in a CVC two-bath lab dip?
Reduction clearing after the disperse bath uses alkali and a reducing agent that would damage reactive dye on the cotton. Dyeing polyester first lets the clearing also remove disperse stain from the cotton before it is dyed.
Why does a disperse shade change after finishing?
At stenter temperatures some disperse dye moves to the fibre surface (thermomigration) or turns to vapour (sublimation). Simulate the bulk heat-setting or finishing on the lab dip and assess it after conditioning.

Textile engineer with 14+ years in dyeing and fabric development. He writes every guide on Dyeing Solution from real production work. Full profile