A practical lab method for reactive dips on cotton knit: preparing and weighing the fabric, calculating dye, salt and soda, loading the pot, 60°C and migration profiles, wash-off, A/B/C dips, body and rib, corrections and records.
At a glance
5 or 10 gConditioned sample, weighed to 0.01 g
1:10–1:20Usual lab liquor ratio
3 portionsTypical soda ash dosing
90–98°CSoaping temperature in wash-off
A lab dip is the small test that decides whether a whole batch of fabric will come out right. A technician takes a few grams of the real fabric, dyes it in a small pot with a trial recipe, washes it off, dries it and compares it with the buyer’s standard. If the dip is made carelessly, the recipe that goes to the floor is wrong before the machine is even loaded. If it is made the same way every time, the lab and the dye house speak the same language and bulk batches hit shade much more often.
This article walks through a reactive lab dip on cotton knit, step by step, the way it is done in a typical knit dye lab. It covers preparing the fabric, calculating the recipe, loading the pot, the temperature profile, dosing salt and alkali, wash-off, drying, A/B/C dips, body and rib in one pot, reading the result and keeping a record. There is a full worked example for a 10 g sample at 2% shade. The chemistry of how reactive dyes bond to cotton is explained in how reactive dyes work, so here we stay with the hands-on method.
The whole job at a glance
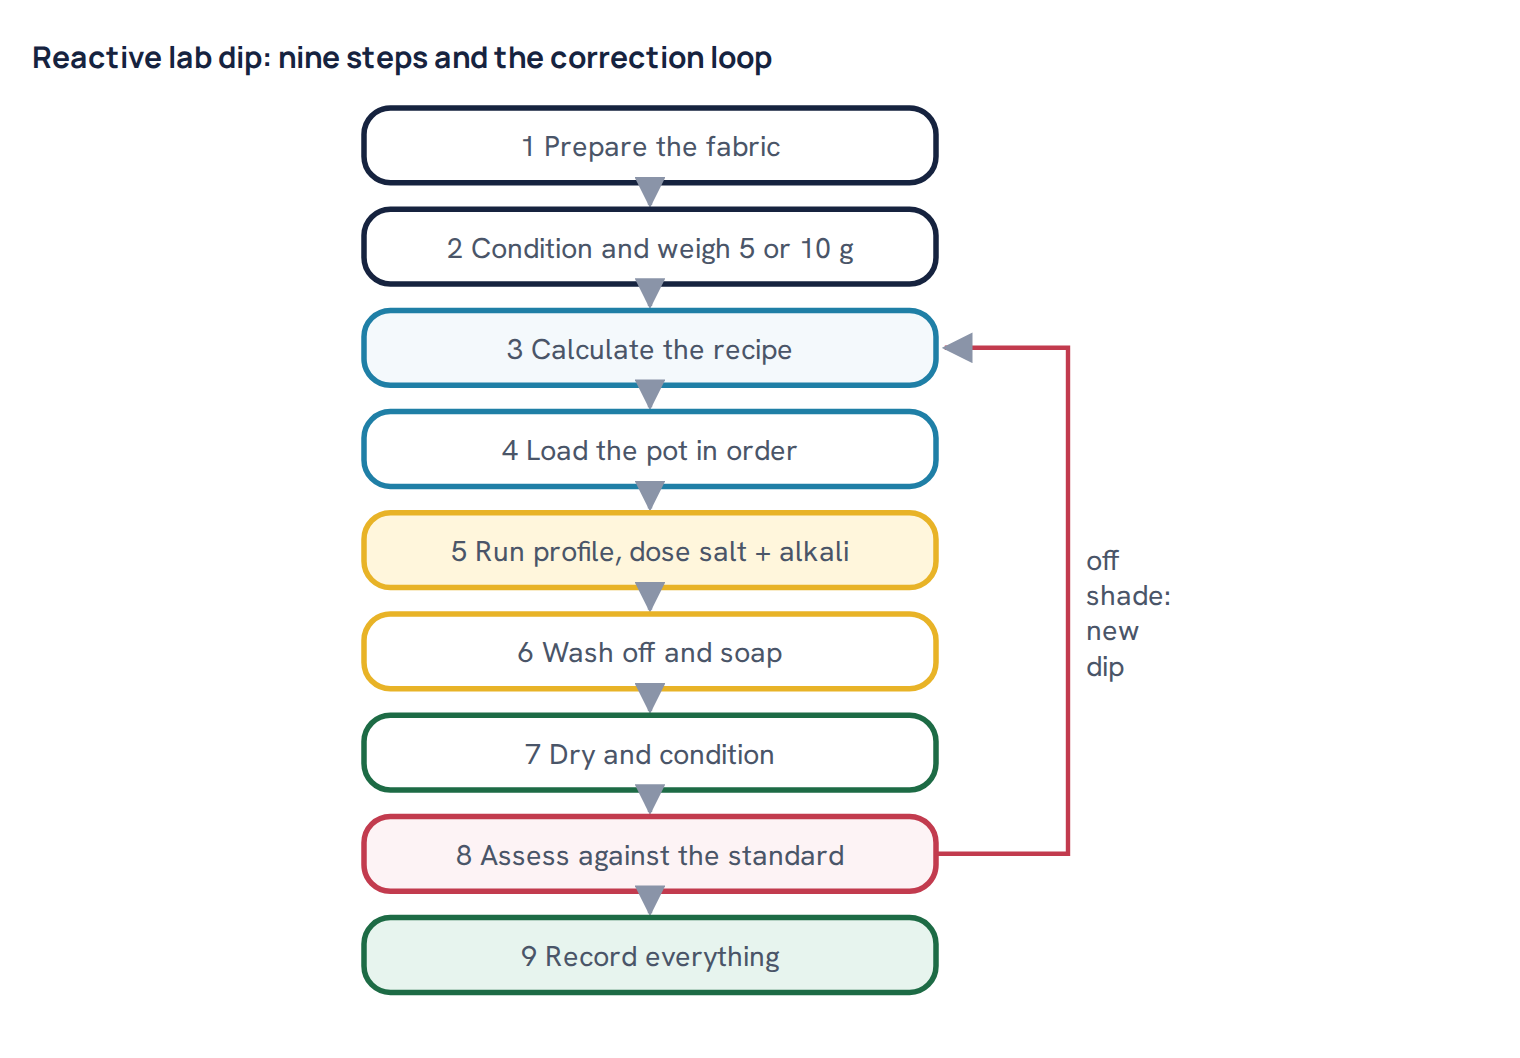
A reactive lab dip has nine steps. Each one can spoil the result, and most lab problems come from the steps people think are boring: weighing, conditioning, wash-off and drying. The recipe is only one part of the job.
Step 1: Prepare the substrate
Use the same fabric as bulk
The first rule is simple and often broken: dye the lab dip on the same fabric that will be dyed in bulk. Same yarn count, same knit structure, same GSM, same yarn lot if possible, and the same pretreatment. A single jersey made from a different spinner’s yarn can take dye differently even when it looks identical in greige form. If the merchandiser sends a “similar” fabric because the real one has not been knitted yet, write that on the dip card. The dip is then only a guide, and it must be confirmed on the real fabric later.
The fabric must also be at the same stage as bulk. If bulk is scoured and bleached in the dyeing machine before dyeing, the lab sample should be pretreated in the same way. If the dye house uses ready-for-dyeing fabric from a separate pretreatment line, take the sample from that fabric. For cotton with elastane, which is more than a third of the batches in our dye house records, heat-setting usually comes before dyeing; the lab sample must be cut after heat-setting, because heat-setting changes how the fabric takes dye.
Lab scouring and bleaching, when needed
When only greige fabric is available, scour and bleach the sample in the lab first. A typical lab recipe for a full bleach before medium and dark shades is caustic soda 2 to 3 g/L, hydrogen peroxide (50%) 2 to 3 g/L, a peroxide stabiliser about 0.5 g/L, a wetting or detergent agent about 1 g/L and a sequestering agent, at a liquor ratio around 1:10 to 1:15, run at 95 to 98°C for 45 to 60 minutes. Light and bright shades may need a stronger bleach or an optical whitener step, while some dark shades only need a scour. These values vary with the fabric and the chemical supplier, so follow your own bulk pretreatment as closely as you can.
After bleaching, rinse hot, then cold. Neutralise with a little acetic acid and remove the leftover peroxide with a peroxide-killing enzyme or the treatment your bulk uses. Residual peroxide can attack some reactive dyes and give a weaker or duller shade. Check that the fabric pH is close to neutral, usually around 6.5 to 7.5 (a simple pH test of the wet fabric is enough). The lab water should be the same quality as the plant water, or better softened; hardness and iron change reactive shades, as explained in water quality in textile dyeing.
Check absorbency
Before dyeing, do a quick drop test. Place a drop of water on the dry, flat fabric from about one centimetre above it and count the seconds until the shine disappears. A well-prepared cotton knit absorbs the drop in a few seconds; many labs aim for under 3 to 5 seconds, but the limit varies between dye houses. If the drop sits on the surface, wax and oil are still there and the dye will strike unevenly. Scour again rather than dyeing a poor sample.
Condition and weigh accurately
Cotton takes up moisture from the air. A sample weighed straight from a hot dryer can weigh several percent less than the same sample after it has rested in room air, so the dye calculated on that weight is wrong. Let the fabric rest in a conditioned room, ideally around 20°C and 65% relative humidity, or at least in the same lab air for an hour or more, before weighing. Weigh on a balance that reads to at least 0.01 g. A 10 g sample should be 10.00 g, give or take 0.02 g. Cut away from fold lines and fabric edges, and avoid any part with oil spots or knitting faults.
Most labs use 5 g or 10 g. A 10 g sample is easier to assess, gives a larger piece for the light cabinet and the spectrophotometer, and makes small weighing errors less important. A 5 g sample saves fabric and chemicals and suits labs with small pots. Choose one and keep to it, so your recipes and records stay comparable.
Step 2: Recipe and calculations
Dye amount in percent on weight of fabric
Reactive dye amounts are given as percent on the weight of fabric (% owf). A 2% shade means 2 g of dye for every 100 g of fabric. For a 10 g sample, that is 0.2 g. Weighing 0.2 g of dye powder for each dip is slow and not accurate enough, so labs use stock solutions: a known weight of dye dissolved in a known volume of water. With a 1% stock (1 g of dye in 100 mL, which is 10 g/L), each millilitre holds 0.01 g of dye. The general formula is:
mL of stock = sample weight (g) × shade % ÷ stock concentration (%)
Choose the stock strength so that every volume you pipette is at least about 1 mL and not much more than about 30 mL. Pale shades often use a 0.1% stock, medium and dark shades a 1% or 2% stock. Dissolve, store and pipette stocks as described in dye stock solutions and pipetting. Never add alkali to a reactive dye stock; the dye would start to react with water and lose strength. The full set of formulas, including conversions, is in dyeing recipe calculation.
Salt and soda ash in grams per litre
Salt and alkali are not given on the fabric weight. They are given in grams per litre of bath, because what matters is their concentration in the water. Salt (common salt or anhydrous Glauber’s salt) pushes the dye onto the fibre. Soda ash raises the pH so that the dye can react with the cotton. Deeper shades need more of both. The table below shows a typical depth scale for 60°C reactive dyes at a normal knit liquor ratio. Every dye supplier publishes its own table, and dyes from different ranges can need quite different amounts, so treat these values as a starting point and use your supplier’s data for your own dyes.
| Total shade % owf | Salt g/L | Soda ash g/L |
|---|---|---|
| Up to 0.5% | 20–30 | 8–10 |
| 0.5–1% | 30–40 | 10–12 |
| 1–2% | 40–60 | 12–15 |
| 2–4% | 60–80 | 15–20 |
| Above 4% | 80–100 | 20 |
The depth used for the table is the total of all dyes in the recipe. A recipe of 0.6% yellow, 1.1% red and 0.3% blue is a 2.0% shade for salt and soda purposes.
Liquor ratio in the lab and in bulk
Liquor ratio (L:R) is the weight of fabric to the volume of bath. In the lab, 1:10 to 1:20 is normal, because a small piece of fabric needs enough water to move freely in the pot. Bulk knit dyeing in modern jet and soft-flow machines usually runs much shorter, often about 1:5 to 1:8, though this depends on the machine and the load. This difference matters. A longer liquor leaves more dye in the bath at the end, so a lab dip at 1:20 can come out lighter than the same recipe in bulk. Many labs therefore work at 1:10 to stay close to bulk. The salt and soda stay at the same g/L, so the bath chemistry matches even though the total grams per kilogram of fabric are higher in the lab. Whatever ratio you choose, use it for every dip. The gap between lab and bulk is handled with a bulk factor, explained in shade matching from lab dip to bulk.
Worked example: 10 g sample, 2% shade, 1:10
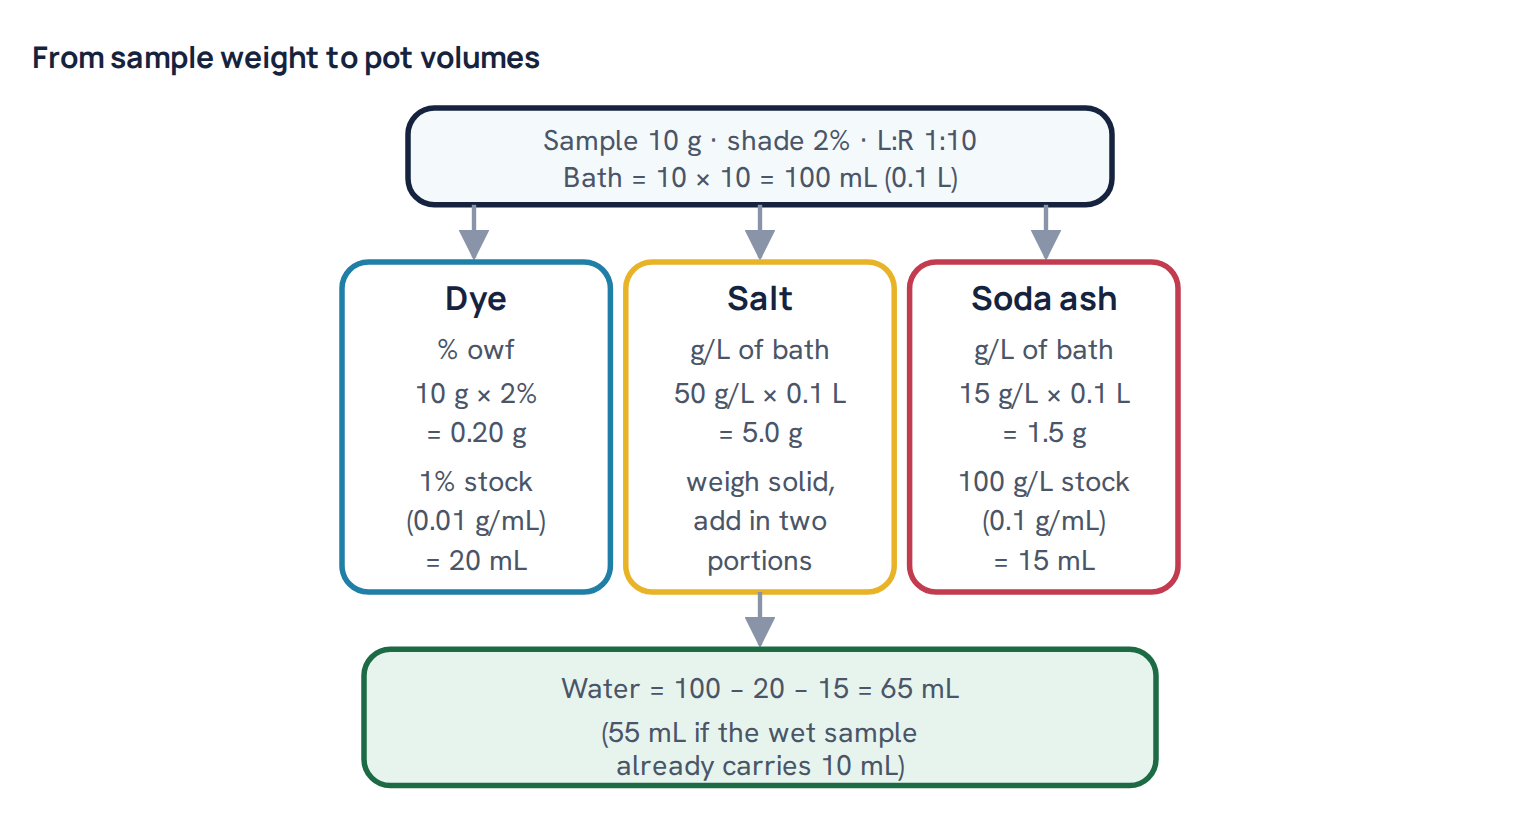
Worked example. A 10 g cotton single jersey is to be dyed at a 2% total shade: yellow 0.6%, red 1.1% and blue 0.3%, at L:R 1:10. The bath is 10 × 10 = 100 mL. With 1% stocks, yellow = 10 × 0.6 ÷ 1 = 6 mL, red = 10 × 1.1 ÷ 1 = 11 mL and blue = 10 × 0.3 ÷ 1 = 3 mL, a total of 20 mL of dye stock holding 0.20 g of dye. From the table, a 2% shade takes about 50 g/L salt and 15 g/L soda ash. Salt = 50 × 100 ÷ 1000 = 5.0 g, weighed as a solid. Soda ash = 15 × 100 ÷ 1000 = 1.5 g, which is 15 mL of a 100 g/L soda ash stock, kept aside for later dosing as 2.5, 5 and 7.5 mL. Water = 100 − 20 − 15 = 65 mL. If the fabric is pre-wetted and squeezed to 100% pickup, it already carries about 10 mL of water, so add 55 mL instead. The bath then holds 50 g/L salt and 15 g/L soda ash, exactly as planned.
Step 3: Loading the pot in the right order
Most knit labs dye in sealed stainless-steel pots that rotate in an infrared or glycerine-heated lab dyeing machine. Some still use open beakers in a water bath with hand stirring. Either way, the order in which things go into the pot changes how evenly the dye goes on.
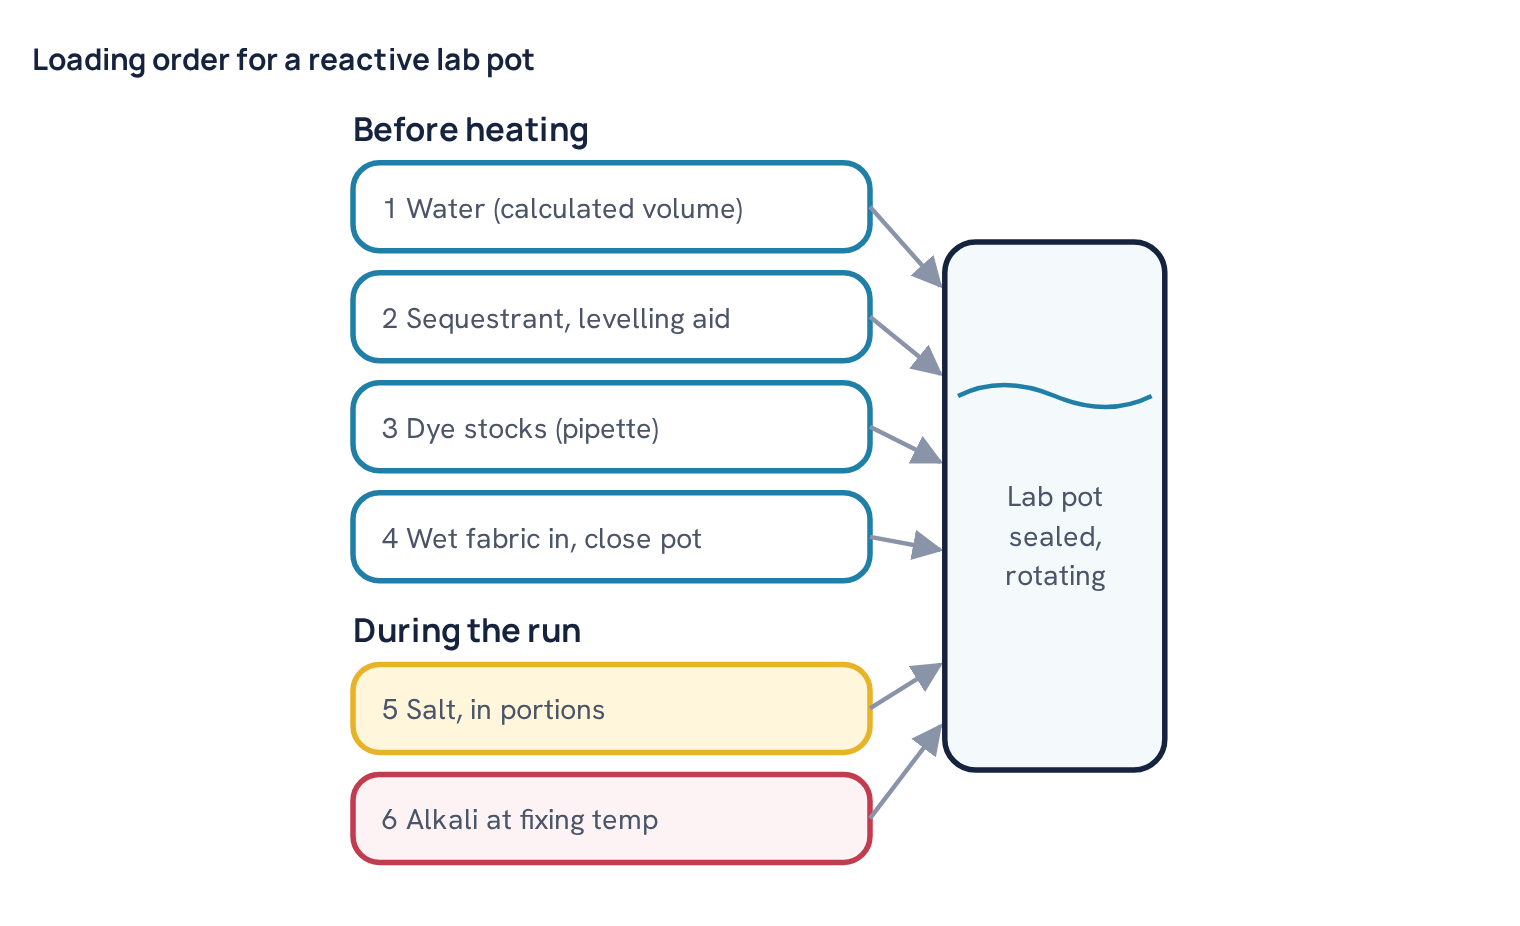
Start with water, then any auxiliaries the bulk recipe uses, such as a sequestering agent or an anti-crease and levelling aid (their roles are covered in dyeing auxiliaries explained). Then pipette the dye stocks into the water and swirl. The fabric goes in last, already wetted, so the dye meets a fully wet fabric in a well-mixed bath. A dry fabric dropped into a dye bath soaks up the first liquid it touches and comes out with darker patches.
Salt and alkali come after the fabric has run for a few minutes in the dye alone. In some labs, especially with an all-in method for easy medium shades, the salt is put in at the start with the dye. That is acceptable for well-behaved dyes, but splitting the salt is safer for light, bright and turquoise shades. Alkali is never put in at the start of a normal exhaust dip. If the pot cannot be dosed while running, stop the machine at the planned time, open the pot carefully, add the portion, close it and restart. Keep a timer and record the real times, not the planned ones.
Step 4: Temperature and time profile
Reactive dyes are grouped by the temperature at which they fix. In knit dye houses, the dyes that fix at about 60°C, mostly vinyl sulphone and bifunctional ranges, are the everyday “hot” process. Warm types fix at about 40 to 50°C. True high-temperature monochlorotriazine types fix at around 80°C. Supplier names for these groups differ, so always go by the fixation temperature on the dye’s data sheet and never mix dyes with different fixation temperatures in one recipe unless the supplier says they are compatible.
All-in method for a 60°C dye
The all-in method is the standard lab profile for most medium and dark shades. Dye and auxiliaries start cold or lukewarm, salt is added in portions, the bath is heated to 60°C, the dye is allowed to exhaust, and then soda ash is dosed in portions. After the last portion, the dye fixes for 40 to 60 minutes; pale shades can need less, very dark shades more.
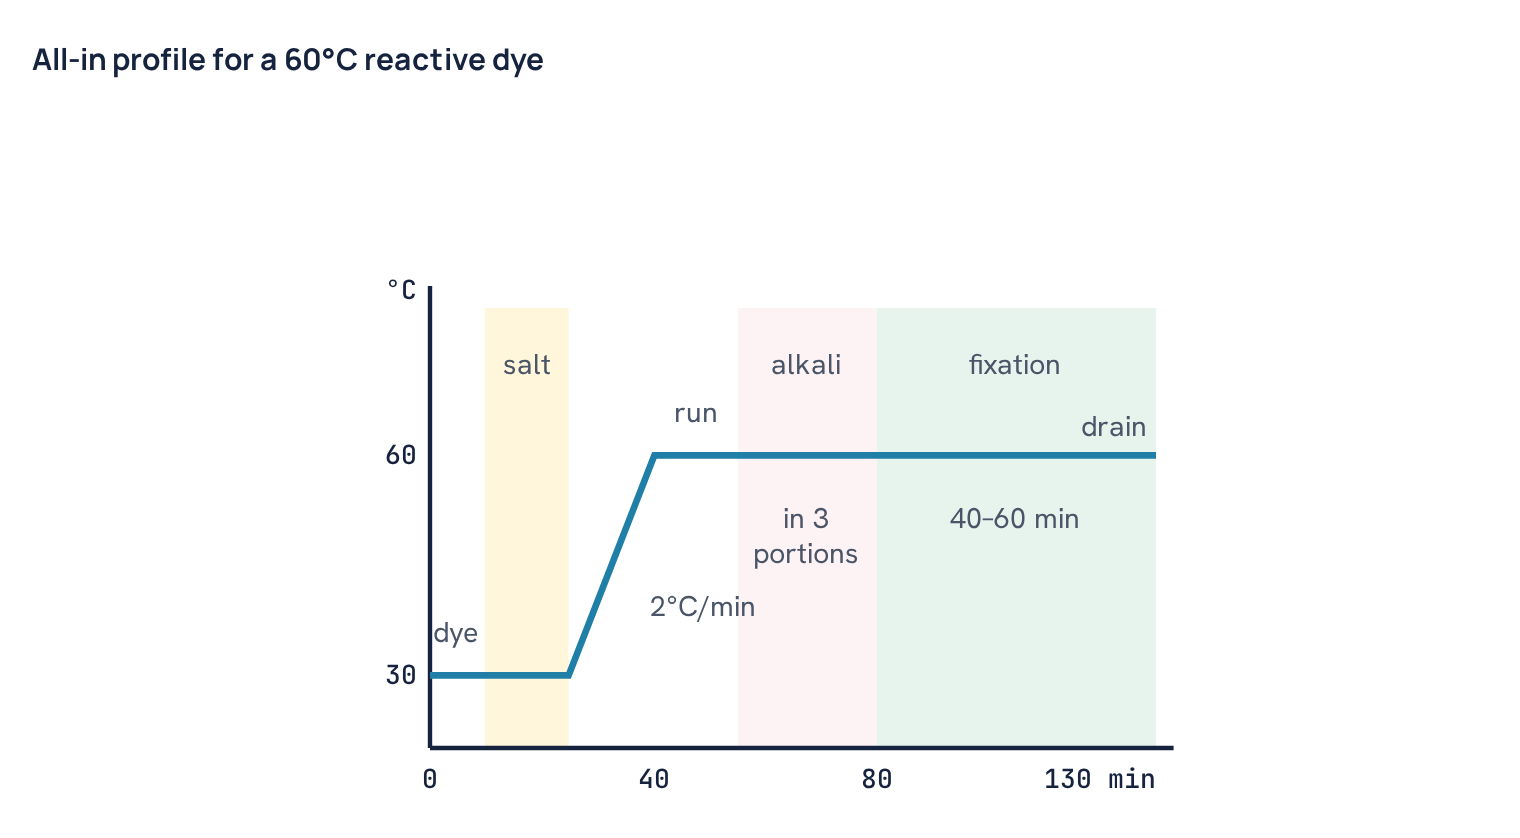
A typical timing at 1:10 looks like this. Load the pot at about 30°C and run 10 minutes with dye only. Add the salt in two or three portions over 10 to 15 minutes. Heat at about 1 to 2°C per minute to 60°C and run 15 to 20 minutes, so the dye can exhaust and spread evenly before it is locked in. Then add the soda ash in three portions over 20 to 30 minutes, a common split being one sixth, two sixths and three sixths of the total. In the worked example that is 2.5 mL, 5 mL and 7.5 mL of soda stock, about 10 minutes apart. Fix for 40 to 60 minutes and drain. Some dye houses dose at 60°C from the start and add dye or salt hot; that also works, provided the lab copies what the bulk machine does.
Why portions? Once alkali is in, the dye reacts with the cotton and can no longer move. If all the alkali goes in at once, the dye that happens to be on the surface at that moment is fixed there, and any unevenness is frozen in. Adding alkali slowly lets the dye fix gradually while it can still level. The same logic applies to salt: a sudden jump in salt makes the dye rush onto the first fibres it meets. The reasons behind this strike and migration behaviour are explained in how reactive dyes work.
Migration method
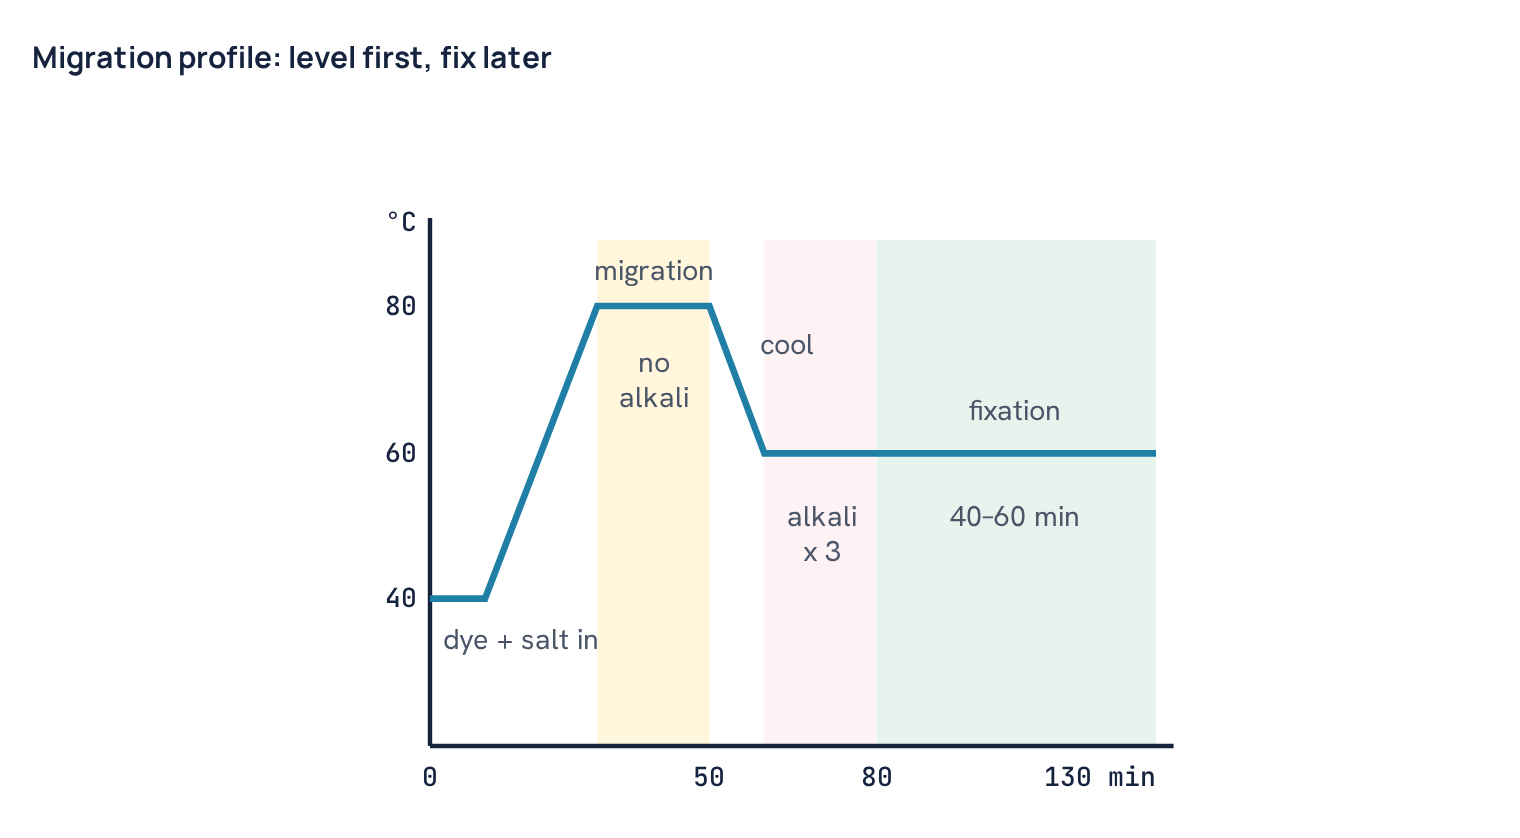
The migration method is used when levelness is the main risk: turquoise and some bright blues and greens, pale shades on compact fabrics, and dye combinations that strike at different speeds. The dye and salt are run hot, at around 80°C, with no alkali. At that temperature the dye moves on and off the fibre freely and evens itself out. The bath is then cooled to the fixing temperature, and alkali is dosed in portions as before. Some turquoise dyes are also fixed at a higher temperature, often 70 to 80°C, because their large molecules diffuse slowly; follow the supplier’s profile for these.
Warm-type dyes
Warm-type dyes follow the same pattern at a lower temperature. A common all-in profile runs dye and salt at 40 to 50°C, holds for 20 to 30 minutes, then doses alkali in portions at the same temperature and fixes for 40 to 60 minutes. Because they are more reactive, they hydrolyse faster in alkali and are less forgiving of slow loading or long pauses after the alkali goes in. If a warm-type shade needs better levelness, the migration step can be done at around 60 to 70°C before cooling back to the fixing temperature, but check the supplier’s advice first. Some warm-type ranges use a mix of soda ash and a little caustic soda instead of soda ash alone; again, follow the data sheet.
| Dye group | Typical fixing temp | Migration step (if used) | Usual alkali |
|---|---|---|---|
| Warm type | 40–50°C | 60–70°C, no alkali | Soda ash, sometimes with caustic |
| 60°C type (vinyl sulphone, bifunctional) | 60°C | About 80°C, no alkali | Soda ash |
| High-temperature type (monochlorotriazine) | About 80°C | Dye usually run at 80°C | Soda ash |
Step 5: Wash-off
At the end of fixation, the fabric holds two kinds of dye: dye bonded to the cotton, and dye that reacted with water instead (hydrolysed dye) or never reacted at all. The loose dye must be removed. If it stays, the dip looks deeper and brighter than the bulk will after its own washing, and it fails wash and rubbing fastness. A lab dip that is not washed off properly gives a false recipe.
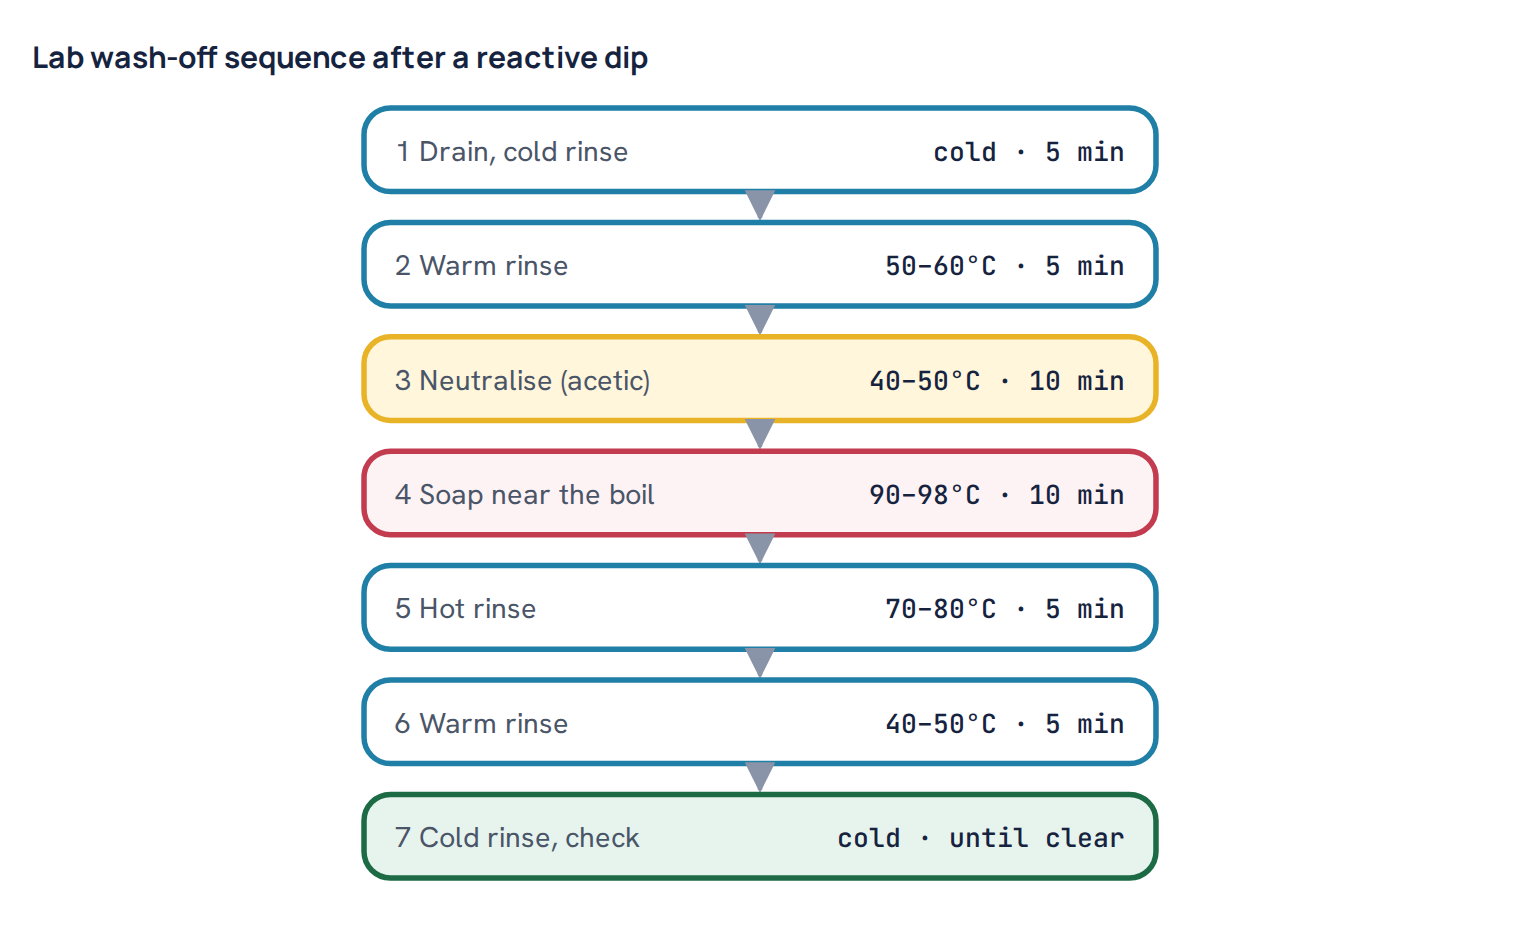
Drain the dye bath and rinse cold to remove salt and alkali. A warm rinse follows. Then neutralise with acetic acid, typically 0.5 to 1 g/L at 40 to 50°C, to bring the fabric close to neutral. This step comes before soaping for a reason: soaping in hot alkaline water can break some of the dye-fibre bonds, especially with vinyl sulphone dyes, and give a lighter, less stable shade. After neutralising, soap with a soaping agent, usually 1 to 2 g/L at 90 to 98°C for 10 minutes. This is where most of the loose dye leaves. Finish with hot, warm and cold rinses until the water stays clear.
Keep the lab wash-off as close as possible to the bulk wash-off in temperature, steps and chemicals. If bulk gets two soapings for dark navy and black, give the lab dip two soapings too. If bulk uses a fixing agent or a softener before drying, apply the same product at the same strength to the lab dip, because some softeners and fixers change the shade noticeably.
Step 6: Drying and conditioning before assessment
Squeeze or hydro-extract the dip gently, then dry it flat, in a lab dryer or a gentle oven, without scorching. A typical drying temperature is below about 100 to 110°C; very hot drying can yellow the cotton and change some shades. Avoid ironing unless the bulk fabric is also pressed or calendered, because ironing changes the surface lustre and the apparent depth.
Do not assess a dip while it is still warm or damp. Many reactive shades look different when hot or wet; turquoise, some reds and some navy shades show this clearly. Let the dip cool and rest in the lab air, ideally in a conditioned room, for at least 30 minutes, and longer if your buyer’s procedure says so. A dip assessed straight from the dryer and one assessed an hour later can disagree, and you will not know which one to trust.
A, B and C dips
Most buyers ask for more than one dip per colour. The lab sends two or three dips, marked A, B and C, that sit slightly apart from each other but all close to the target. The buyer picks the one they prefer, and that recipe becomes the approved recipe. This saves a full round of corrections when the buyer’s eye differs from the lab’s eye.
| Dip | Typical recipe change | Purpose |
|---|---|---|
| A | The lab’s best match | The main proposal |
| B | Same ratio, depth about 5% up or down | Gives a choice of depth |
| C | Small hue change, e.g. one dye 5–10% up | Gives a choice of tone (redder, greener) |
Make each of A, B and C as a separate, fresh dip, all in the same lab run if possible, with fabric cut from the same piece. Then any difference between them is only the recipe. Label every dip on the back with its code and recipe number before drying, because dips that look nearly the same are easy to mix up.
Body and rib in the same pot
About 4 in 10 orders in our dye house records are body fabric with a matching rib or collar. In bulk, these parts are often dyed in the same batch and must match in the finished garment. Rib is usually more compact, often has elastane, and may be knitted from a different yarn count than the body, so it can dye lighter or darker than the body even in the same bath.
The lab check is simple: dye body and rib together in the same pot, in the same bath. Prepare each fabric in the same way as bulk, including heat-setting for rib with elastane, then weigh them separately and use the total weight for the liquor and dye calculation. If possible, keep the body-to-rib weight proportion close to the bulk proportion. After wash-off and drying, compare the rib against the body and both against the standard. If the rib comes out off-tone or off-depth, there are three common options: choose dyes that build up more evenly on both fabrics, adjust the rib’s pretreatment, or dye the rib separately with its own recipe. Finding this in the lab costs one dip. Finding it after cutting costs a whole order.
Reading the result and simple corrections
Assess the dip in a light cabinet under daylight (D65) first, then under the second light source the buyer names, often a store light such as TL84 or an incandescent source. Place the dip and the standard side by side, same direction of knit, at the angle your procedure fixes. Then measure both on the spectrophotometer and note the colour difference. Many buyers accept a ΔE CMC (2:1) of around 1.0 or less, but the limit varies by buyer and by shade. What ΔE and the CIELAB values mean is explained in colour measurement and ΔE.
For corrections, keep to a few clear rules. Fix the hue before the depth. Change one thing at a time. Make each correction as a new dip on new fabric; never add dye to a finished dip. If the dip is too light or too dark but the tone is right, scale all dyes up or down by the same factor so the ratio does not change. If the tone is wrong, change the dye that controls that tone by a small step, typically 5 to 10% of its own amount. A recipe that keeps swinging from too red to too blue after three or four corrections usually needs a different dye selection, not a fifth correction. The full correction logic and the move from lab to bulk are in shade matching: lab dip to bulk, right first time.
Before you correct the recipe, make sure the dip is a fair test. Unlevel patches, darker edges or a two-tone look are process problems, not recipe problems. Look again at the pretreatment, the loading order, the dosing and the wash-off before changing any dye amount.
Common mistake: Weighing the sample straight from the dryer or while damp. The weight is wrong by several percent, so every dye amount calculated from it is wrong too, and the dip cannot be repeated in bulk. Condition the fabric in lab air before weighing.
Common mistake: Adding all the soda ash in one go, or adding it before the dye has run and exhausted at temperature. The dye fixes wherever it is at that moment, giving an unlevel or surface-heavy dip that bulk will never copy. Dose alkali in portions after the exhaustion phase.
Common mistake: Skipping or shortening the soaping. Loose hydrolysed dye stays on the fabric, the dip looks deeper and brighter than it really is, and the bulk batch, which gets a proper wash-off, comes out lighter and flatter than the approved dip.
Common mistake: Using a dye stock that is days old, was made in warm water, or picked up alkali from a dirty flask. Part of the dye has already reacted with water, so the stock is weaker than its label. Make reactive stocks fresh, store them cool and date every bottle.
Recording the dip
A lab dip is only useful if someone can repeat it. That someone may be you next month, a colleague on the night shift, or the bulk dyeing officer who needs to know exactly how the approved shade was reached. Write down everything on a dip card or in the lab system, at the time you do it, not from memory at the end of the day.
| Record | Example entry |
|---|---|
| Buyer, colour name, standard reference | Colour and standard code from the order |
| Fabric | Type, GSM, yarn lot, body or rib, pretreatment |
| Sample weight and L:R | 10.00 g, 1:10, 100 mL |
| Dyes and % owf | Each dye, its lot number and % owf |
| Stocks used | Concentration, date made, mL pipetted |
| Salt, soda ash, auxiliaries | g/L and actual grams or mL |
| Profile | Method, temperatures, real dosing times |
| Wash-off and finish | Steps, soaping strength, softener if used |
| Result | ΔE, visual comment, pass or fail, dip code |
| Technician, machine, pot | Name, lab machine and pot number |
Record the dye lot numbers in particular. Reactive dye strength can vary between lots, and when a bulk batch misses, the first question is often whether the lab used the same dye lot as the floor. Over time, these records also give you your own data: how many corrections a typical shade needs, which dye combinations are risky and how far bulk drifts from lab. That history is worth more than any table in a textbook.
A good reactive lab dip is not a clever recipe. It is ordinary steps done the same way every time: the right fabric, an honest weight, correct arithmetic, a sensible loading order, patient dosing, a full wash-off and a calm assessment. When those are fixed, the only thing that changes from one dip to the next is the recipe, and that is exactly what a lab dip is supposed to test.
Questions
How much fabric do I need for a reactive lab dip?
Most labs use 5 g or 10 g of conditioned fabric weighed to 0.01 g. A 10 g sample is easier to assess and less sensitive to small weighing errors.
How do I calculate dye stock for a lab dip?
Use mL of stock = sample weight × shade % ÷ stock %. For a 10 g sample at 2% with a 1% stock, that is 10 × 2 ÷ 1 = 20 mL.
Why are salt and soda ash given in g/L and not % owf?
Salt and alkali work through their concentration in the bath, so they are calculated on the liquor volume. At 1:10, a 10 g sample has a 100 mL bath, so 50 g/L salt is 5 g.
Why is alkali added in portions?
Once alkali is in, the dye fixes where it is and can no longer level. Adding soda ash in two or three portions lets the dye fix gradually and evenly.
Why must a lab dip be soaped before assessment?
Soaping near the boil removes loose hydrolysed dye. Without it the dip looks deeper and brighter than bulk will, and the recipe sent to the floor is wrong.

Textile engineer with 14+ years in dyeing and fabric development. He writes every guide on Dyeing Solution from real production work. Full profile