How knit dye labs turn a buyer's standard into an approved lab dip and a bulk recipe that hits shade first time: dye selection, accurate lab technique, correction logic, bulk factors, shade bands and the records that make it repeatable.
At a glance
Y : R : BRatio sets hue, total sets depth
1 changePer correction step
≥ 1 mLPractical minimum pipette volume
Bulk ÷ labBulk factor from your own history
Every coloured garment starts with a small piece of fabric in a buyer’s envelope. It might be a cut of last season’s fabric, a cotton swatch, a paper card or a colour code from a standard book. The dye lab has to turn that reference into a recipe that gives the same colour on a new fabric, first in a beaker and then in a machine holding hundreds of kilograms. That job is shade matching, and it decides how much a dye house earns. A batch that hits shade first time goes straight to finishing. A batch that misses needs additions, re-dyeing or stripping, and each of those costs time, water, energy and quality.
This article follows the whole path in knit dyeing: from receiving the standard, through choosing dyes and making lab dips, to correcting, getting approval and transferring the recipe to bulk. It explains why lab and bulk differ, how to build a bulk correction factor from your own records, and how to measure and improve right-first-time performance. There are worked examples with numbers along the way.
What shade matching really is
Shade matching is the work of finding a mix of dyes that makes a fabric look the same colour as a standard. “Look the same” has two parts. The first is the instrument: a spectrophotometer measures both samples and reports the colour difference, usually as ΔE in the CMC or CIEDE2000 formula. The second is the eye: a trained colourist compares the two in a light cabinet under daylight and at least one other light. A good match passes both checks. If you need the background on how the instrument reads colour, see the companion article on colour measurement, CIELAB, ΔE and metamerism.
A shade match is also more than a colour. The recipe must give the fastness the buyer asks for, it must be dyeable level in bulk on the machines you have, and it must be affordable. A perfect colour made with a dye that bleeds in washing, or with an expensive dye where a cheaper one would do, is not a good match.
The shade-matching workflow
Most dye houses follow the same basic sequence, even if the names on the forms differ. Each step depends on the one before it, so a shortcut early on usually shows up as a problem later.
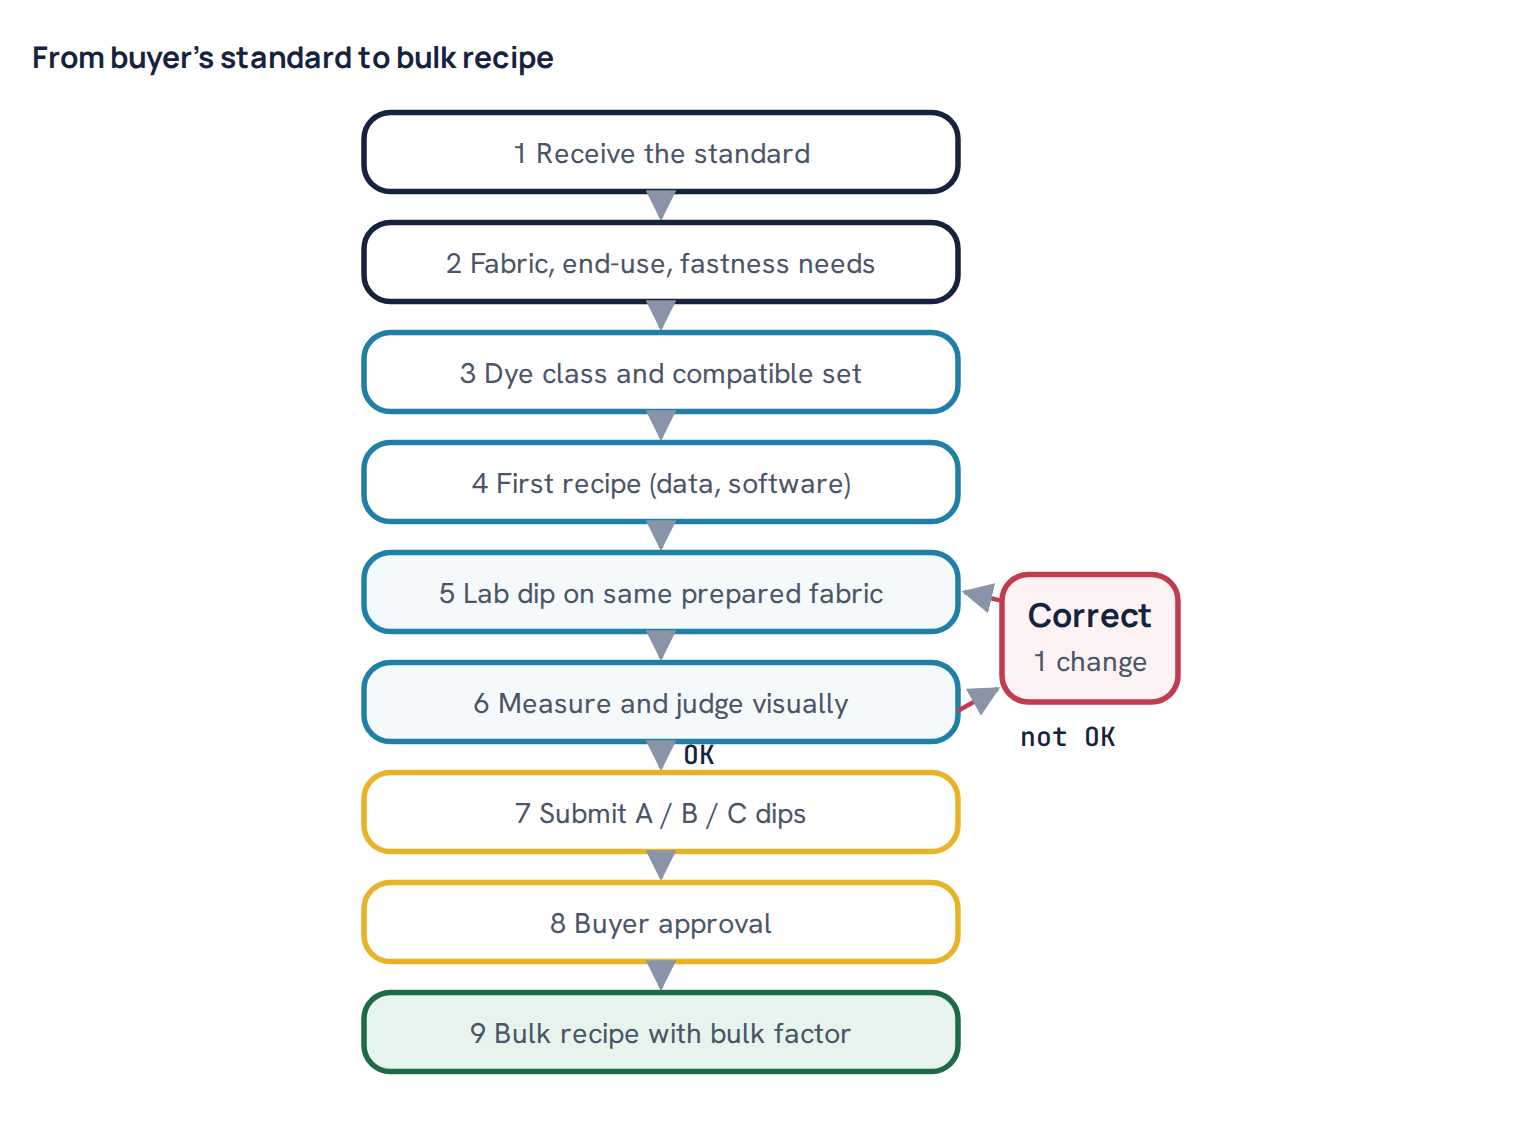
- Receive the standard. Record what it is (fabric, paper, code), the buyer, the order, and which light sources the buyer uses for approval. Keep the standard away from light and heat, and measure it on receipt so you have its numbers on file.
- Assess substrate, end-use and fastness. What fibre and construction will be dyed: cotton single jersey, cotton-elastane, polyester-cotton, viscose? Is it a T-shirt, sportswear, babywear? What wash, rubbing, perspiration and light fastness does the buyer specify?
- Choose the dye class and a compatible dye set. The fibre decides the class. The fastness and process decide which dyes inside that class.
- Make the first recipe. Start from your shade database, from experience with similar colours, or from colour-matching software that predicts a recipe from calibrated dye data.
- Dye a lab dip. Use the same fabric, pretreated and heat set the same way as bulk will be.
- Measure and assess. Instrument reading plus visual check under the agreed lights.
- Correct and repeat until the dip is inside tolerance.
- Submit dips. Usually two or three options, labelled A, B and C, around the target.
- Approval. The buyer picks one, or asks for another round.
- Bulk recipe. Convert the approved lab recipe to bulk, applying your own lab-to-bulk factor.
Choosing the dyes
The fibre narrows the choice first. Cotton and viscose knits are mostly dyed with reactive dyes, polyester with disperse dyes, nylon with acid dyes. The article on which dye class suits which fibre covers this in detail. Inside one class there are still dozens of dyes, and the choice among them decides whether the shade will be easy or painful to reproduce.
Work from a trichromatic set
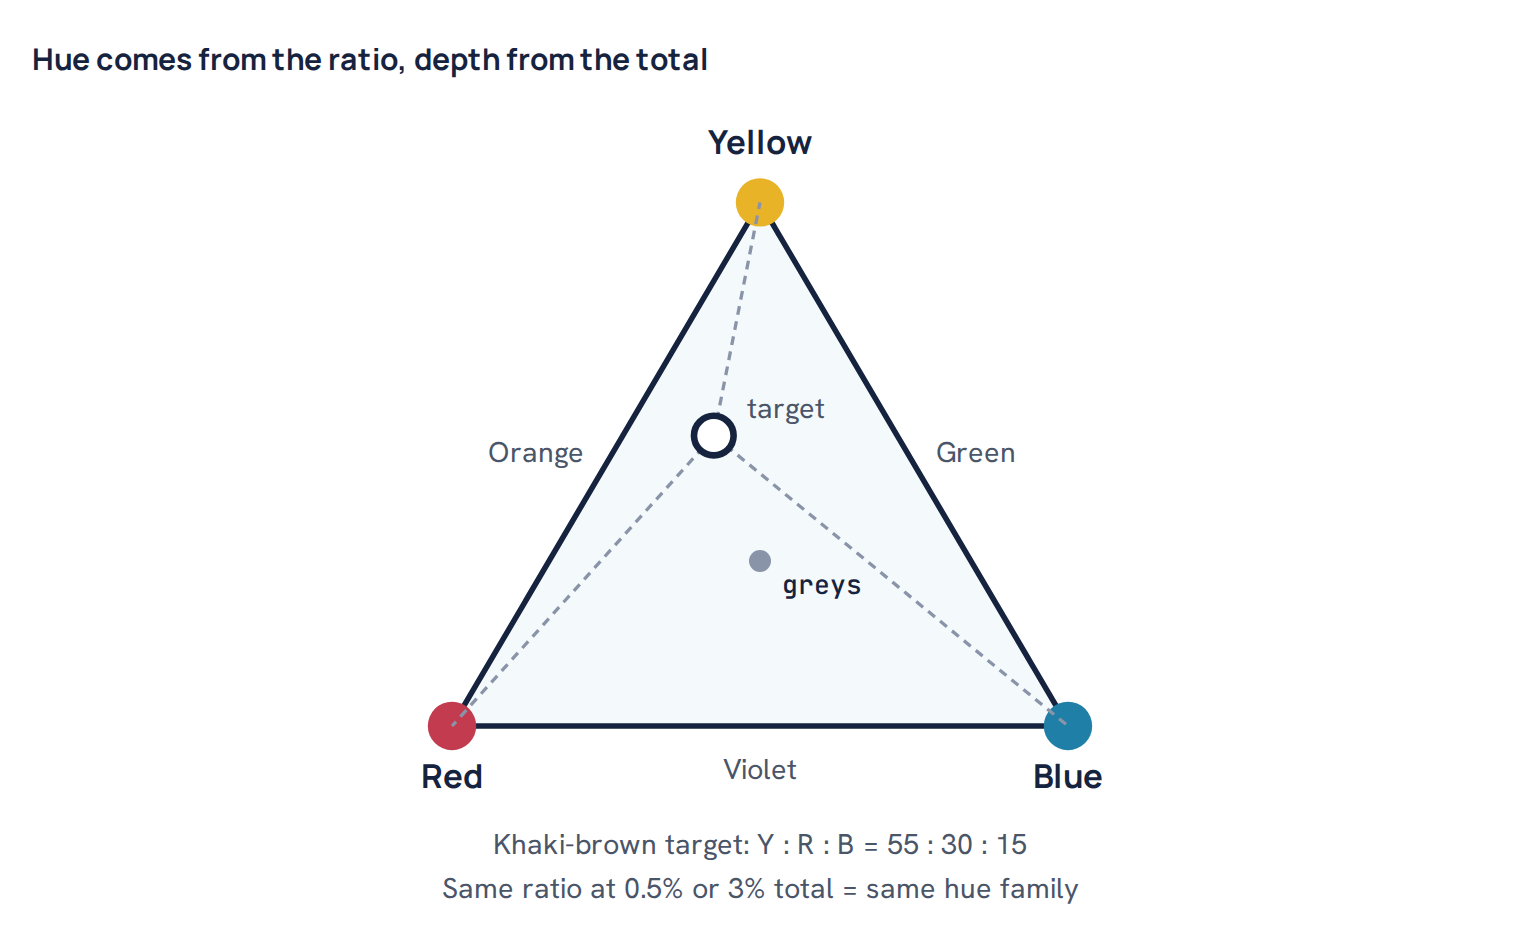
Most shades can be built from three dyes: a yellow, a red and a blue. Their ratio sets the hue, and the total amount sets the depth. A dye house that keeps one or two well-proven trichromatic sets per dye class, plus a few special dyes for bright or very dark shades, matches faster than one that pulls a different dye from the shelf for each colour.
Compatibility matters more than any single dye
Three dyes in one bath only behave like one colour if they move together. They should have similar substantivity, so they go onto the fibre at a similar rate; similar exhaustion and fixation curves against temperature and time; and similar response to salt, alkali or pH. If the red exhausts early and the blue late, any change in bulk heating rate, liquor ratio or time shifts the ratio on the fabric, and the shade drifts. Dye makers publish compatibility data for their ranges, and for reactive dyes the reactive group and the recommended dyeing temperature are good first clues. For the chemistry behind this, see how reactive dyes work.
Fastness, metamerism and cost
- Fastness. The weakest dye in the recipe sets the fastness of the shade. If the buyer asks for high light fastness on a pale shade, check each dye’s rating at that depth, because light fastness usually falls as depth falls.
- Metamerism. If the standard was dyed with different dyes, or on a different fibre, your match may agree in daylight and split under shop light or tungsten. Choosing dyes whose reflectance curves resemble the standard’s reduces this. Matching software can rank recipes by a metamerism index.
- Cost. Two recipes can give the same colour at very different prices. A high-strength dye that costs more per kilogram may still be cheaper per batch. Compare cost per kilogram of dyed fabric, not per kilogram of dye.
Getting a good first recipe
The first recipe decides how many loops you need. There are three sources, and good labs use all three.
The shade database. Every approved shade, with its fabric, recipe and measured values, is a starting point for the next similar colour. A navy for cotton single jersey last month is a better start than a guess. The database only works if the records are clean and searchable by colour values, fabric and dye set.
Experience. A senior colourist can look at a standard and write a recipe close enough to need one or two corrections. That skill is real, but it lives in one head. Writing it into the database turns it into a shop asset.
Colour-matching software. The software holds calibration data for each dye: a set of dyeings at several depths on your own fabric, measured on your own spectrophotometer. It predicts a recipe for a measured standard and can correct a dip from its measurement. Its predictions are only as good as the calibration. If the calibration dyeings were made on a different fabric, or the dye lot has changed strength, the predictions drift. Recalibrate when the base fabric, the process or the dye supplier changes. Use the dye recipe calculator for the weighing arithmetic once you have the percentages.
Lab dip technique: where accuracy is won or lost
A lab dip is a small, fast model of the bulk process. If the model is not faithful, the approved recipe is a recipe for the lab, not for production. Most lab-to-bulk problems start with something done differently in the beaker.
- Same fabric, same preparation. Take the lab sample from the actual greige lot, scoured or bleached and, for elastane blends, heat set exactly as the bulk will be. Whiteness, absorbency and residual peroxide or alkali all change dye uptake.
- Weighing. Weigh the fabric on a balance reading to at least 0.01 g, and condition it first, because a damp sample weighs more and gets less dye per gram of fibre. Weigh dye for stock solutions on a balance reading to 0.001 g, and weigh enough that the balance error is small.
- Stock solution concentration. Choose a stock strength that lets you pipette a sensible volume, usually not less than about 1 mL. Very small volumes give large percentage errors.
- Stock solution age. Dissolved reactive dyes slowly hydrolyse, faster when warm or if the water is alkaline. Many labs make reactive stocks fresh daily or keep them only a few days; the safe life varies by dye and storage, so follow the dye maker’s advice and date every bottle. Never add alkali to a stock.
- Pipetting. Use calibrated pipettes or an automatic dispenser, check them regularly, and read the meniscus at eye level.
- Liquor ratio. Keep the lab liquor ratio fixed and recorded. Lab machines often run at 1:10 to 1:20, while bulk jets may run at 1:5 to 1:8. The difference is allowed for later, but only if the lab ratio is consistent.
- Same water and auxiliaries. Use the same water quality as bulk, or softened water with similar hardness, and the same salt, alkali, sequestering and levelling agents at the same g/L.
- Temperature profile. Follow the bulk curve: same start temperature, heating rate, dosing points and holding time. A lab machine that heats much faster than bulk can change exhaustion behaviour.
- Wash-off and finish. Soap and rinse as bulk does. If bulk gets a softener or a fixing agent, apply it to the dip too, because both can shift shade.
- Drying and conditioning. Dry the same way each time, let the sample cool and condition before reading. Many dyed fabrics read differently when warm or damp, and some shades change for a while after drying.
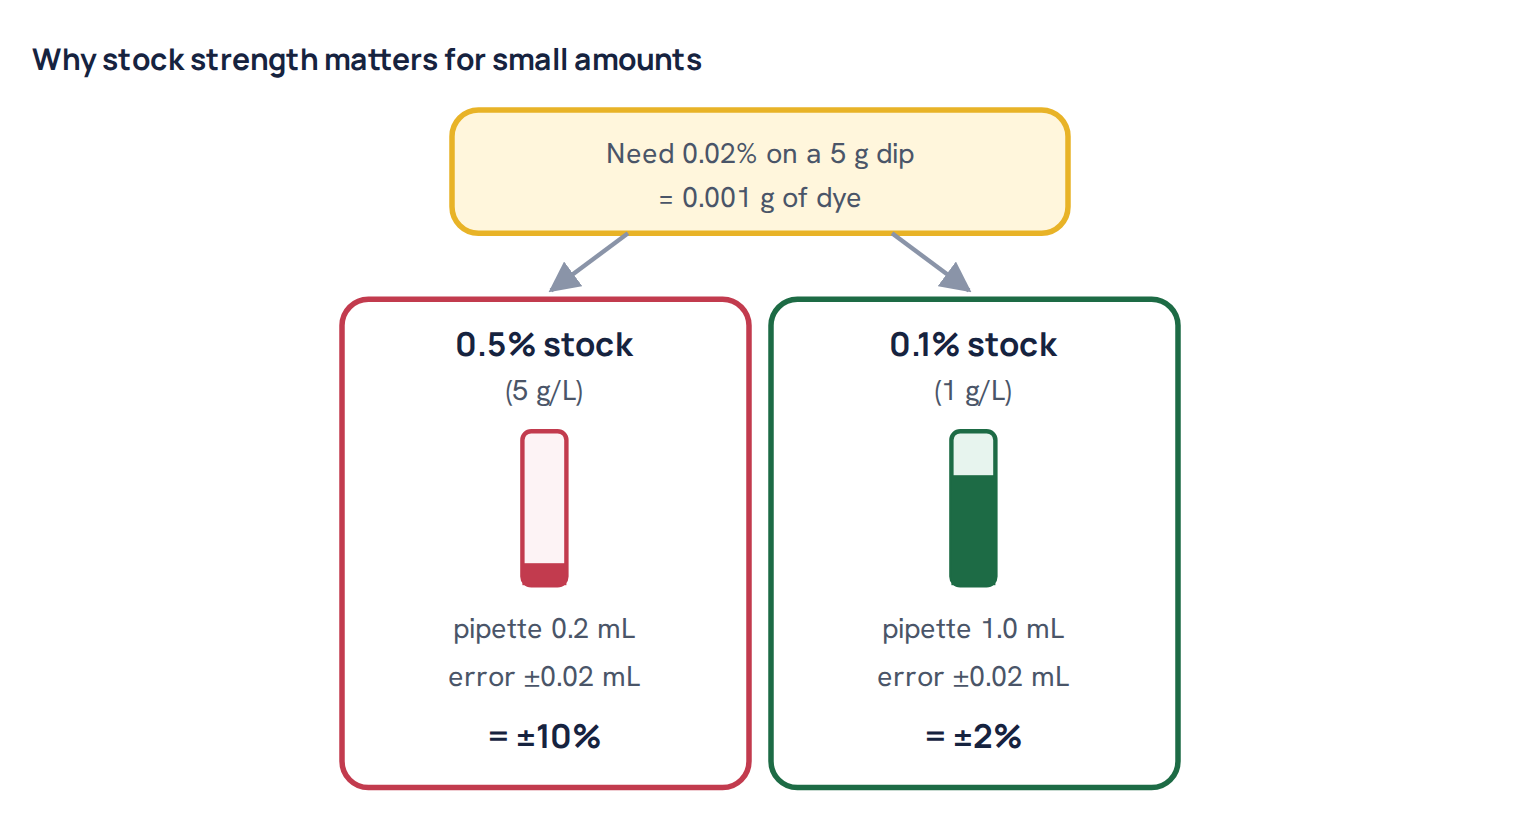
Worked example. A 5 g lab dip needs Yellow 1.20%, Red 0.45% and Blue 0.02%. Grams of dye = fabric weight × % ÷ 100. Yellow: 5 × 1.20 ÷ 100 = 0.060 g, which is 12 mL of a 0.5% stock (0.005 g/mL). Red: 0.0225 g, or 4.5 mL of the same stock. Blue: 0.001 g, which would be only 0.2 mL of 0.5% stock. From a 0.1% stock it is 1.0 mL, and a 0.02 mL pipetting error drops from 10% to 2% of the blue. In a khaki, 10% more or less blue is a visible shift. For the full arithmetic, see dyeing recipe calculation.
Correction logic: one change at a time
When a dip is off, the measurement tells you how. ΔL* says lighter or darker, Δa* says redder or greener, Δb* says yellower or bluer, and ΔC* and ΔH* split the difference into brightness and hue. Many instruments also report a strength value, the dip’s colour strength as a percentage of the standard. The art is to turn those numbers into the smallest change that fixes the biggest problem.
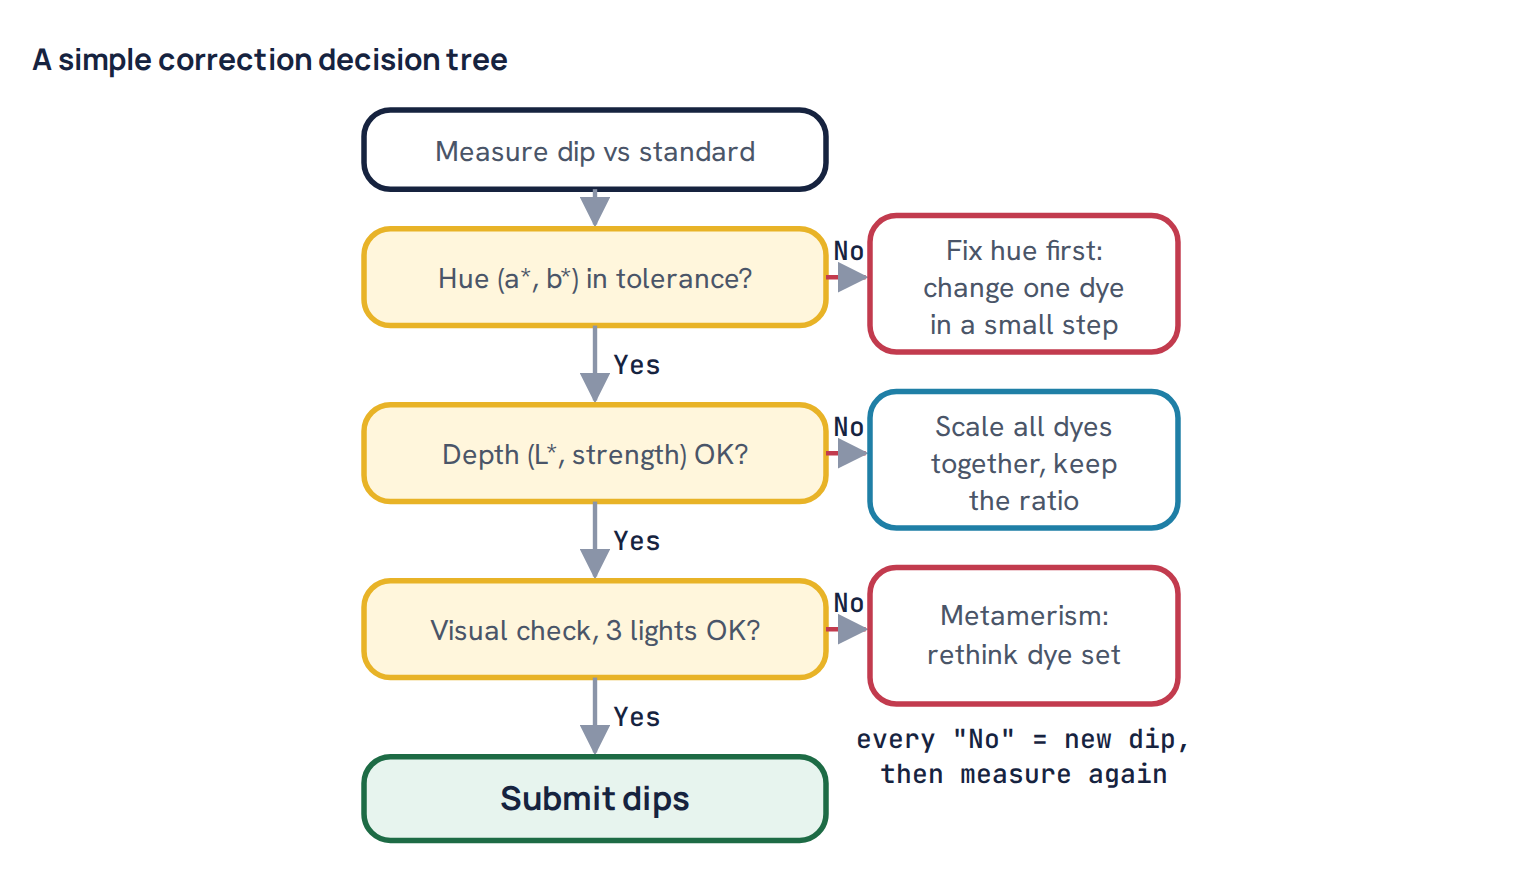
Some rules that save loops:
- Separate hue from strength. If the dip is the right hue but weak, raise all three dyes by the same percentage. That keeps the ratio, so it counts as one move. If the hue is wrong, change the dye responsible for that direction.
- Change one component at a time. If you change two dyes and the result improves in one direction and worsens in another, you cannot tell which change did what.
- Use small steps. Corrections of roughly 3 to 10% of a component are typical for a near miss; large changes overshoot. The right step size depends on how close you are and on the dye’s strength.
- Think about side effects. Adding blue to a khaki makes it greener and also darker and duller. Removing red makes it greener too. Choose the move that fixes the main error with the least collateral change.
- Re-dye from scratch. Never correct a lab dip by adding dye to the finished sample. Every correction is a new dip.
Worked example. A khaki dip with Yellow 0.80%, Red 0.40%, Blue 0.20% reads against the standard: ΔL* +0.8 (lighter), Δa* +0.6 (redder), Δb* −0.1, strength 94%. The hue error is mainly red, so first cut red by about 7.5%: 0.40 × 0.925 = 0.37%. The depth is about 6% weak, so then scale all three by 100 ÷ 94 ≈ 1.064. New recipe: Yellow 0.80 × 1.064 = 0.85%, Red 0.37 × 1.064 = 0.39%, Blue 0.20 × 1.064 = 0.21%. Note that removing some red also lightens the shade slightly, which is why careful colourists sometimes scale by a touch more. The next dip tells you whether that was right.
Submitting dips and getting approval
Most buyers expect more than one option. A common practice is to submit two or three dips, labelled A, B and C, all inside the colour tolerance but spread slightly around the target: for example one closest by instrument, one a little redder and one a little greener or brighter. This gives the buyer a real choice and makes it more likely one is approved in the first round.
Each dip should go out with its own label: buyer, colour name or code, fabric quality, dip letter, date and the light source used for assessment. Keep a twin of every submitted dip in the lab, protected from light, along with its recipe. When the approval comes back, the approved twin becomes the lab’s master for bulk. The tolerance agreed with the buyer, commonly something like ΔE CMC (2:1) of 1.0 or less though it varies by buyer and colour, should be written on the approval record.
From lab to bulk
An approved lab recipe is a prediction, not a guarantee. Bulk differs from the lab in ways that change dye uptake, even when everyone follows the same written process.
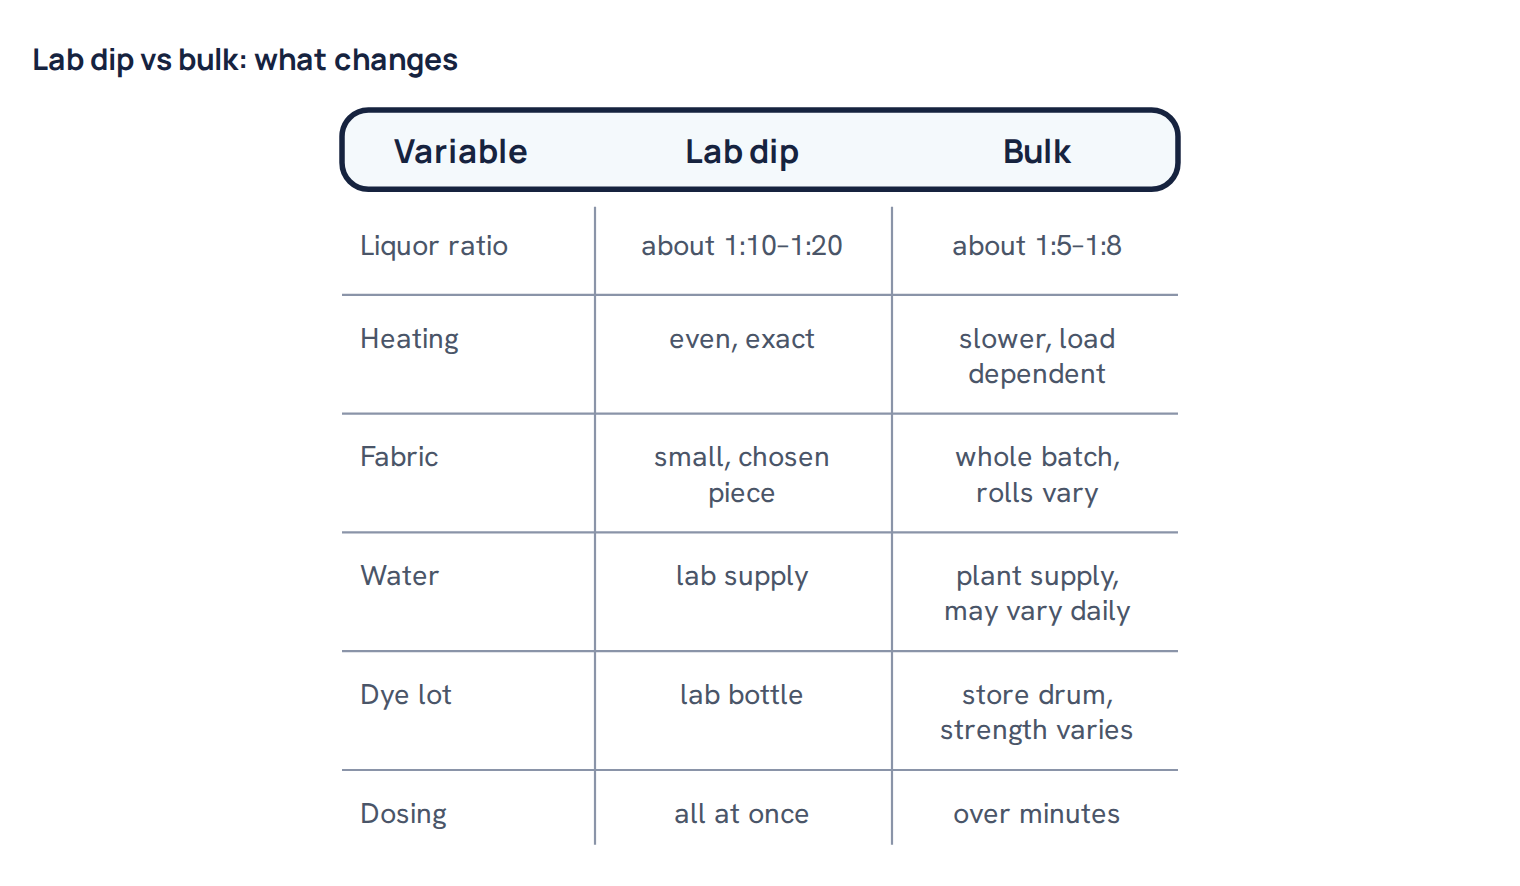
- Liquor ratio. At a shorter liquor ratio the dye concentration in the bath is higher, and for many reactive dyes exhaustion is higher too. The same % owf can give a slightly deeper shade in bulk.
- Heating rate and circulation. A full jet heats more slowly and less evenly than a lab beaker, which changes how dyes with different temperature behaviour share the fibre.
- Fabric preparation. Bulk scouring or bleaching may differ slightly from the lab sample’s, and absorbency varies along a batch.
- Water. Hardness, iron and pH can change dye uptake and hue, especially for some turquoise and bright shades.
- Dye lot strength. Commercial dyes are standardised, but each new lot can differ a little in strength or shade. Test every incoming lot against a retained standard and adjust if needed.
Building a bulk factor from history
Because these differences repeat, they can be measured. A bulk factor (or correction factor) is the ratio of the dye amount that actually gave the approved shade in bulk to the amount the lab recipe called for. Build it per machine group, per fabric quality and ideally per dye set, from batches that matched. Factors a little below 1.0 are common for reactive dyes on cotton when bulk runs at a shorter liquor ratio, but some dye houses find the opposite. Only your own records can tell you.
| Lot | Lab total % | Final bulk total % | Ratio bulk ÷ lab |
|---|---|---|---|
| 1 | 2.00 | 1.84 | 0.92 |
| 2 | 1.60 | 1.50 | 0.94 |
| 3 | 2.40 | 2.23 | 0.93 |
| 4 | 1.20 | 1.14 | 0.95 |
| 5 | 3.00 | 2.73 | 0.91 |
Worked example. The table shows five navy and dark lots of cotton single jersey on the same jet group (example figures). The ratios average (0.92 + 0.94 + 0.93 + 0.95 + 0.91) ÷ 5 = 0.93. A new lab recipe of Yellow 0.30%, Red 0.50%, Blue 1.20% would go to bulk as 0.28%, 0.47% and 1.12%. For a 400 kg batch, the blue is 400 × 1.12 × 10 = 4,480 g instead of 4,800 g. If the history showed one dye behaving differently, for example the red always needing a separate correction, apply individual factors per dye rather than one overall number.
First-bulk sampling and additions
For a new shade, or a known shade on a new fabric, many dye houses take a sample from the machine before the final rinse or soaping stage, dry it quickly, and compare it with the approved dip. If it is off, they make an addition: extra dye dosed into the machine, usually with more process time.
Additions rescue the batch but cost more than time. Dye added late goes onto fabric that is already partly dyed and, for reactive dyes, may need a fresh alkali step. It goes on faster and less evenly, so the risk of unlevel dyeing and rope marks rises. Extra cycles mean more mechanical stress, which can raise pilling and crease marks. More hydrolysed dye must then be washed off, and if wash-off is short, wash and rubbing fastness suffer. When a shade is badly off, stripping and re-dyeing may be the only way out, which is worse again. That is why the target is right first time, not good additions.
Right first time: the KPI that tells the truth
Right first time (RFT) is the share of bulk batches that reach the approved shade without any addition, re-dye or strip. It is usually counted as a percentage per month, per machine group and per shade family. Some dye houses count a batch with one small addition separately, but the honest figure counts only batches with no correction at all. Lab RFT, the share of shades approved on the first submission, is a useful second figure.
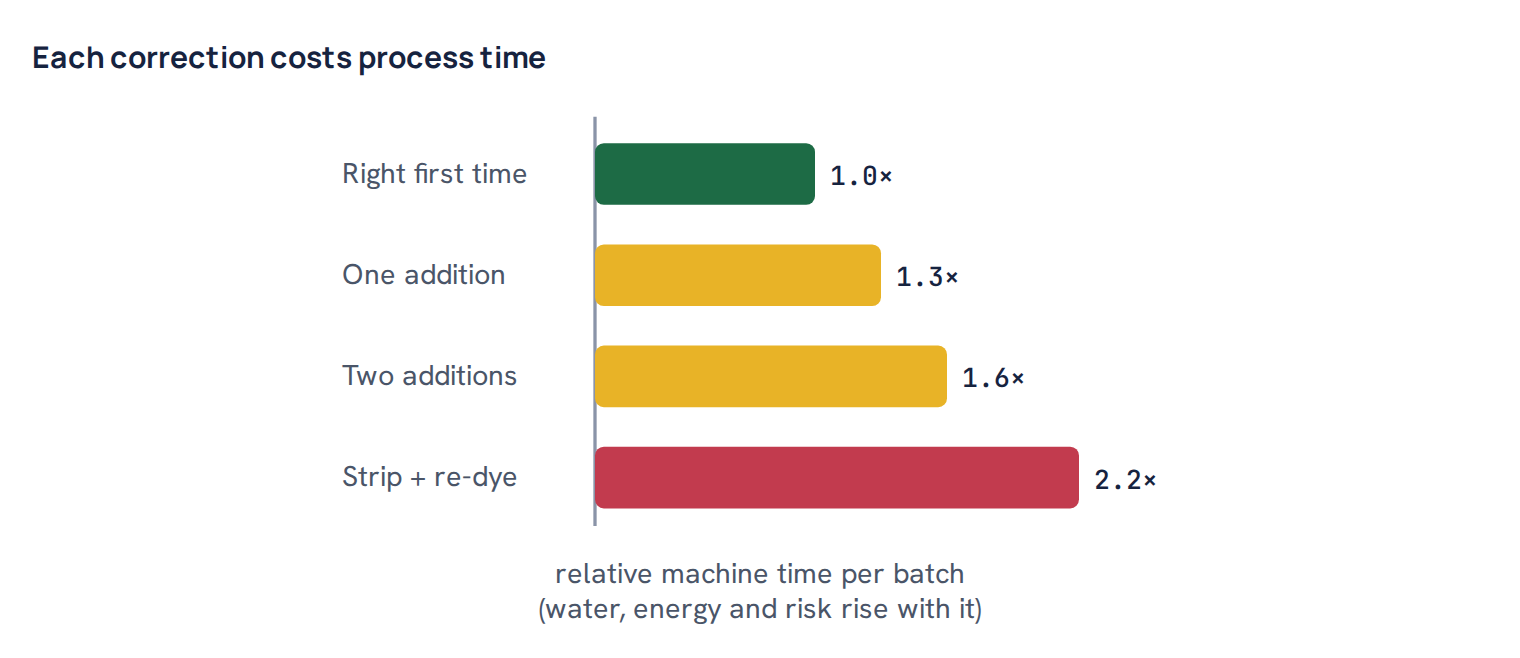
Ways to raise RFT, roughly in order of impact:
- Make lab dips truly match bulk conditions: same fabric preparation, liquor ratio policy, water and process curve.
- Keep a small number of compatible dye sets and avoid one-off dyes.
- Test every incoming dye lot for strength and shade before it reaches the store.
- Build and update bulk factors from real batch data, and review them monthly.
- Control bulk weighing: calibrated scales, two-person check for dyes, and full dissolution before dosing.
- Standardise bulk preparation so absorbency and whiteness are consistent.
- Track every miss with a reason code and fix the most frequent cause first.
Shade bands and lot-to-lot continuity
Large orders are dyed in many batches, sometimes over weeks. Each batch may be inside tolerance against the standard, yet two batches can differ from each other enough to show if their panels are sewn side by side. Shade banding manages this. Samples from each batch are measured and grouped into bands, for example by a small grid of lightness and hue differences, and the garment factory cuts each garment from one band only.
For continuity, measure the first approved bulk batch and keep it as the bulk master alongside the lab master. Compare later batches with both. If batches start drifting one way, look for a cause, such as a new dye lot, a change in water or a new greige lot, before the drift leaves tolerance. For repeat orders months later, start from the recorded bulk recipe and its factor, not from the original lab dip, and check against the retained bulk master.
Records to keep
Good records turn every shade into a faster match next time and every miss into a lesson. A useful minimum:
| Record | What it holds |
|---|---|
| Standard file | Buyer, code, source, measured values, light sources, tolerance |
| Lab dip log | Every dip: recipe, fabric lot, stock dates, readings, decision |
| Approval record | Approved dip letter, date, buyer comments, retained twin |
| Bulk card | Batch, machine, weight, liquor ratio, factor used, dye lots |
| Correction log | Additions, amounts, reason code, final readings |
| Dye lot tests | Strength and shade of each incoming lot vs standard |
| Shade bands | Band per batch, readings, master samples |
Fastness results belong with the shade record too. Test wash fastness on the approved shade before bulk if the dye set is new; the method is described in how to test colour fastness to washing.
Common mistakes
Common mistake: Making lab dips on a convenient fabric from the shelf instead of the actual greige lot, prepared the bulk way. The dip is approved, and the bulk misses because the fabric was never the same.
Common mistake: Using an old reactive stock solution. Hydrolysed dye still colours the water but does not fix, so the dip comes out weak and the recipe is pushed too strong for bulk.
Common mistake: Changing two or three dyes in one correction. The next dip moves, but nobody knows why, and the loop count doubles.
Common mistake: Reading a dip while it is still warm or damp. The numbers change as it cools and conditions, and corrections chase a moving target.
Common mistake: Approving a match by instrument alone. A low ΔE in daylight does not rule out a split under shop lights; always check visually under the buyer’s lights.
Common mistake: Treating additions as normal. Each addition carries a hidden cost in levelness and fastness risk, and a dye house that relies on them never finds the root cause of its misses.
Shade matching rewards discipline more than talent. Choose compatible dyes, make the lab dip a faithful model of bulk, correct in small single steps, and let your own records set the bulk factor. Done that way, right first time becomes the normal result rather than a lucky one.
Questions
What is a lab dip?
A lab dip is a small sample of the actual fabric dyed in the lab with a trial recipe, to match a buyer’s colour standard. It is measured and checked visually, corrected if needed, and submitted for approval before bulk dyeing.
Why does bulk not match the approved lab dip?
Bulk runs at a different liquor ratio and heating rate, with plant water, whole-batch fabric and store dye lots. These shift dye uptake, so many dye houses apply a bulk factor built from their own batch history.
How do I correct a lab dip that is off shade?
Fix the hue first by changing one dye in a small step, then fix depth by scaling all dyes together so the ratio stays the same. Make each correction as a fresh dip, not by adding dye to the old one.
What is right first time in dyeing?
Right first time is the share of bulk batches that reach the approved shade with no addition, re-dye or strip. It is the clearest single measure of how well the lab and production work together.
Why are A, B and C dips submitted?
Submitting two or three dips spread slightly around the target, all inside tolerance, gives the buyer a real choice and raises the chance of approval in the first round.

Textile engineer with 14+ years in dyeing and fabric development. He writes every guide on Dyeing Solution from real production work. Full profile