From the analytical balance to the light cabinet: the equipment a dyeing lab needs, how each tool is used and checked, a calibration schedule, and why a 0.0001 g balance matters for pale lab dips.
At a glance
0.0001 gAnalytical balance readability
4 · 7 · 10pH buffer calibration points
95–105%Acceptable pH electrode slope
6 zonesReceive to assessment workflow
A dye lab is where every bulk shade starts. Before a single kilogram of fabric goes into a production machine, someone in the lab has weighed a few grams of fabric, measured a few millilitres of dye solution, dyed a small sample and judged it against the buyer’s standard. If the lab is accurate, bulk has a fair chance of matching first time. If the lab is careless, every error is multiplied in production. A 5 g lab dip scaled to a typical bulk batch of about 18 kg is a factor of 3,600, so a small slip on the lab bench becomes a large problem on the floor.
This article walks through the equipment a textile dyeing lab needs, from the balance to the light cabinet, and explains how each tool is used, checked and looked after. It is written for new lab technicians, junior dye-lab officers and students. The aim is practical: what to buy or expect to find, what each instrument is good for, where it goes wrong, and how often to check it. The theory of shade matching, colour measurement and recipe calculation is covered in other articles, and this one links to them where needed.
How a dye lab is laid out: the six working zones
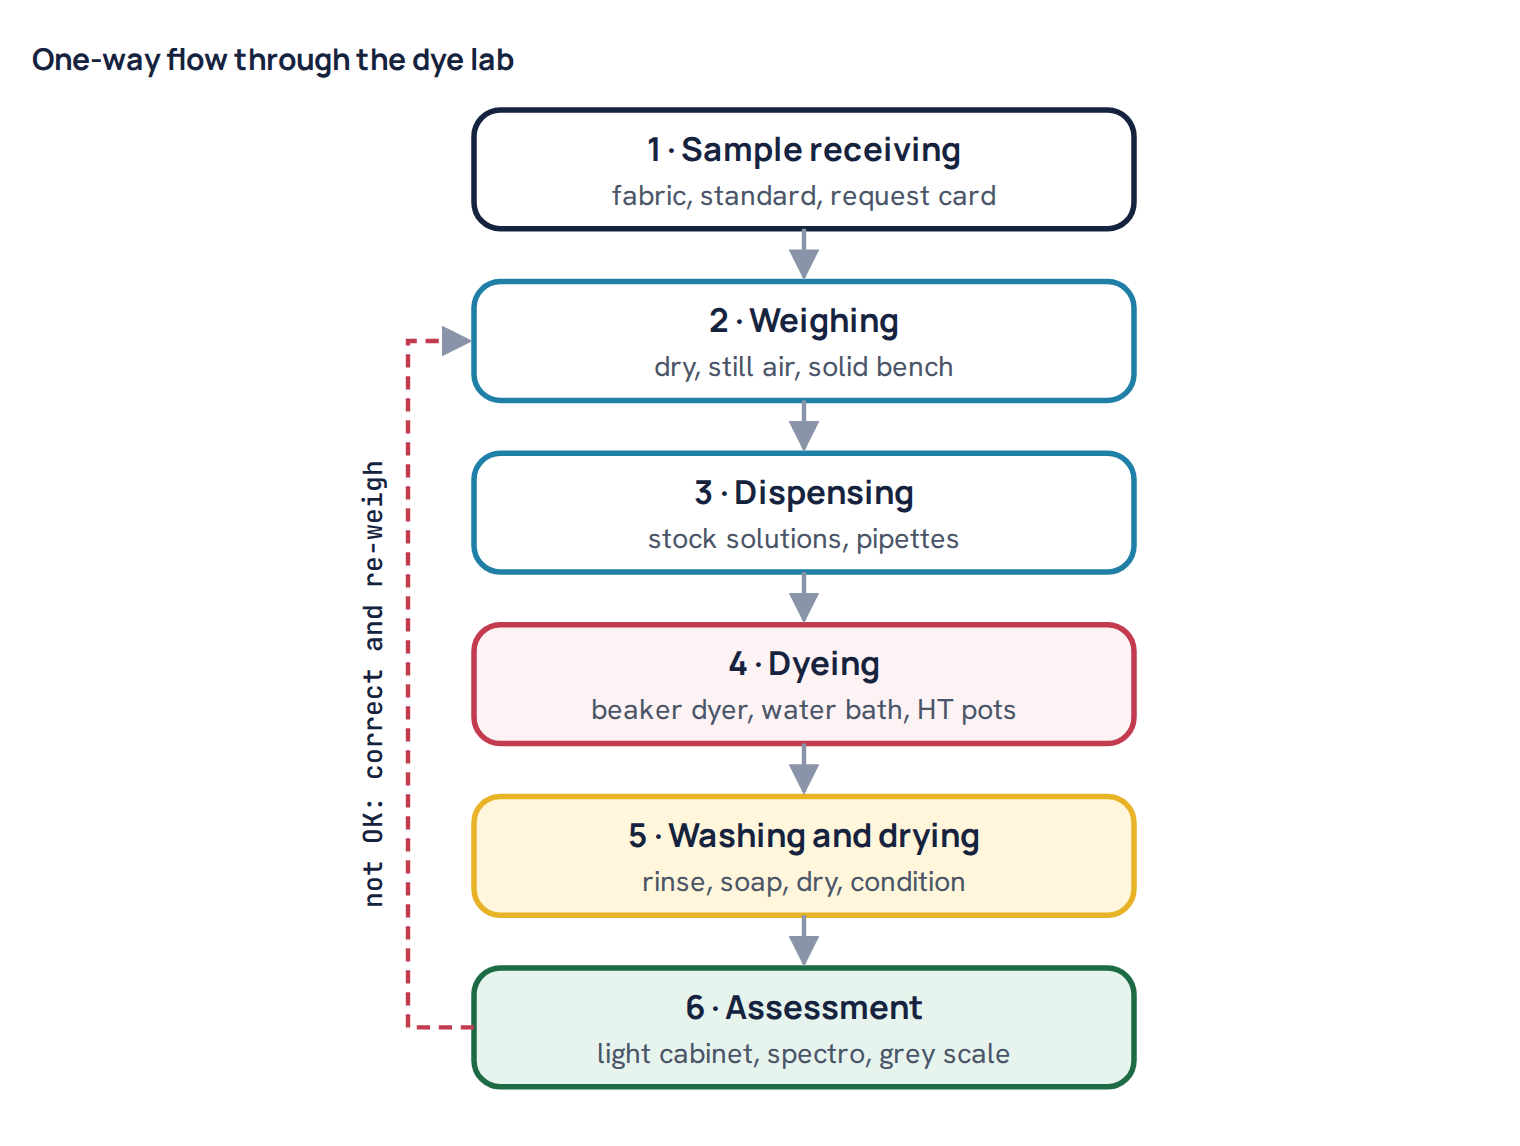
A good lab is arranged so that work flows in one direction, from dry to wet and back to dry. Each zone has its own equipment and its own enemies. Dust, moisture, heat and vibration all spoil measurements, so the zones should be kept apart as much as the room allows. Even a small lab with one long bench can follow the same order from one end to the other.
- Sample receiving. The request card, the buyer’s standard, the fabric for dyeing and any special notes arrive here. Each job gets a number before anything else happens. Standards are kept away from light and handled with clean hands.
- Weighing. The balances live here, on a solid bench, away from doors, fans, air-conditioner outlets and the dyeing machines. This is the quietest, driest corner of the lab.
- Dispensing. Stock solutions, pipettes, burettes and any automatic dispenser are grouped together. Recipes are measured into dye pots or beakers in this zone.
- Dyeing. Beaker dyeing machines, water baths and high-temperature pot machines. This zone is hot and wet and needs good ventilation and drainage.
- Washing and drying. Sinks for rinsing and soaping, a lab washing tester, a hot-air dryer or iron, and sometimes a pad mangle and a small stenter or curing oven.
- Assessment. The light cabinet, the spectrophotometer, grey scales and the conditioning area. This zone must be clean, with neutral surroundings and no direct sunlight.
Keep the balance and the assessment area as far from the dyeing machines as you can. Steam and heat from an open water bath can make a balance drift, and a wet bench near the light cabinet invites splashes on standards. If space is tight, a simple glass or board partition already helps.
Balances: the most important instrument in the lab
Every lab dip starts on a balance. Fabric, dye powder for stock solutions, salt, alkali and auxiliaries are all weighed, and the accuracy of the final shade can never be better than the accuracy of these weights. Most dye labs need two kinds of balance.
- Analytical balance. Readability 0.0001 g (0.1 mg), capacity usually around 200–220 g. It is used for weighing dye powder to make stock solutions and for any small, critical weight. It always has a glass draught shield with sliding doors.
- Precision (top-pan) balance. Readability 0.01 g, capacity often 600 g to a few kilograms. It is used for weighing fabric samples, salt, soda ash and other chemicals where a few hundredths of a gram do not matter.
Readability is only the smallest step the display shows. It is not the same as accuracy. A balance that reads to 0.0001 g may repeat a weighing only to within 0.0001–0.0003 g in a normal lab, and less well if the room is draughty. A useful rule is to keep the amount you weigh at least about 1,000 times larger than the readability if you want the error from the display alone to stay near 0.1%. On a 0.01 g balance that means weighing at least about 10 g. On a 0.0001 g balance it means at least about 0.1 g.
Setting up and using a balance
- Place it on a heavy, stable bench, ideally stone or a dedicated weighing table, away from doors, fans and machines.
- Level it using the bubble indicator and the adjustable feet. A tilted balance weighs wrongly even after calibration.
- Leave it switched on, or allow the warm-up time stated by the maker, often around 30 minutes, before accurate work.
- Close all draught shield doors before reading. Open only one door to add or remove material.
- Use a clean, dry weighing boat or beaker, tare it, then add the material slowly with a clean spatula.
- Let the reading settle before recording. Most balances show a stability mark.
- Bring everything you weigh to room temperature first. A warm beaker creates air currents and reads light.
Calibration and daily checks
Many modern balances have internal calibration that runs automatically or at the press of a button. That is useful, but it does not prove the balance is right. The lab should also own a small set of certified check weights, for example 100 mg, 1 g, 10 g and 100 g for the analytical balance, and larger ones for the top-pan balance. Check one or two weights every morning and record the readings. If the reading is outside the lab’s tolerance, stop, recalibrate and check again. Handle check weights only with tweezers or gloves, because fingerprints add mass and cause corrosion. An outside calibration service should check the balance at least once a year, or more often if your customers or quality system require it.
Common mistake: Weighing fine dye powder on the analytical balance with the draught shield open “just for a second”. A breath, a passing person or the air conditioner can move the display by several tenths of a milligram, and the powder blows around inside the chamber and contaminates the next weighing.
Worked example: why balance readability matters for pale shades
Pale shades are where weighing errors hurt most. The dye amounts are tiny, and the eye is very sensitive to small differences in pale colours. The example below compares a 0.01 g balance with a 0.0001 g balance for a typical pale lab dip.
Worked example. A lab dip uses 5 g of fabric at 0.05% shade. The dye needed is 5 × 0.05 ÷ 100 = 0.0025 g. On a 0.01 g balance this cannot be weighed at all: the display would show 0.00 g, and the smallest possible reading of 0.01 g is four times too much. On a 0.0001 g balance the display can show 0.0025 g, but the rounding alone is ±0.00005 g, which is ±2% of the dye, and real repeatability of one or two digits makes it ±4–8%. That is why nobody weighs dye directly for a lab dip. Instead, a stock solution is made. To make a 0.1% stock (1 g/L), weigh 0.50 g of dye and make it up to 500 mL. On a 0.01 g balance the rounding error is ±0.005 g on 0.50 g, which is ±1%, and a real error of ±0.01 g is ±2%. On a 0.0001 g balance the rounding error is ±0.00005 g on 0.5000 g, which is ±0.01%. The lab dip then takes 0.0025 g ÷ 1 g/L = 2.5 mL of stock, measured with a pipette. With the analytical balance the stock strength is essentially exact. With the top-pan balance the whole shade may already be 1–2% weak or strong before any dyeing begins, and in a pale or sensitive shade a strength difference of that size can already be visible.
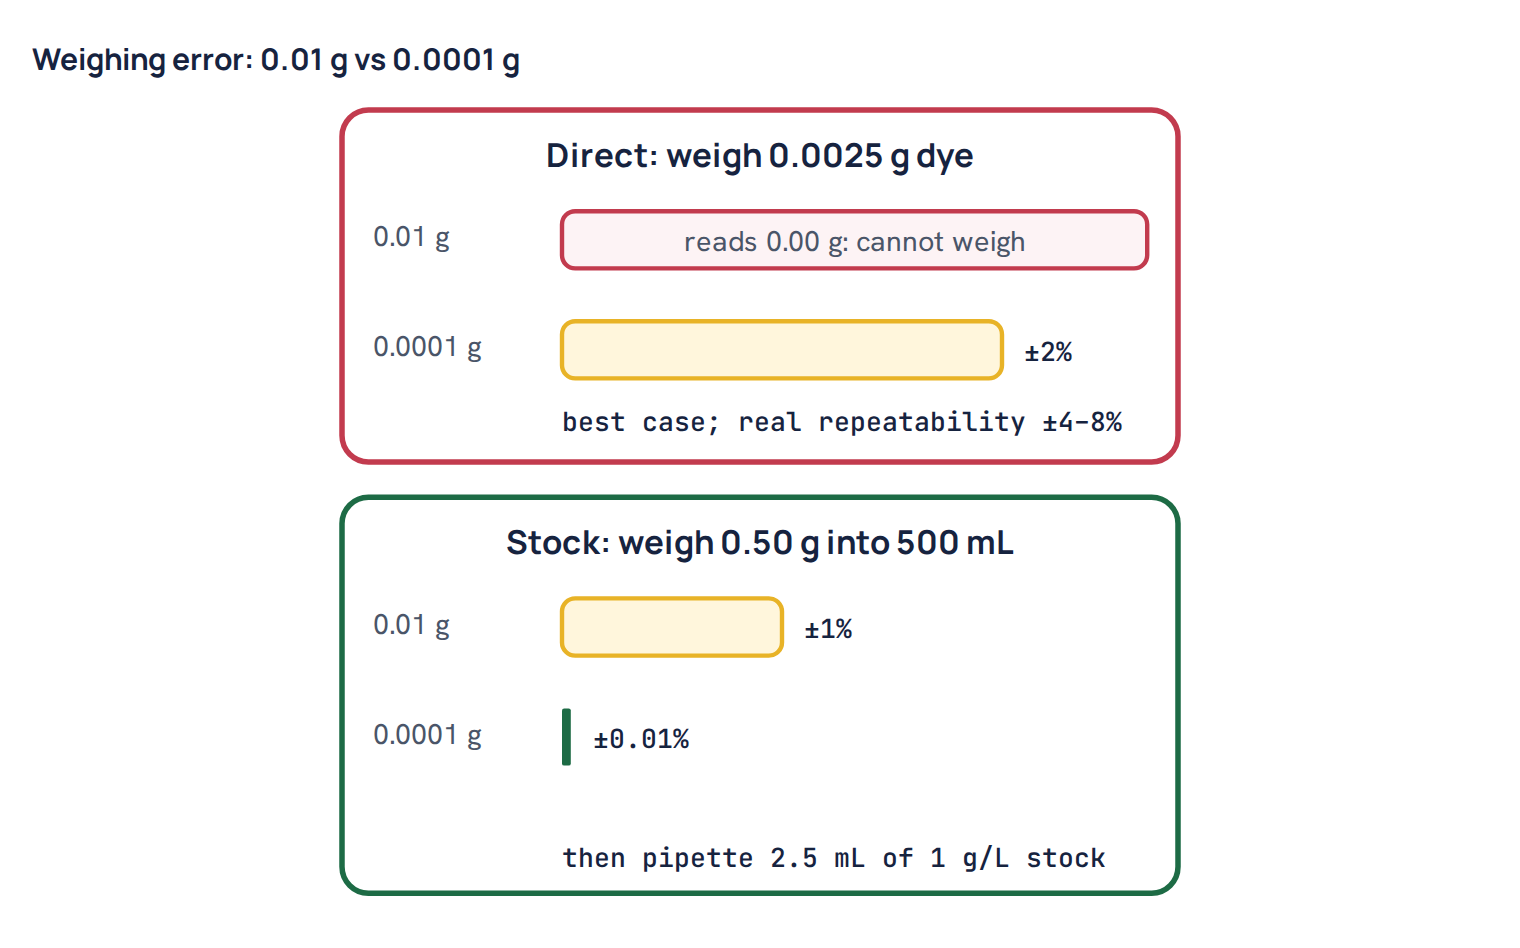
The same arithmetic explains why many labs make stock solutions at 0.1%, 0.5% and 1% for different depth ranges. Pale shades use the weaker stock so that the pipetted volume is large enough to measure accurately. The full method for preparing and using stocks is in the article on dye stock solutions and pipetting, and the recipe formulas are in dyeing recipe calculation.
Measuring liquids: pipettes, burettes and automatic dispensers
Once a stock solution exists, the recipe becomes a list of volumes. The tools for measuring those volumes range from simple glass pipettes to computer-controlled dispensing systems.
- Graduated glass pipettes (1, 2, 5, 10 and 25 mL) are the basic tool in most labs. Use a pipette filler, never your mouth. Read the bottom of the meniscus at eye level. Use a pipette size where the volume you need is a large part of the full scale; measuring 0.3 mL with a 10 mL pipette is poor practice.
- Volumetric (bulb) pipettes deliver one fixed volume very accurately and are best for making dilutions of stock solutions.
- Adjustable micropipettes with disposable tips cover small volumes, for example 100–1,000 µL and 1–10 mL. They are fast and accurate if calibrated and used with the correct technique, but viscous or foaming solutions can cause errors.
- Burettes (25 or 50 mL) are mainly used for titrations, such as checking alkali strength or water hardness. Some labs mount a row of burettes with one dye stock each for quick dispensing.
- Automatic dispensers measure stock solutions into dye pots by volume or, more commonly in modern systems, by weight on a built-in balance. They save time and remove most human error, which matters when a lab handles many dips per day. They still need daily checks: prime the lines, check for air bubbles and blocked nozzles, and verify the dosing accuracy by dispensing water onto a balance.
Pipettes, volumetric flasks and burettes should be Class A glassware where accuracy matters. Class A items have tighter tolerances than Class B and are marked on the glass. Beakers and conical flasks are only for holding and mixing liquids. Their markings are approximate, often within about 5%, and must never be used to measure a recipe.
Common mistake: Making stock solutions “to the mark” in a beaker instead of a volumetric flask. The beaker marking can be several percent out, so every recipe made from that stock carries the same hidden error, and the lab blames the dye or the machine instead.
Volumetric flasks and stock solution storage
Stock solutions are made in volumetric flasks, typically 100, 250, 500 or 1,000 mL. Dissolve the weighed dye first in a beaker with a little water at the temperature the dye class needs, then transfer it to the flask, rinse the beaker into the flask several times, fill to just below the mark, mix, and finally bring the meniscus exactly to the line. Invert the stoppered flask several times to mix fully.
Store stocks in clean, labelled bottles, preferably amber glass or opaque plastic, out of sunlight. Each label should show the dye, concentration, date and time made, and who made it. Stability depends on the dye class. Reactive dye stocks slowly hydrolyse in water, especially if warm or slightly alkaline, so many labs make them fresh daily or keep them only for a short period that they have tested themselves. Disperse dye stocks are dispersions, not true solutions, so they must be stirred or shaken thoroughly before every withdrawal. Never add alkali, salt or other chemicals to a dye stock. Keep a stock register so that any odd result can be traced back to the bottle that was used.
Lab dyeing machines
The lab dyeing machine has one job: to reproduce the bulk dyeing conditions as closely as possible in a small pot. That means the right temperature, the right heating and cooling rates, the right liquor ratio and enough movement between fabric and liquor. Different dye classes need different equipment.
Open water baths for reactive and other low-temperature dyeing
A thermostatically controlled water bath, often with shaking or a rotating holder for the beakers, works for dyeing up to about 95 °C. It is simple, cheap and easy to watch, so it is common for reactive dyeing of cotton, where typical dyeing temperatures run from about 40 °C to 80 °C depending on the reactive group. The fabric is usually stirred by hand with a glass rod at fixed intervals, or moved by the shaker. The weak points are evaporation from open beakers, which changes the liquor ratio, and uneven temperature in a bath that is not stirred. Covering the beakers and topping up with hot water to the original mark help.
Infrared and glycerine-bath beaker dyers
Most modern labs also have a closed-pot beaker dyeing machine. Sealed stainless steel pots, usually holding about 100–500 mL, are clamped onto a carrier that rotates through a heating zone. In infrared machines the pots are heated by infrared lamps. In glycerine-bath or glycol-bath machines the pots dip into a heated oil-like liquid that can be held well above the boiling point of water. Because the pots are sealed, they can reach about 130–140 °C, which makes these machines suitable for polyester with disperse dyes, as well as for reactive, acid and other classes at lower temperatures.
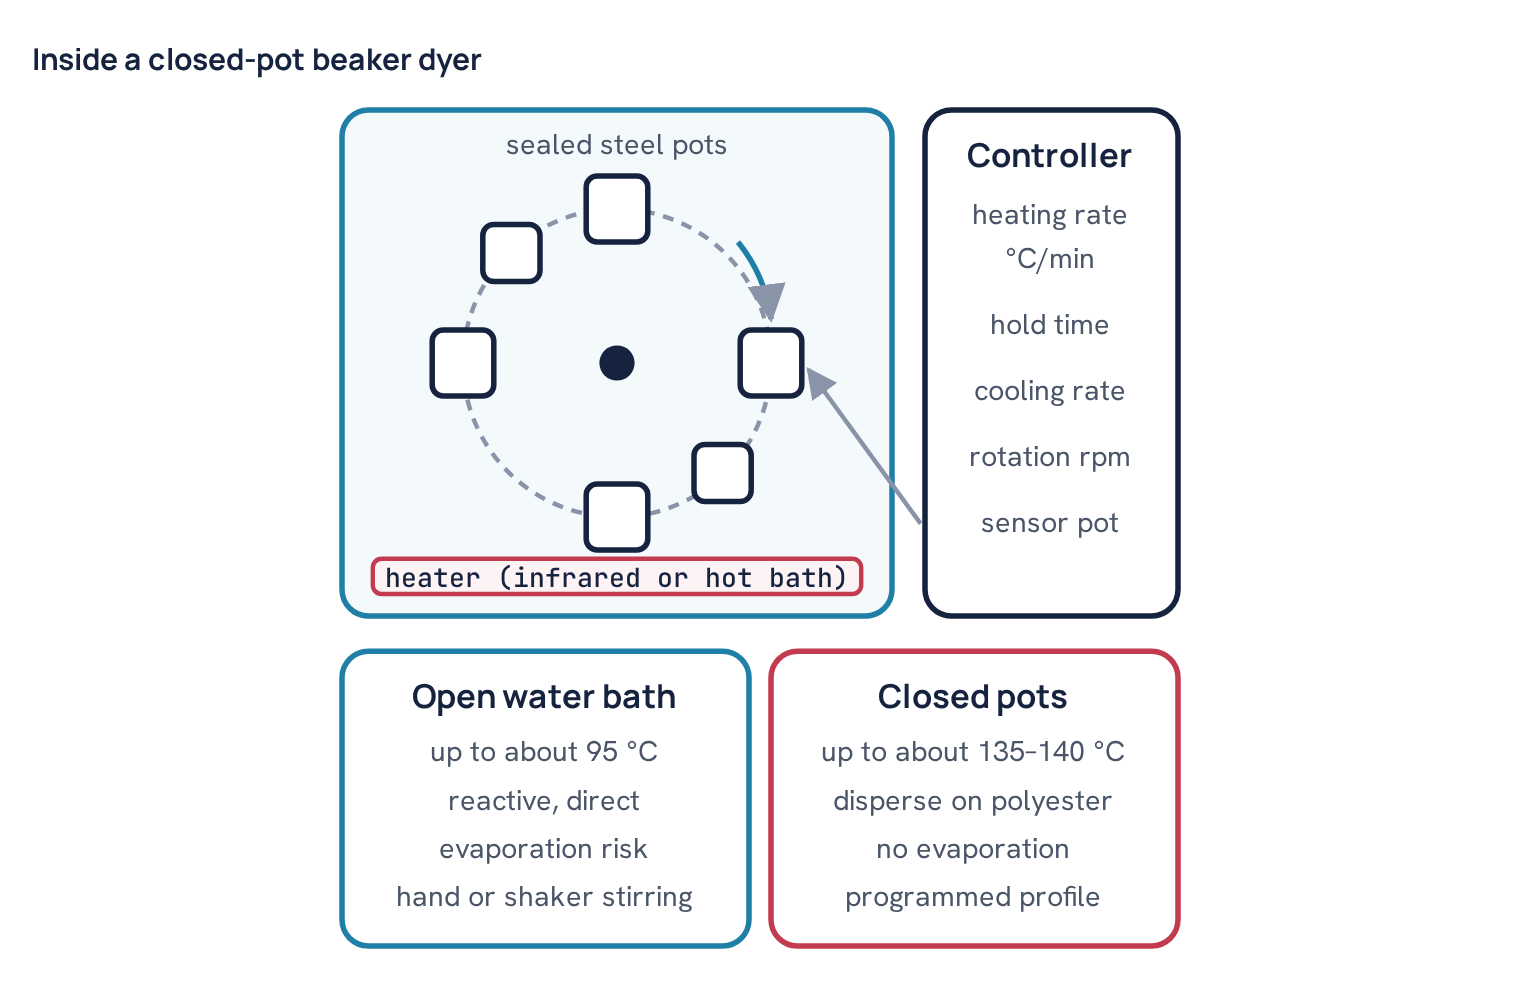
Two settings decide how well a closed-pot machine imitates bulk. The first is rotation. The pots turn end over end or around a wheel so that the liquor moves through the fabric, often at a speed adjustable somewhere in the range of about 10–60 rpm. Too slow, and the fabric sits still and dyes unevenly. Too fast for a small sample, and it twists into a tight rope. Many labs add a few steel balls or a perforated holder so the sample stays open. The second is heating rate control. A good controller lets you program the heating rate, hold time and cooling rate in the same steps as the bulk machine program.
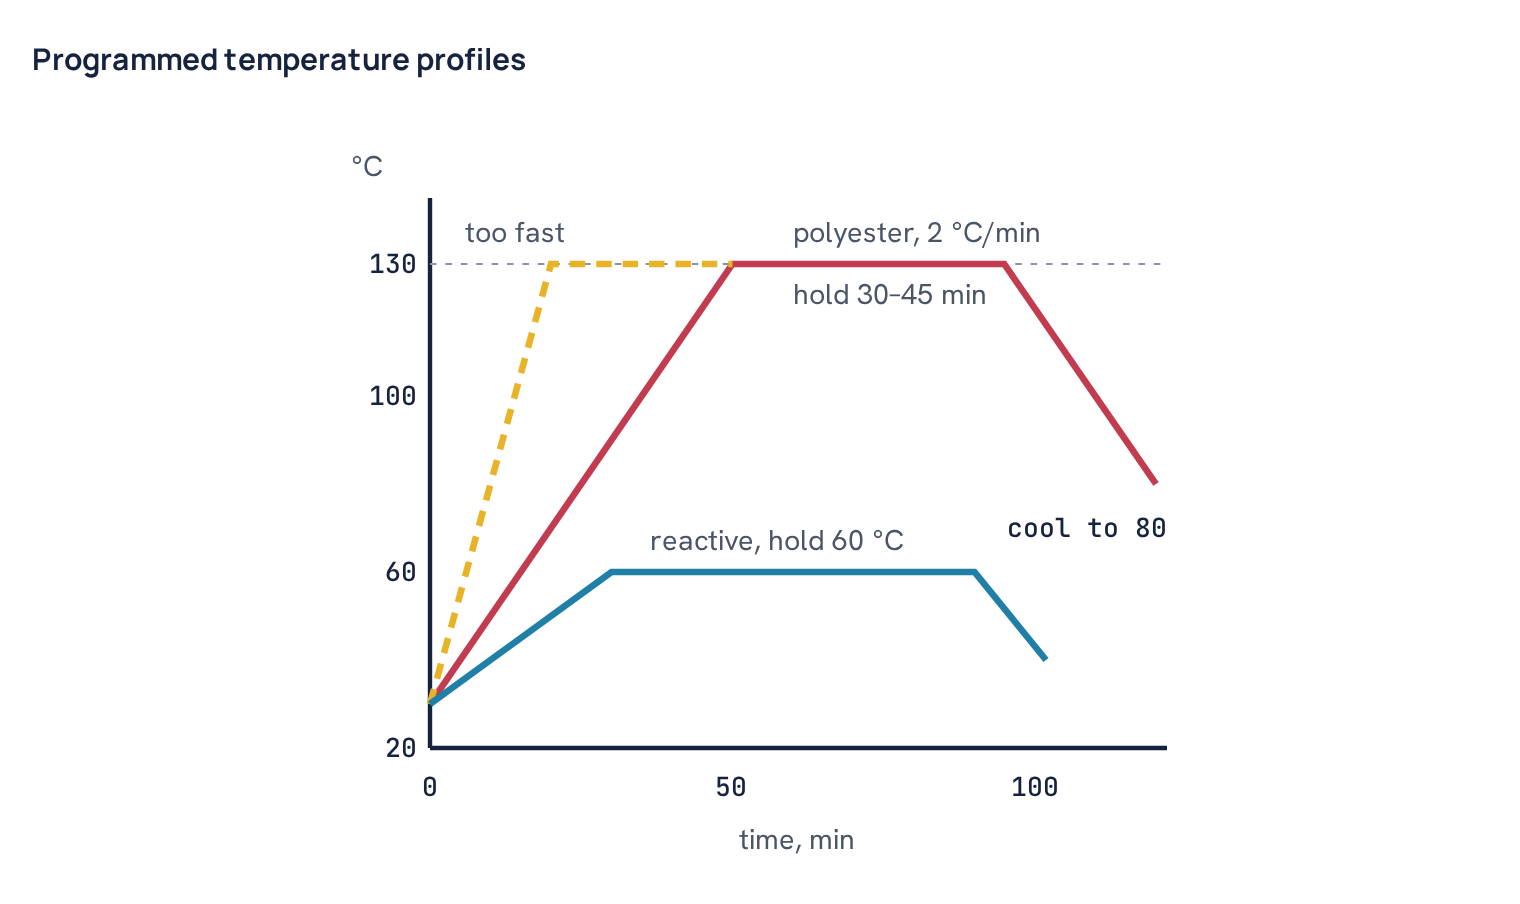
For polyester, a heating rate of about 1–2 °C per minute through the critical range, then 30–45 minutes at around 130 °C, is a common starting point, but the right values depend on the dyes, fabric and bulk machine. The reasons are explained in the article on how disperse dyes work on polyester. The point for the lab is simple: if the lab profile differs from the bulk profile, the lab dip is a recipe for a different process. About a quarter of batches in our dye house contain polyester and well over a third contain elastane, so the lab must be able to reproduce both high-temperature polyester profiles and the gentler limits that elastane needs.
Lab dips for body fabric and matching rib or collar should be dyed side by side in the same run. About 4 in 10 of our orders are body fabric plus a matching rib or collar, and the two constructions often take up dye differently. Dyeing them together in the same machine cycle shows the difference before bulk does.
Common mistake: Trusting the display temperature without checking it. The controller sensor may sit in one pot while the others run several degrees cooler or hotter. Verify periodically with a calibrated thermometer or a logging probe in a pot of water, at the temperatures you actually use.
Pad mangle, lab stenter and curing oven
Not every trial is an exhaust dyeing. Continuous dyeing, pad-batch and most finishing processes apply liquor by padding, and the lab needs small versions of that equipment.
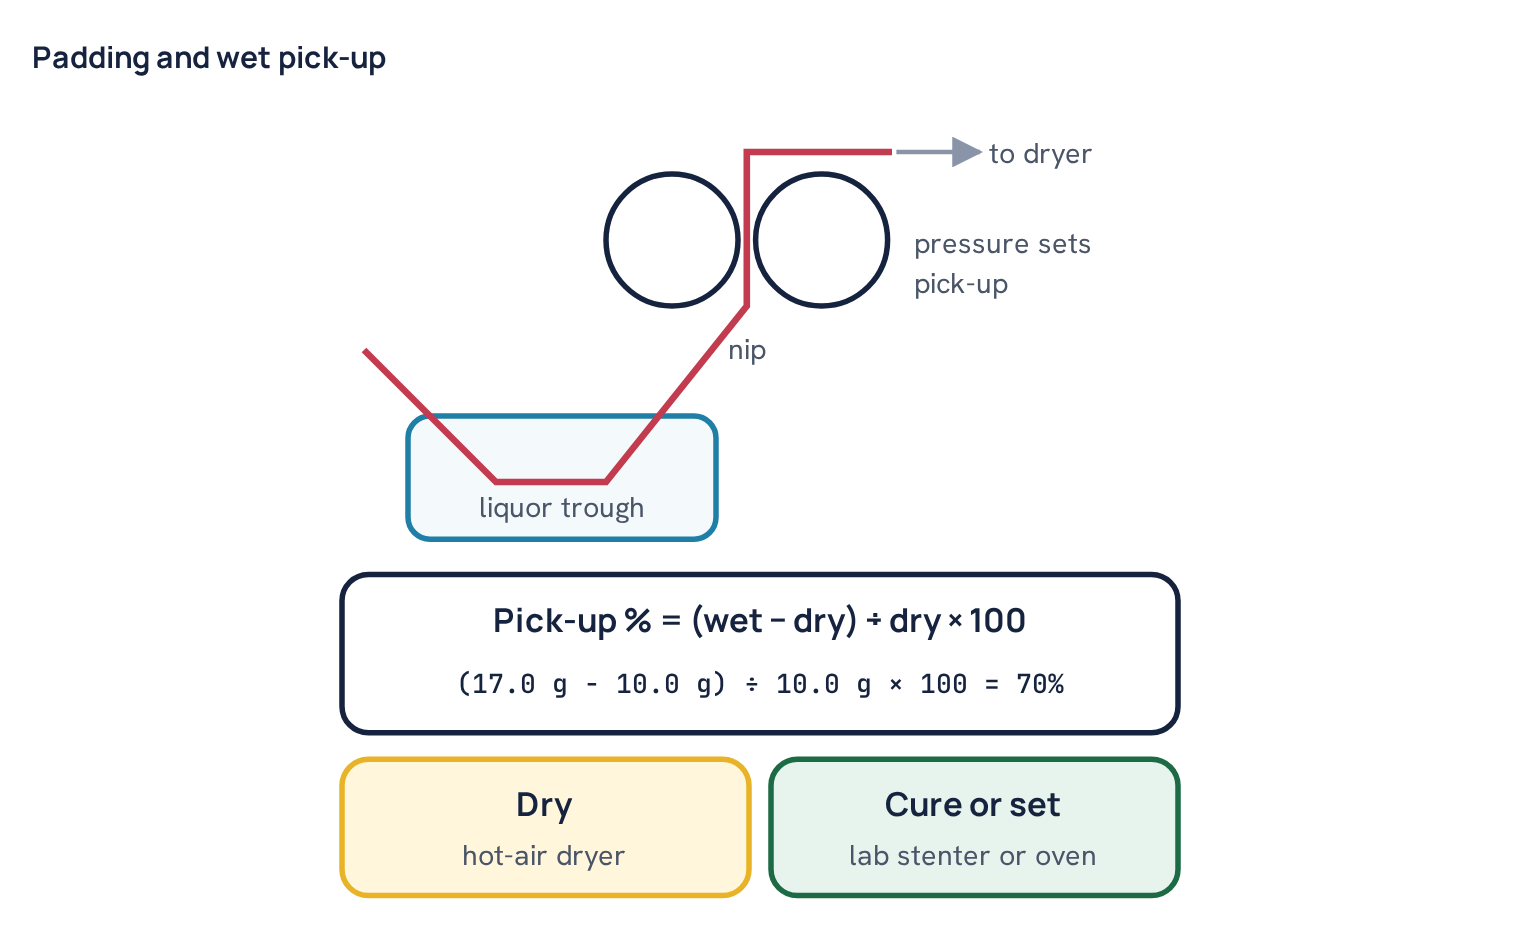
A lab pad mangle has two rubber-covered rollers pressed together by pneumatic or screw pressure, with a small trough for the liquor. The fabric passes through the liquor and then through the nip, which squeezes out the excess. The amount of liquor left on the fabric is the wet pick-up, expressed as a percentage of the dry fabric weight. Pick-up depends on nip pressure, roller speed, roller hardness and the fabric itself. Typical values for knitted cotton are around 60–90%, and each lab should measure its own.
A lab stenter holds the fabric on a pin frame at set dimensions while hot air dries, cures or heat-sets it. Temperature, dwell time and fan speed are adjustable. It is used for heat-setting trials on polyester and elastane blends, for curing finishes such as resins or some functional finishes, and for checking how a shade changes after finishing. Heat-setting of elastane blends is often done somewhere around 180–195 °C for under a minute, but the exact window depends on the fibre and must come from the fabric supplier’s or your own trials. A simple curing oven with accurate temperature control can replace the stenter for some jobs, though it does not hold the width.
Drying: hot-air dryer and iron
After dyeing and washing, the sample must be dried before it is judged, because wet fabric looks darker. A small hot-air dryer, a tumble dryer for samples, or a clean iron on a padded board are all used. Keep the drying temperature moderate and consistent. Some dyes change shade temporarily with heat, a behaviour called thermochromism, and a sample judged straight off a hot iron can look different ten minutes later. Let every sample cool and condition in normal room air before assessment, and dry the standard and the dip the same way when they are compared.
pH meter, conductivity and hardness
pH controls dye fixation, levelness and the behaviour of many auxiliaries, so the pH meter is in daily use: checking dyebath pH before and during dyeing, checking stock alkali or acid solutions and testing fabric pH after neutralisation. Fabric pH is tested on a water extract of the fabric, using the same meter.
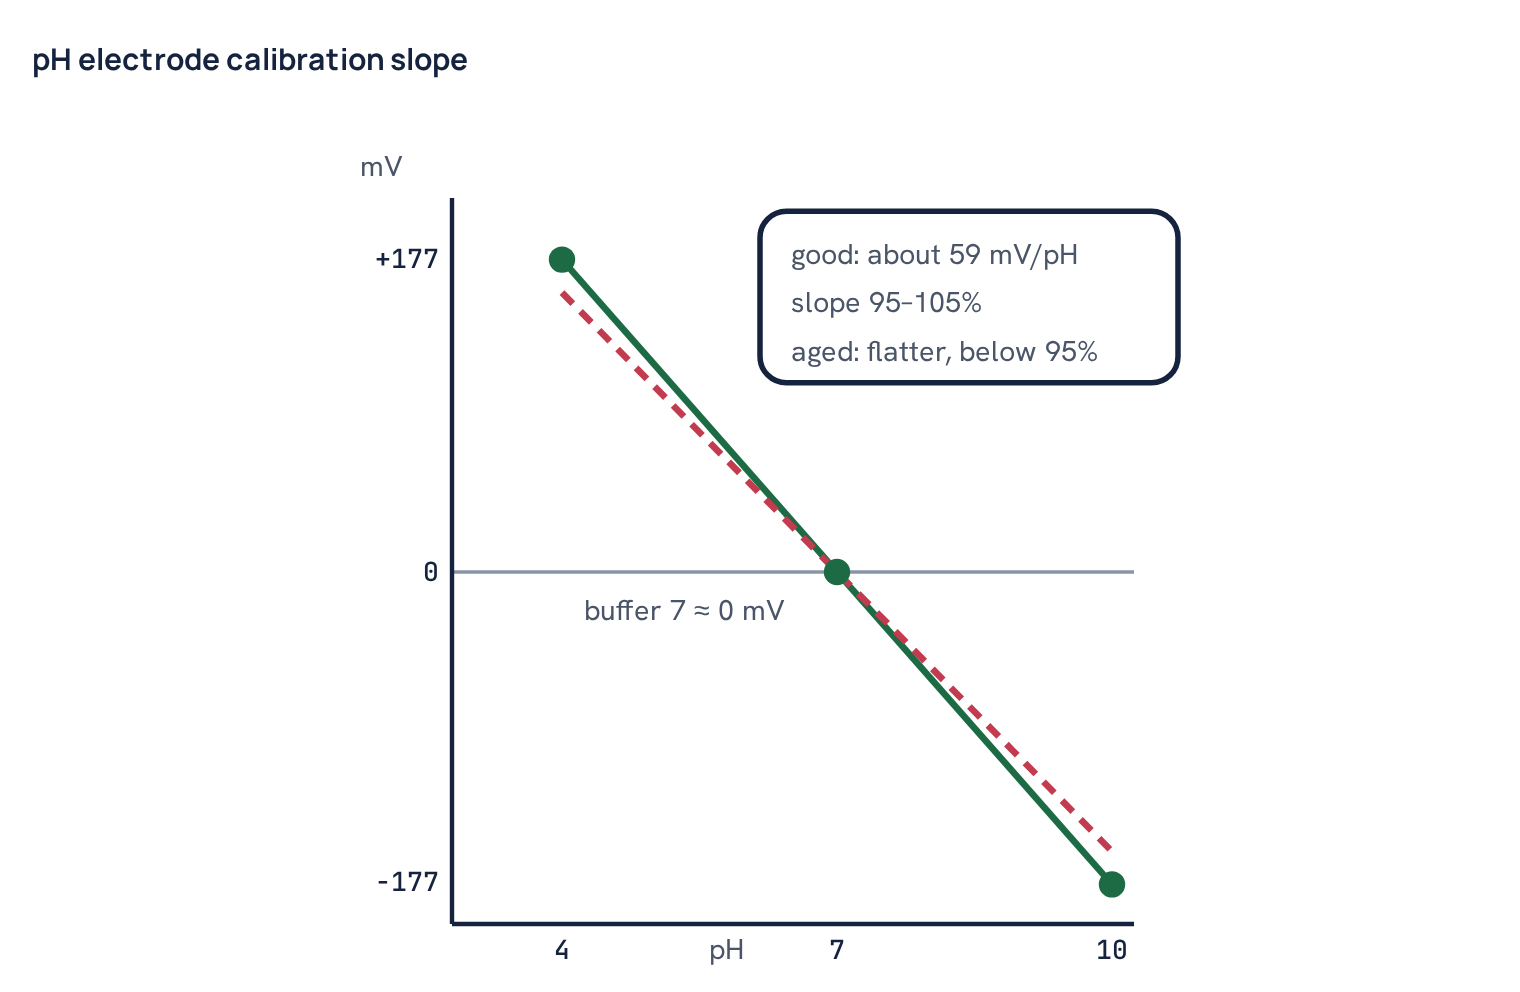
A pH electrode produces a voltage that changes with pH. At 25 °C an ideal electrode changes by about 59 mV per pH unit, and reads about 0 mV at pH 7. Real electrodes drift and age, so the meter must be calibrated with buffer solutions. Two-point calibration uses pH 7 and either pH 4 or pH 10, chosen to bracket the samples you measure. Three-point calibration uses all three. The meter reports the slope, the measured mV per pH as a percentage of the ideal. A slope of about 95–105% is generally acceptable. A slope that keeps falling below that range means the electrode needs cleaning or replacing.
Good electrode care is simple. Rinse with distilled water between samples and blot, do not rub, the glass bulb. Store the electrode in its storage solution, usually 3 M potassium chloride, never in distilled water, and never let it dry out. Use the meter’s temperature compensation or measure at a stated temperature, because both the electrode and the solution change with temperature. Replace buffers regularly, and never pour used buffer back into the bottle.
A conductivity meter gives a fast measure of dissolved salts in water, in µS/cm. It is useful for checking the incoming water and the soft water supply each day, and for spotting contamination. A hardness test kit, either a titration kit using EDTA with an indicator or test strips for quick checks, measures calcium and magnesium, usually reported as mg/L (ppm) as calcium carbonate. Why these numbers matter is explained in water quality in textile dyeing. In the lab the key rule is that lab water should match bulk water, or be soft water of known quality, and it should be checked rather than assumed.
Colour assessment: light cabinet, spectrophotometer and grey scales
The assessment zone turns a dyed sample into a decision. Three tools do the work.
- Light cabinet. A viewing booth with neutral grey interior and several standard light sources, usually daylight D65, a tri-band store fluorescent such as F11, incandescent A, and often UV. Samples are viewed side by side at a fixed angle. Changing the source reveals metamerism, where two samples match under one light and not under another. Lamps age and must be replaced according to their rated hours, not when they fail.
- Spectrophotometer. Measures reflectance across the visible spectrum and calculates colour values and colour differences. It supports, but does not replace, visual judgement. It must be calibrated with its white and black standards at the frequency the maker states, often every shift. The theory, including CIELAB and ΔE, is in colour measurement explained.
- Grey scales. Standard cards with pairs of grey patches rated from 5 (no difference) to 1 (large difference), with half-steps. One scale assesses change in colour and the other assesses staining of adjacent fabric. They are used for fastness ratings and quick shade comparisons. Keep them in their covers, away from light and dirt, and replace them when they become marked or faded.
How these tools fit into a lab-to-bulk routine is covered in shade matching from lab dip to bulk.
Lab washing and fastness testing basics
Most dye labs run at least basic fastness checks before a recipe goes to bulk. The main tool is a rotating wash-fastness tester: a heated water tank with a shaft carrying sealed stainless steel canisters. The dyed sample is sewn to a multifibre or adjacent fabric, placed in a canister with a measured volume of detergent solution and a set number of steel balls, and rotated at a fixed speed, often about 40 rpm, at a set temperature and time. Afterwards the change in shade and staining are rated with grey scales. The full method is in how to test colour fastness to washing.
Other common fastness tools are a rubbing tester for dry and wet rubbing, a perspiration tester with weights and glass or acrylic plates held in an oven, and sometimes a light fastness tester. Each needs its own standard cloths, reagents and regular checks, and the results are only as good as the conditioning and timing.
Safety equipment
A dye lab handles fine powders, hot liquids, strong alkalis, acids and reducing agents. Basic safety equipment is not optional.
- Fume hood or local extraction for weighing dusty dyes and handling volatile or irritating chemicals. Some reactive dyes are known respiratory sensitisers, so dust must not be breathed in.
- Gloves: nitrile for general handling, heat-resistant gloves for opening hot pots. Let closed pots cool below about 80 °C before opening, as the contents are under pressure above the boil.
- Eye protection: safety glasses at all times on the wet side, and goggles or a face shield for caustic soda, acids and hot liquor.
- Eye wash station and safety shower within a few seconds’ walk, checked regularly so the water is clean.
- Dust mask when weighing powders outside a hood, a lab coat and closed shoes.
- Safety data sheets for every chemical, a spill kit, and correct storage: sodium hydrosulphite kept dry and sealed because it can self-heat when damp, oxidisers separated from reducing agents, acids separated from alkalis.
Maintenance and calibration schedule
Equipment that is never checked slowly drifts, and the drift shows up as lab-to-bulk problems that nobody can explain. The table below is a typical starting schedule. Adjust it to your own equipment, the maker’s instructions and your customers’ requirements.
| Equipment | Daily or each use | Weekly or monthly | Periodic or external |
|---|---|---|---|
| Analytical and top-pan balances | Level check, check weight, clean pan | Multi-point check across the range | Calibration by accredited service, at least yearly |
| Pipettes and micropipettes | Visual check, clean | Gravimetric check with water | Recalibrate or replace damaged items |
| Automatic dispenser | Prime lines, check for bubbles | Gravimetric accuracy check | Service and nozzle replacement |
| Beaker dyer and water bath | Clean pots, check seals | Temperature check with probe | Sensor calibration, heater and motor service |
| pH meter | Two- or three-point calibration | Clean electrode, replace buffers | Replace electrode when slope fails |
| Conductivity meter | Check with standard solution | Clean cell | Replace cell when unstable |
| Spectrophotometer | White and black calibration | Check with a control tile | Manufacturer service and certification |
| Light cabinet | Clean interior | Check lamp hours | Replace lamps at rated hours |
| Pad mangle | Clean rollers and trough | Pick-up check on standard fabric | Roller hardness and pressure check |
| Lab stenter or oven | Clean lint | Temperature check with probe | Thermocouple calibration |
| Wash-fastness tester | Check water level and temperature | Clean canisters and balls | Speed and temperature verification |
| Grey scales | Keep covered | Inspect for marks | Replace when worn or faded |
| Eye wash and shower | Visual check | Flush and test | Inspection as per safety rules |
Record keeping
A lab that cannot show its records cannot prove its results. Good records also make it possible to find the cause when a shade goes wrong in bulk. At a minimum, keep:
- Lab dip register. Job number, buyer, colour, fabric, recipe, process profile, date, technician and result for every dip and every correction.
- Recipe cards linked to the dye and chemical lot numbers used, so a change in dye lot can be traced.
- Stock solution log. Dye, concentration, date and time made, made by, and when discarded.
- Calibration logs for balances, pH meter, conductivity meter, spectrophotometer, thermometers and probes, with the values found and actions taken.
- Maintenance log for every machine, including repairs and parts replaced.
- Water check log with daily hardness, conductivity and pH of the water used in the lab.
- Fastness test reports with method, conditions and grey scale ratings.
Paper registers work, but a simple spreadsheet or lab software makes searching much easier. Whatever the system, write the entry at the time the work is done, not at the end of the shift from memory. A record written afterwards is a guess with a date on it.
Common mistake: Recording only the final approved recipe and throwing away the corrections. The corrections show how the dyes behave on that fabric, which is exactly what you need when the same colour returns on a new lot or a different machine.
With the right equipment, checked on a schedule and used in a fixed order, the lab becomes a reliable model of the dye house. The next steps are the practical procedures that use this equipment: preparing stock solutions and following a full reactive lab dip from weighing to assessment, as in the step-by-step reactive lab dip on cotton knit.
Questions
What balance does a dye lab need?
Two: an analytical balance reading to 0.0001 g for weighing dye powder into stock solutions, and a top-pan balance reading to 0.01 g for fabric and chemicals. Both need daily checks with certified weights.
Why not weigh dye directly for a lab dip?
The amounts are too small. A 5 g dip at 0.05% needs only 0.0025 g of dye, which a 0.01 g balance cannot weigh and even an analytical balance weighs with several percent error, so labs dissolve a larger weighed amount into a stock solution and pipette it.
What is the difference between a water bath and a closed-pot beaker dyer?
An open water bath works up to about 95 °C and suits reactive dyeing of cotton. Sealed steel pots in an infrared or glycerine-bath machine reach about 130–140 °C, so they can dye polyester with disperse dyes, with programmed heating and cooling rates.
How often should a pH meter be calibrated?
In most dye labs, every day before use, with two or three buffers that bracket the samples. Check the slope; around 95–105% is generally acceptable, and a falling slope means the electrode needs cleaning or replacing.
How do I measure wet pick-up on a pad mangle?
Weigh the dry sample, pad it, and weigh it again straight away. Pick-up % is (wet − dry) ÷ dry × 100, so 10.0 g dry and 17.0 g wet gives 70%.

Textile engineer with 14+ years in dyeing and fabric development. He writes every guide on Dyeing Solution from real production work. Full profile