Why labs measure dyes by volume, how to choose and prepare 0.1%, 0.5% and 1% stocks, how long they last by dye class, and how to pipette and check them so lab dips repeat.
At a glance
±1%Pipetting error vs ~50% weighing 2 mg
1–10 g/LCommon dye stocks (0.1–1% w/v)
1–20 mLComfortable volume per dye
Same dayTypical reactive stock life
Almost every lab dip starts with a pipette, not a balance. The dyes go into the beaker as measured volumes of stock solution, and the salt, soda ash and acid often do too. If the stock is wrong, or the pipetting is careless, the lab dip is wrong before the machine even starts. Then the recipe goes to bulk, the shade misses, and people blame the dye, the water or the machine. This article explains how dye and chemical stock solutions work, how to choose the right strength, how to make them, how long they last, and how to pipette them so that the numbers on the recipe card are the numbers in the beaker.
Why the lab works with stock solutions
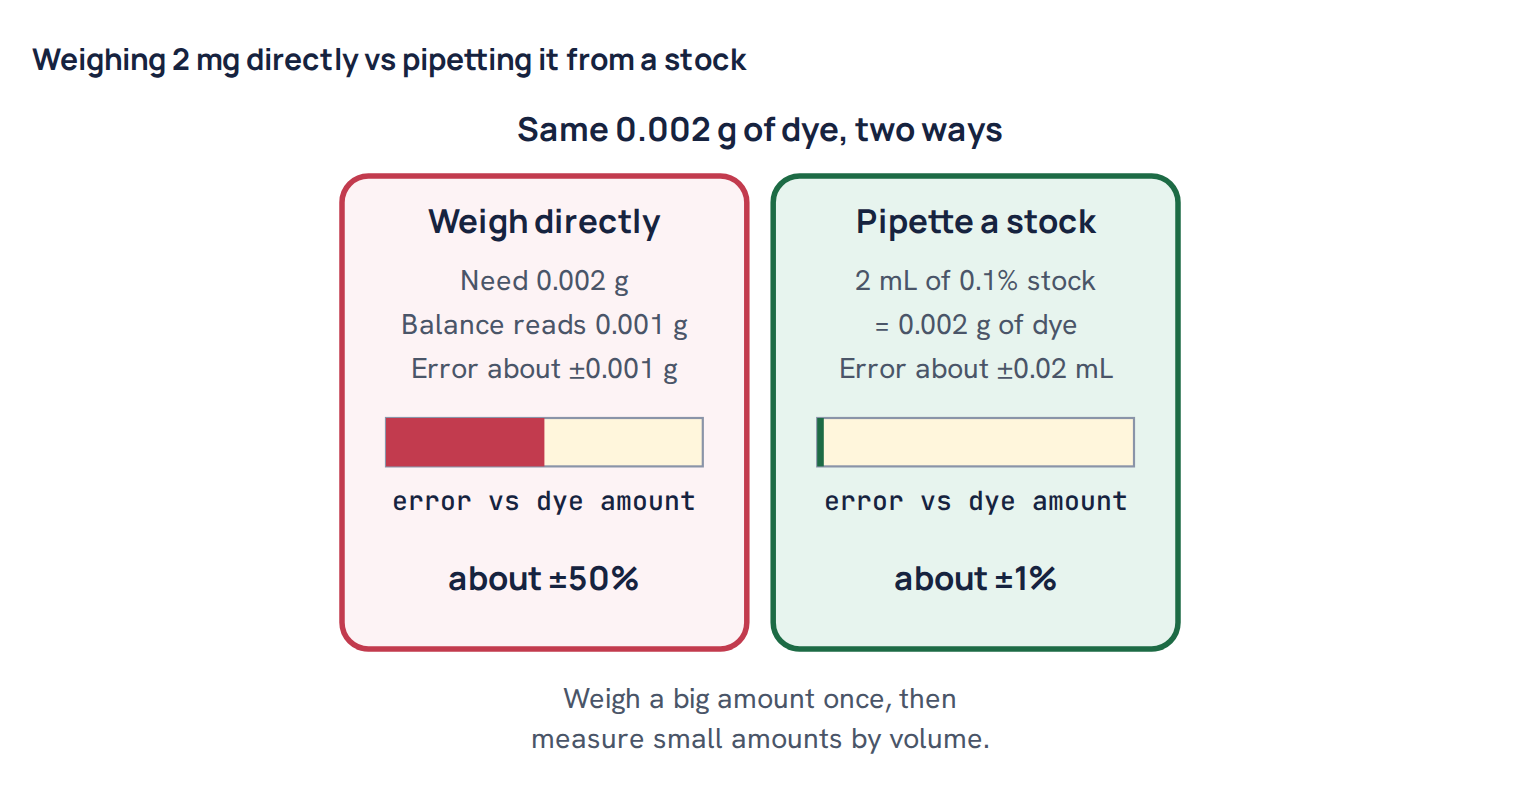
A lab dip sample is small. Most labs dye 5 g or 10 g of fabric per beaker. Bulk recipes, on the other hand, often contain very small amounts of shading dye. A pale grey may need 0.04% of a blue dye. On a 5 g sample that is 0.04 × 5 ÷ 100 = 0.002 g, which is two milligrams.
A normal top-pan lab balance reads to 0.001 g. That means the reading of 0.002 g could really be anything from about 0.0015 g to 0.0025 g, and even small air currents or static on the weighing paper move the last digit. The possible error is around half of the whole amount. Even a four-place analytical balance struggles with powder this small, because some of it sticks to the spatula and the paper.
A stock solution solves this. You weigh a larger, easy amount of dye once (for example 0.250 g), dissolve it in a known volume of water (for example 250 mL), and then measure the dye by volume. Now the same 0.002 g of dye is simply 2 mL of solution. A good 2 mL or 5 mL pipette delivers 2 mL with an error of roughly ±0.01 to ±0.02 mL, which is about ±1% or better. You have turned a 50% problem into a 1% problem.
Stock solutions also make the work faster. A technician can set up twenty beakers in the time it would take to weigh five, and every beaker uses the same dissolved dye, so there is no batch-to-batch variation from weighing.
What a “0.5% stock” actually means
In dye labs, stock strength is normally written as percent weight per volume (% w/v). That means grams of dye per 100 mL of solution. The three common strengths are:
- 0.1% w/v = 0.1 g per 100 mL = 1 g/L = 1 mg per mL
- 0.5% w/v = 0.5 g per 100 mL = 5 g/L = 5 mg per mL
- 1% w/v = 1 g per 100 mL = 10 g/L = 10 mg per mL
The “mg per mL” form is the easiest to think with. If a 0.5% stock holds 5 mg in every mL, then 7 mL holds 35 mg. Some labs also keep a 2% stock (20 g/L) for very dark shades such as black and navy, provided the dye is soluble enough at that strength.
Notice “per 100 mL of solution”, not “added to 100 mL of water”. You dissolve the dye and then make the total volume up to the mark. Adding 1 g of dye to 100 mL of water gives slightly more than 100 mL and a slightly weaker solution. That difference is small but it is a systematic error, and it is the kind of error that makes lab and bulk disagree for no obvious reason.
The formula: how many mL of stock
Dye amounts in a recipe are given as shade percent on the weight of fabric (owf). The full explanation of shade percent and liquor ratio is in our article on recipe calculation. For the lab, one formula covers almost everything:
mL of stock = (shade % × sample weight in g) ÷ stock concentration %
Why it works: shade % × sample weight ÷ 100 gives the grams of dye needed. Stock % ÷ 100 gives the grams of dye in each mL. Divide one by the other and the two “÷ 100” cancel, which leaves the simple form above.
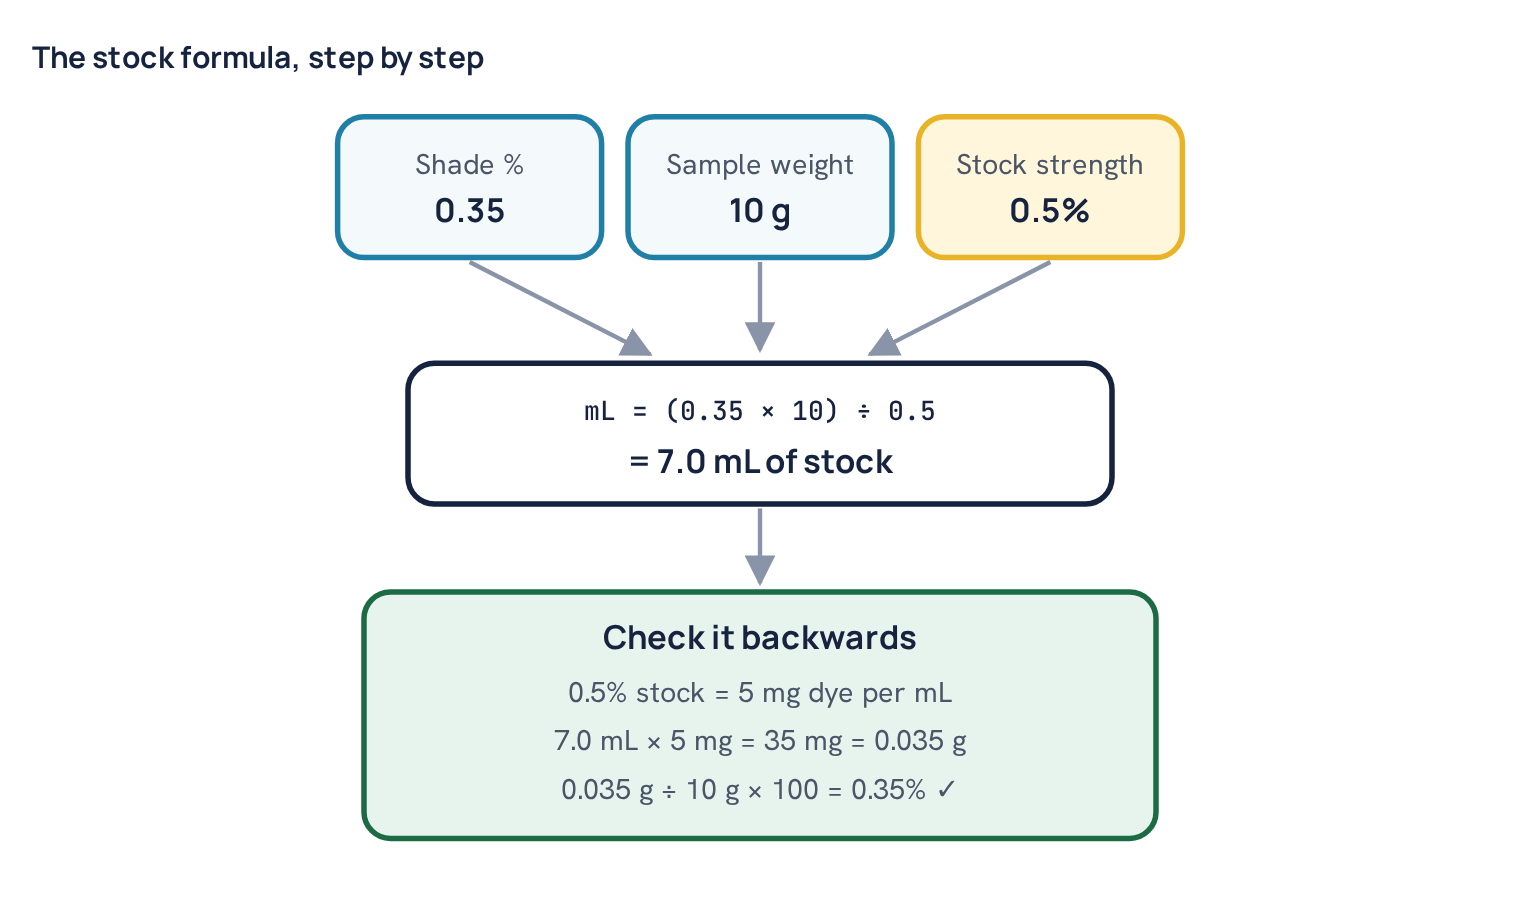
Worked example. A three-dye recipe on a 10 g cotton sample: yellow 1.20%, red 0.35%, blue 0.08%. The yellow is kept as a 1% stock, the red as 0.5% and the blue as 0.1%. Yellow: (1.20 × 10) ÷ 1 = 12.0 mL. Red: (0.35 × 10) ÷ 0.5 = 7.0 mL. Blue: (0.08 × 10) ÷ 0.1 = 8.0 mL. Total dye solution = 27.0 mL. At a liquor ratio of 1:8 the bath is 80 mL, so 27 mL of dye solution fits easily with room left for the chemicals and water.
Choosing the stock strength by shade depth
The formula works with any stock, but some strengths are much better than others for a given shade. The rule is simple: choose the stock so that the volume you pipette is neither too small to measure accurately nor too big to fit in the bath.
- Too small: below about 0.5 mL, the error of even a good pipette becomes a large share of the volume. Drops hanging on the tip are around 0.03 to 0.05 mL each, which is up to 10% of 0.5 mL.
- Too big: if the dye stocks alone add up to more than about half the bath volume, there is no room for the salt and alkali solutions, and the liquor ratio drifts.
- Comfortable zone: roughly 1 to 20 mL per dye on a 5 g or 10 g sample.
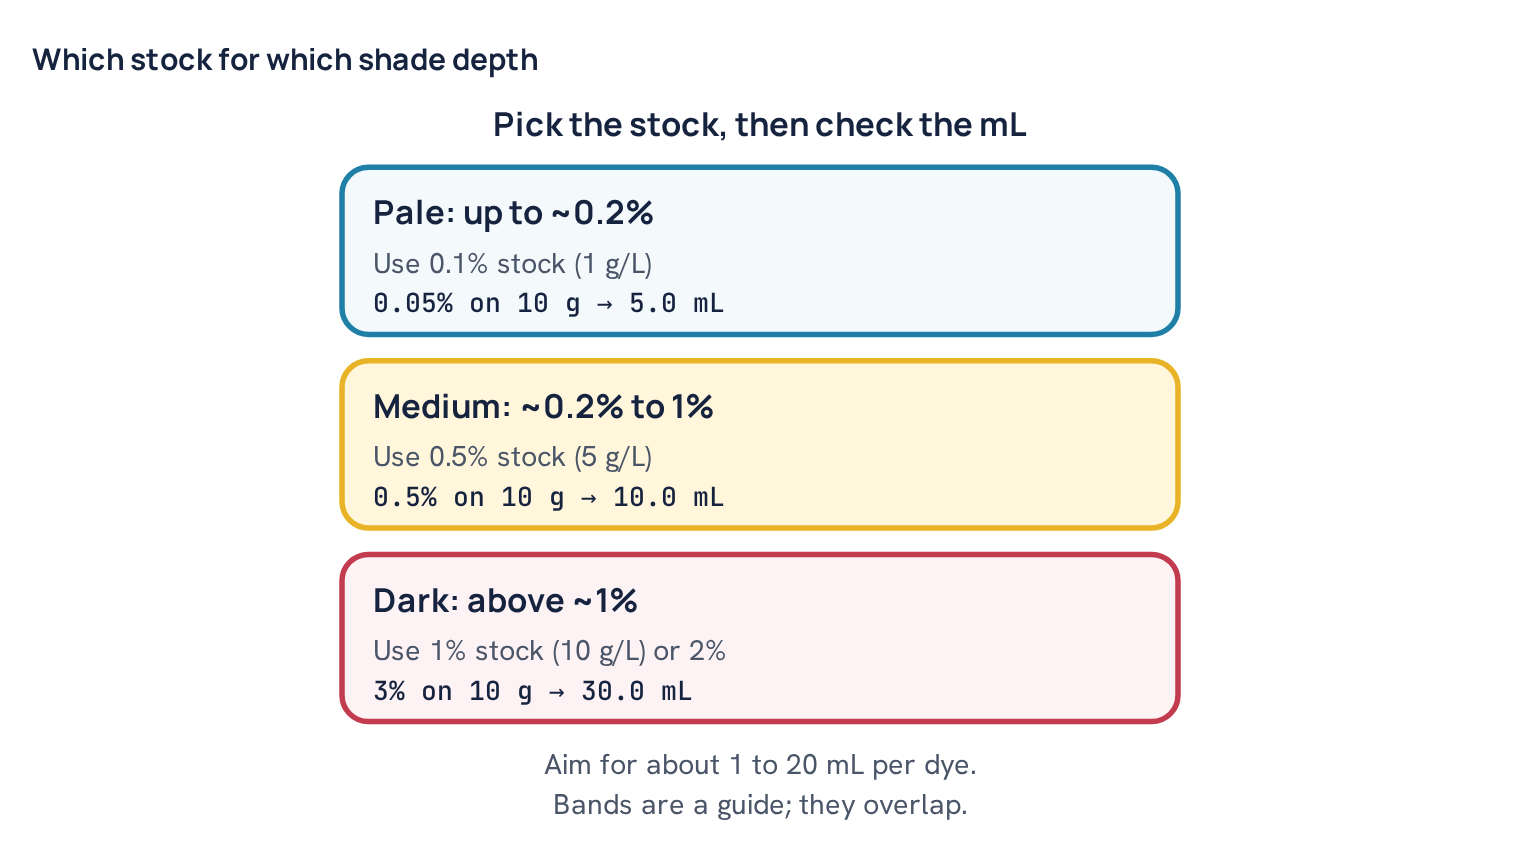
The table below shows the volumes for common shades. Cells marked “too small” are below about 0.5 mL and cells marked “too big” would take up most or all of a 1:10 bath (50 mL for 5 g, 100 mL for 10 g). Use the neighbouring column instead.
| Shade % | 5 g at 0.1% | 5 g at 0.5% | 5 g at 1% | 10 g at 0.1% | 10 g at 0.5% | 10 g at 1% |
|---|---|---|---|---|---|---|
| 0.01 | 0.5 mL | too small (0.1) | too small (0.05) | 1.0 mL | too small (0.2) | too small (0.1) |
| 0.05 | 2.5 mL | 0.5 mL | too small (0.25) | 5.0 mL | 1.0 mL | 0.5 mL |
| 0.1 | 5.0 mL | 1.0 mL | 0.5 mL | 10.0 mL | 2.0 mL | 1.0 mL |
| 0.25 | 12.5 mL | 2.5 mL | 1.25 mL | 25.0 mL | 5.0 mL | 2.5 mL |
| 0.5 | 25.0 mL | 5.0 mL | 2.5 mL | too big (50) | 10.0 mL | 5.0 mL |
| 1.0 | too big (50) | 10.0 mL | 5.0 mL | too big (100) | 20.0 mL | 10.0 mL |
| 2.0 | too big (100) | 20.0 mL | 10.0 mL | too big (200) | 40.0 mL | 20.0 mL |
| 4.0 | too big (200) | 40.0 mL | 20.0 mL | too big (400) | 80.0 mL | 40.0 mL |
For dark three-dye recipes such as navy or black on a 10 g sample, the total can reach 50 to 70 mL even from 1% stocks. In that case use a 2% stock for the main dye, or dye a 5 g sample at a slightly longer liquor ratio. Whatever you choose, keep the same stock strengths for the lab dip and any later corrections, so the technician is not switching columns in the middle of a shade.
Common mistake: using a 1% stock for a 0.02% shading dye “because it is already on the bench”. On a 5 g sample that is 0.1 mL, about two drops. One extra drop or one drop left on the tip changes the shading dye by 30 to 50%, and the shade swings from greenish to reddish between repeats. Make or keep a 0.1% stock of every shading dye you use often.
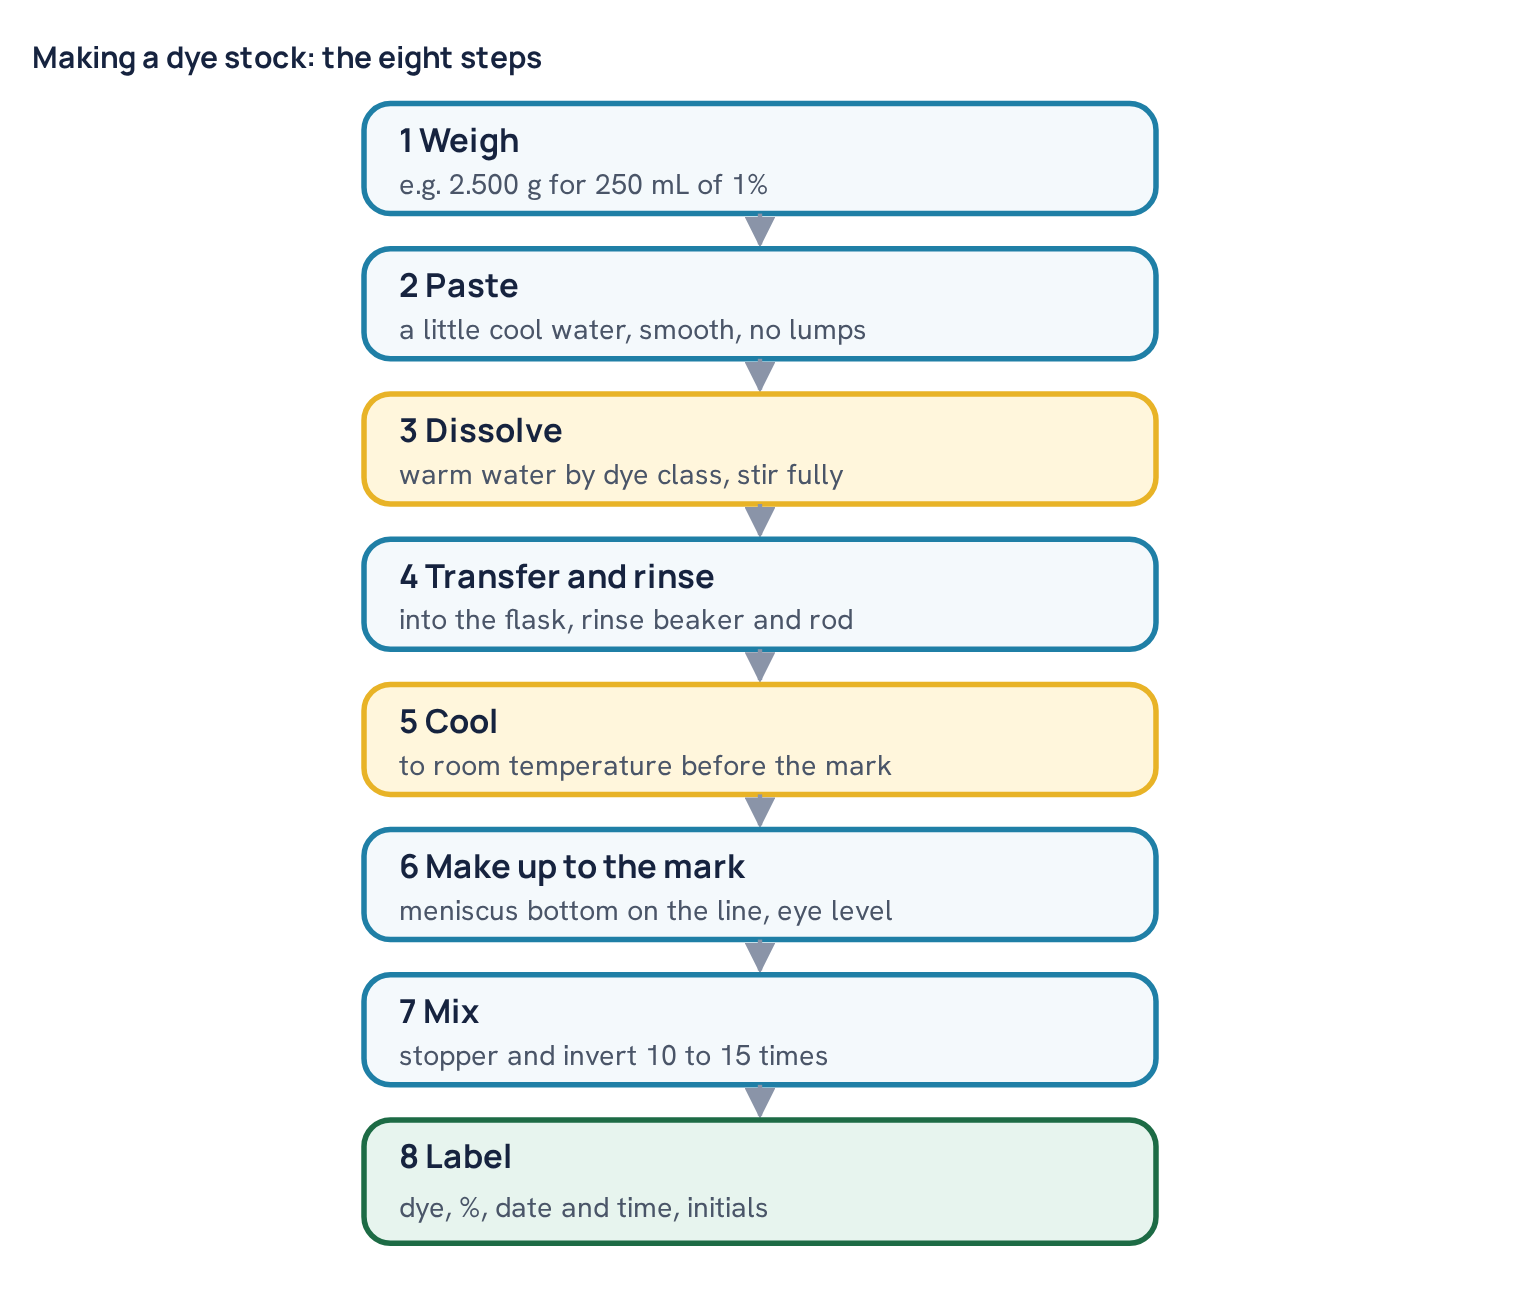
Preparing a dye stock correctly
A stock is only as good as its preparation. The aim is a solution (or, for disperse dyes, a fine dispersion) where every mL contains exactly the stated amount of dye, with nothing undissolved at the bottom.
- Weigh. Weigh the dye on a clean, dry watch glass or weighing boat to 0.001 g. For 250 mL of a 1% stock you need 2.500 g; for a 0.5% stock 1.250 g; for 0.1%, 0.250 g. Weighing amounts of 0.25 g or more keeps the weighing error well below 1%.
- Paste. Transfer the powder to a clean beaker and add a few mL of cold or lukewarm water. Stir it into a smooth paste with a glass rod, crushing lumps. Pasting first wets every particle; if you pour a lot of hot water onto dry powder, the outside of each lump gels and the inside stays dry.
- Dissolve. Add warm water (temperature by dye class, see the table) in portions while stirring, until the dye is fully dissolved. Hold the beaker up to the light; there should be no specks, streaks or sediment.
- Transfer. Pour the solution into a volumetric flask of the right size through a small funnel. Rinse the beaker, rod and funnel two or three times with small amounts of water and add the rinses to the flask. Dye left on the rod is dye missing from the stock.
- Cool. Let the flask come to room temperature, close to 20 to 25 °C. Volumetric glass is calibrated at a set temperature, usually 20 °C.
- Make up to the mark. Add water slowly, using a wash bottle or dropper at the end, until the bottom of the meniscus sits on the line at eye level.
- Mix. Stopper and invert the flask 10 to 15 times. Without mixing, the top layer you added last is weaker than the bottom.
- Label. Transfer to a clean, dry storage bottle and label it with the dye name, concentration, date and time of preparation, and the preparer’s initials.
Dissolving temperature by dye class
Each dye class dissolves best in a different temperature range. The values below are typical starting points; individual dyes differ, so always check the supplier’s data sheet, and see our guide to testing dye strength and solubility if a dye is hard to dissolve.
| Dye class | Typical water temperature | Notes |
|---|---|---|
| Reactive | About 40–60 °C | Neutral water only. No soda ash, no caustic. Some high-solubility dyes dissolve in cold water. |
| Disperse | About 40–50 °C | Forms a dispersion, not a true solution. Do not boil; it can cause aggregation. |
| Acid | About 70–90 °C | Some milling and metal-complex types need near-boiling water. |
| Direct | About 70–90 °C | Most dissolve well hot; a few need extra stirring time. |
Common mistake: filling the flask to the mark while the solution is still hot, then storing it. As it cools the volume shrinks, so the stock ends up slightly stronger than labelled. From 50 °C down to 20 °C water contracts by roughly 1%, enough to shift a pale shade visibly over a series of lab dips.
Stability and shelf life by dye class
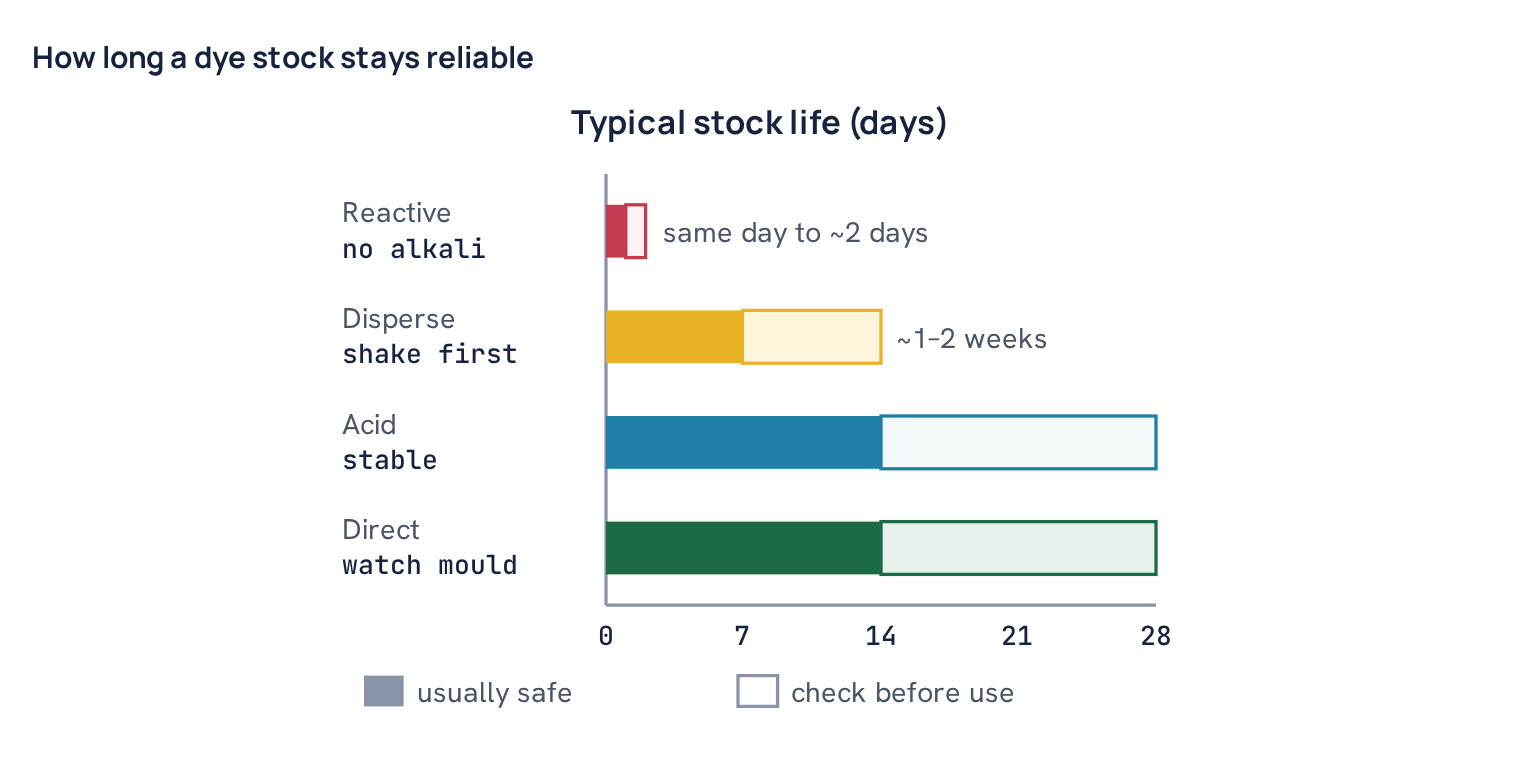
A stock does not stay the same forever. What changes depends on the dye chemistry. Shelf lives below are typical ranges reported by labs and suppliers; they vary with the dye, the water, the storage temperature and light, so your own lab should confirm them by comparing an old stock against a freshly made one.
Reactive dyes: prepare fresh, never with alkali
A reactive dye has a reactive group designed to form a covalent bond with cellulose. The same group can also react with water. This side reaction is called hydrolysis, and a hydrolysed dye molecule can no longer fix to the fibre. It still colours the bath, but it washes off in soaping. The chemistry is covered in how reactive dyes work.
Hydrolysis is fast under alkaline conditions and at high temperature, and slow, but not zero, in neutral water at room temperature. So a neutral reactive stock loses a little fixable dye every hour. Most labs use reactive stocks the same day, or within one to two days if kept cool, closed and out of sunlight. Highly reactive types (for example many vinyl sulphone and bifunctional dyes) are more sensitive than monochlorotriazine types. Never dissolve a reactive dye with soda ash or caustic “to help it dissolve”, and never mix dye and alkali in the same stock. That stock may be largely hydrolysed within hours.
Disperse dyes: shake, then pipette
Disperse dyes are almost insoluble in water. The “stock” is a fine dispersion of dye particles held apart by dispersing agent. Left standing, particles settle, so the top of the bottle is weaker than the bottom. Always shake or stir the bottle well right before pipetting, and pipette promptly. A magnetic stirrer running at low speed is ideal. Many labs keep disperse stocks for about one to two weeks; throw away any stock that shows sediment you cannot re-disperse, or specks on a filter paper spot (see below).
Acid and direct dyes: more stable, but not forever
Acid and direct dye stocks have no reactive group to hydrolyse, so they are much more stable. Two to four weeks is common if the bottle is kept closed, cool and dark. Watch for three things: evaporation (the stock becomes stronger), slow crystallisation of less soluble dyes in cold weather (the stock becomes weaker), and mould growth in neutral solutions kept a long time. Any cloudiness, crystals or floating growth means make a new stock.
Chemical stock solutions
Salt, alkali and acid are also easier to add as solutions. They are usually kept in g/L, because the recipe gives them in g/L of bath. For what each chemical does, see dyeing auxiliaries explained.
| Chemical | Typical stock | Notes |
|---|---|---|
| Glauber’s salt or common salt | 200 g/L | Well below the solubility limit at room temperature. Stable for weeks. |
| Soda ash | 100 g/L | Dissolve in warm water. Keep closed; it slowly picks up carbon dioxide from air. |
| Caustic soda | 10–50 g/L | Make from a standardised stronger solution. Check strength by titration if kept long. |
| Acetic acid | 10% v/v or 10 g/L | State clearly whether the label is v/v or w/v. |
| Sodium hydrosulphite | Do not keep a stock | Decomposes in solution. Weigh fresh each time. |
The formula for chemicals is: mL of stock = (g/L in recipe × bath volume in mL) ÷ stock g/L. The bath volume is the sample weight × liquor ratio.
Worked example. Continue the 10 g reactive sample at 1:8 (80 mL bath). The recipe asks for 50 g/L salt and 15 g/L soda ash. Salt needed = 50 × 80 ÷ 1000 = 4.0 g; from a 200 g/L stock that is 4.0 ÷ 200 × 1000 = 20.0 mL. Soda ash needed = 15 × 80 ÷ 1000 = 1.2 g; from a 100 g/L stock that is 12.0 mL. Dye solutions from the earlier example = 27.0 mL. Water to add = 80 − 27 − 20 − 12 = 21.0 mL. The soda ash goes in later in the process, so add the 21 mL water at the start and keep the 12 mL soda ash ready; the bath reaches exactly 80 mL once everything is in.
Dense solutions behave a little differently in a pipette. Strong salt solutions are more viscous and drain more slowly, so wait the full drain time before touching off the tip. This matters even more for auto-dispensers, as explained below.
Pipetting technique
A perfect stock is wasted if the pipetting is loose. Most lab dip repeat failures that are blamed on “the dye” come down to pipetting.
Use the right pipette size
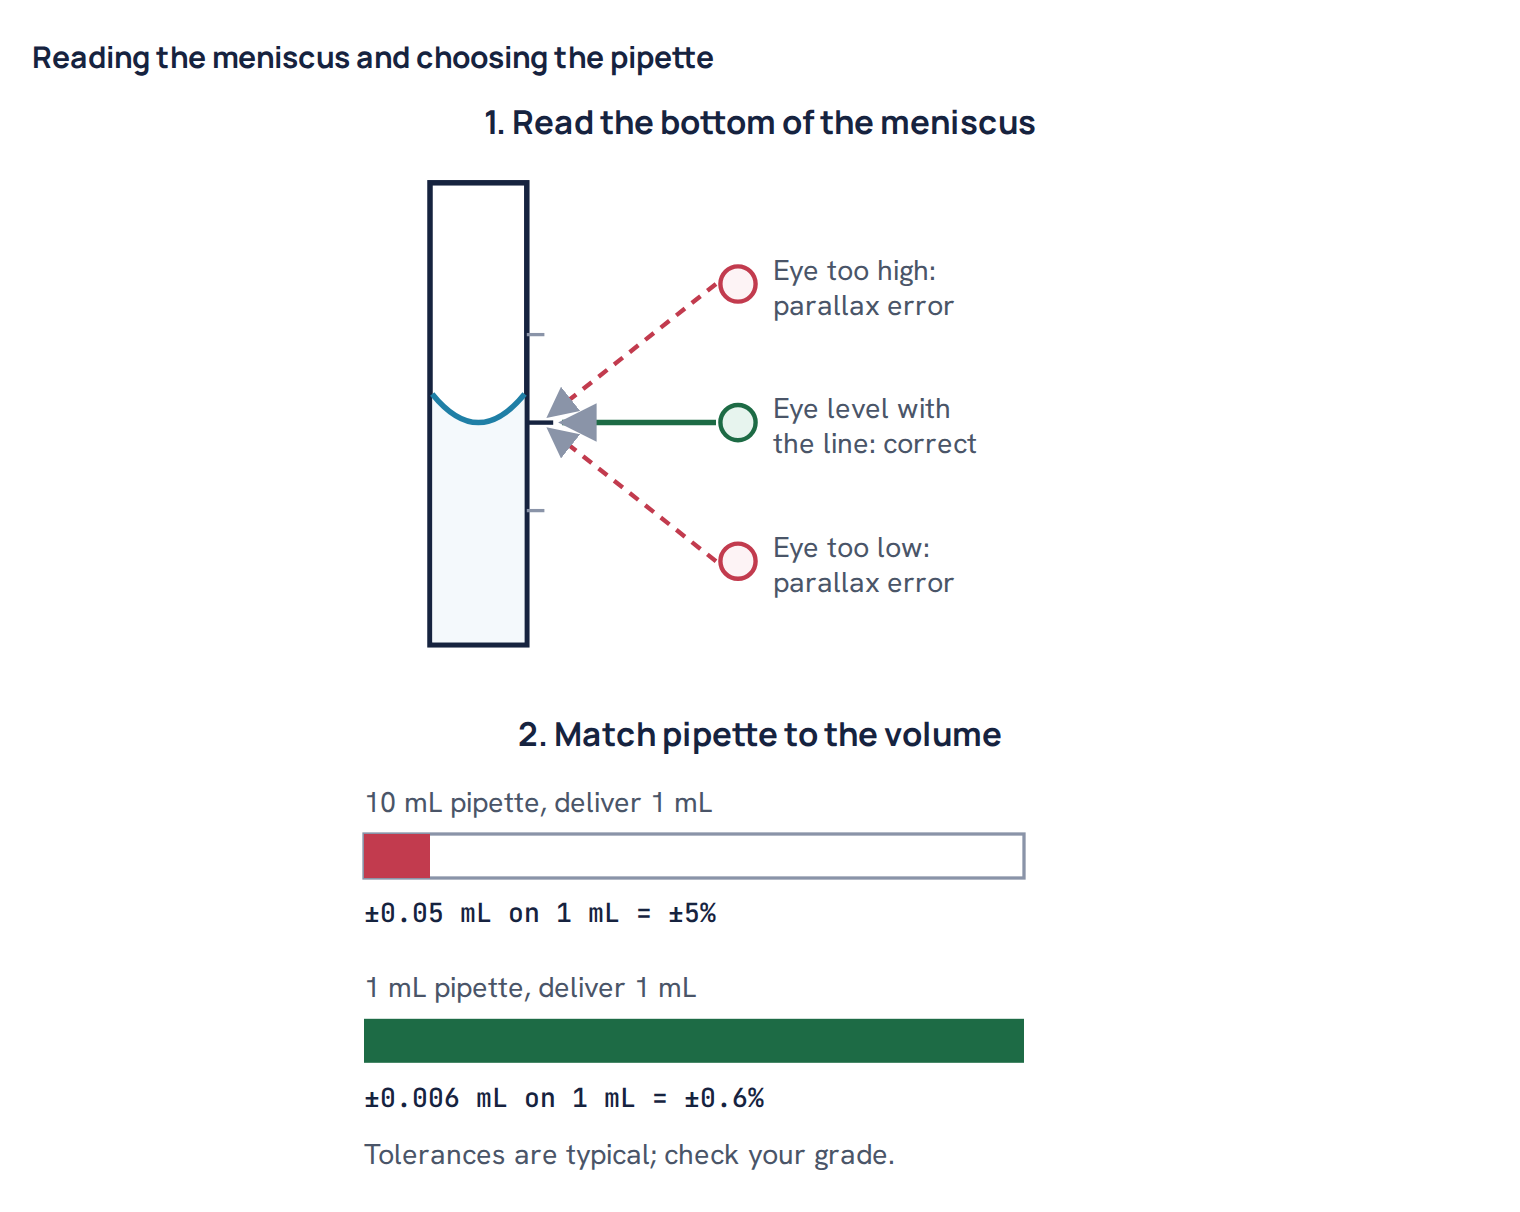
Every pipette has a tolerance in mL, not in percent. A typical good-quality 10 mL graduated pipette has a tolerance around ±0.05 mL; a 1 mL graduated pipette around ±0.006 mL. Values vary by grade and maker. Delivering 1 mL from the 10 mL pipette risks ±5%; from the 1 mL pipette, about ±0.6%. The rule: choose the smallest pipette that delivers the volume in one go, and avoid using less than about one fifth of a pipette’s capacity.
Good habits at the bench
- Pour, do not dip. Pour a little stock into a small clean beaker and pipette from that. Never put a pipette into the stock bottle, and never return unused solution to the bottle.
- Rinse the pipette with the stock once before the first delivery, so leftover water does not dilute the first portion.
- Use a pipette filler. Never mouth-pipette dyes or chemicals.
- Wipe the outside of the tip after filling, so drops on the outside do not add to the delivery.
- Hold the pipette vertical, touch the tip to the inside wall of the beaker, and let it drain. For “to deliver” pipettes, do not blow out the last bit unless the pipette is marked for blow-out.
- Read the bottom of the meniscus at eye level, against a white card if the dye is dark. For very dark solutions where the bottom cannot be seen, read the top of the meniscus consistently.
- Avoid the smallest volumes. If a dye needs less than about 0.5 mL, switch to a weaker stock rather than trying to pipette drops.
- Add in a fixed order, such as dyes from the weakest stock to the strongest, ticking each line on the recipe card as it goes in.
Auto-dispensers and their calibration
Many labs now use automatic dosing units that dispense dye and chemical stocks by pump or by weight. They remove most human pipetting error, but they bring their own risks. A volumetric dispenser assumes a density; if it is calibrated with water and then used for a 200 g/L salt solution, which is noticeably denser than water, the delivered mass is off unless the unit is set for that density. Gravimetric dispensers avoid this but depend on the scale and on the stock concentration being right.
Calibrate each channel on a schedule, typically daily or weekly, by dispensing a set volume of water onto a balance. Flush lines when stocks change, because the old stock in the tubing dilutes or contaminates the first doses. Check for air bubbles, dripping nozzles and crystallised salt at the tips. A machine that is wrong is wrong on every beaker, which is worse than one careless technician.
Checking accuracy
Gravimetric check of pipettes and dispensers
The simplest check uses water and a balance. At about 20 to 25 °C, 1 mL of pure water weighs about 0.997 to 0.998 g. Dispense a set volume into a tared beaker several times and compare the mass with what it should be.
Worked example. A technician checks a 1 mL pipette by dispensing 1 mL of water ten times into a tared beaker at 25 °C. Expected mass = 10 × 0.997 = 9.970 g. The balance shows 9.820 g. Error = (9.820 − 9.970) ÷ 9.970 × 100 = −1.5%. Many labs set an action limit of about ±1% for routine pipettes, though limits vary. This pipette is delivering short, likely from a chipped tip or from not waiting for full drainage. Replace it or retrain, then recheck.
The filter paper spot test
Put one or two drops of the stock on a filter paper and let it spread. A good solution gives an even, round spot. Specks or dark dots in the centre mean undissolved dye or aggregates, common in disperse stocks that have settled and in acid or direct stocks that have started to crystallise. A sharp dark ring with a pale centre can also point to aggregation. To compare strength, spot the old stock and a freshly made one side by side with the same pipette and the same volume; a visibly weaker spot means the old stock has lost strength.
Strength check by measurement
For a firmer check, dilute both old and fresh stock by the same factor and measure absorbance, or dye two lab dips side by side and compare them on the spectrophotometer. The method is explained in colour measurement and delta E. If the old stock gives a weaker result than the fresh one by more than your lab’s tolerance, discard it.
Evaporation and temperature
An open bottle loses water slowly, and the dye does not evaporate. So every mL lost makes the stock stronger. In a warm lab with fans running, a bottle left uncapped during a shift can lose several mL.
Worked example. A 250 mL bottle of 1% stock is left uncapped and loses 5 mL of water. The 2.5 g of dye is now in 245 mL. New strength = 2.5 ÷ 245 × 100 = 1.02%. Every lab dip from this bottle now has 2% more of that dye. If it is the shading dye in a light grey, that is enough to move the shade outside a tight tolerance.
Temperature affects volume too. Water expands when warm. A stock pipetted while still warm from dissolving contains slightly less dye per mL than the label says; the same stock made up to the mark warm becomes stronger once it cools. The fix is simple: make up and pipette at room temperature, keep bottles capped, and keep stock bottles away from the dyeing machines and from direct sunlight. Light can also fade some dyes in solution, which is one more reason to use amber bottles or a closed cupboard.
Common mistake: topping up an old stock bottle with a freshly made batch of the same dye. The old portion may have evaporated, settled or hydrolysed, and now nobody knows the real strength or the real date. Finish or discard the old stock, wash the bottle, and start a new label.
Contamination
A trace of one dye in another stock is invisible in the bottle but obvious on fabric. A few drops of red in a turquoise stock will dull every green made from it. Common sources are shared pipettes that are not rinsed, beakers reused without washing, wet glass rods moved between stocks, and auto-dispenser lines that were not flushed.
- Use a separate pipette for each stock, or rinse thoroughly with water and then with the next stock.
- Wash glassware with water, then rinse with the lab’s standard water (distilled, deionised or soft water) before drying.
- Make stocks with the same water quality every time. Hardness and iron change how some dyes dissolve and behave; see water quality in dyeing.
- Keep reactive dye stocks well away from soda ash and caustic bottles. A splash of alkali in a reactive stock ruins it.
- Keep caps on their own bottles. A cap swapped between a dark and a light stock carries dye with it.
A simple daily routine
- At the start of the day, check labels and dates. Discard reactive stocks older than your lab’s limit and any stock with sediment, crystals or growth.
- Prepare fresh reactive stocks for the day’s work, following the eight steps.
- Shake disperse stocks, and stir or invert all other stocks before pouring.
- Run a quick gravimetric check on the most used pipette or the dispenser channels.
- Before each lab dip, choose the stock strength so every volume falls in the 1 to 20 mL zone, and write the stock strength next to each dye on the recipe card.
- Keep every bottle capped between uses, and wash and dry all glassware at the end of the shift.
Good stocks and careful pipetting do not make a shade match by themselves, but they remove a whole group of hidden errors. When the lab numbers are honest, shade matching from lab dip to bulk becomes a question of process, not of guesswork.
Questions
Why not just weigh the dye for each lab dip?
Pale and shading dyes often need only a few milligrams on a 5 g sample. A normal lab balance cannot weigh that accurately, but 2 mL of a 0.1% stock delivers the same amount within about 1%.
How do I calculate mL of dye stock?
mL of stock = (shade % × sample weight in g) ÷ stock concentration %. For 0.35% on 10 g from a 0.5% stock: 0.35 × 10 ÷ 0.5 = 7.0 mL.
How long can I keep a reactive dye stock?
Reactive dyes slowly hydrolyse even in neutral water, so most labs use the stock the same day or within one to two days if kept cool and closed. Never add alkali to a reactive stock.
Which stock strength should I use?
Choose the stock so each dye volume falls between about 1 and 20 mL: 0.1% for pale shades, 0.5% for medium and 1% or 2% for dark shades. These bands are a guide and overlap.
How can I check my pipette is accurate?
Dispense a known volume of water several times onto a balance. At room temperature 1 mL of water weighs about 0.997 g; compare the total with the expected mass and act if the error exceeds your lab’s limit, often about ±1%.

Textile engineer with 14+ years in dyeing and fabric development. He writes every guide on Dyeing Solution from real production work. Full profile