Every new dye or chemical lot can differ from the last. Here is how a dye lab tests strength, shade, solubility, purity and auxiliary performance, decides release or rejection, and corrects recipes with a strength factor.
At a glance
95–105%Typical dye strength window
1/1 + 1/3Depths for comparative dyeing
× 100 ÷ S%Strength factor correction
QuarantineNo issue until lab release
Every dye and chemical that comes through the store door is a promise from a supplier: this drum is the same as the last one. Most of the time the promise holds well enough. Sometimes it does not. A new lot of a reactive red can be a few percent weaker, a little bluer, or slower to dissolve. A bag of soda ash can carry extra moisture. A drum of peroxide can arrive weaker than its label. None of these differences is visible to the eye at the store, but every one of them can move a bulk shade or spoil a batch.
Incoming testing is the lab’s job of checking each new lot before it is used on production. This article explains why it matters, how the main tests are done step by step, what typical acceptance limits look like, and how to correct recipes when a dye lot is accepted but is not exactly at standard strength. The numbers given are typical ranges. Every mill sets its own limits, and you should follow your own written specification where one exists.
Why every new dye lot is tested
A commercial dye is not a pure chemical. It is the coloured molecule plus standardising agents (often salts or other diluents), dispersing agents for disperse dyes, dust-binding oils, moisture and small amounts of by-products from manufacture. The maker blends each batch to a target strength against its own standard. That blending has a tolerance, and the tolerance of the maker is not always the tolerance your dye house needs.
The result is lot-to-lot variation in two things:
- Strength. The same weight of dye gives more or less depth. A lot that is 5% weak gives a visibly lighter shade in mid and dark depths.
- Shade (hue and brightness). The colour itself can be slightly redder, bluer, duller or brighter. This is often caused by a change in the proportion of minor coloured components or by-products.
In a three-dye recipe, a strength change in just one dye does not only change the depth. It changes the balance between the dyes, so the hue moves too. A navy made from a blue, a red and a yellow can turn greener or redder if only the red lot is weaker. This is one of the common root causes behind shade variation from lot to lot in bulk, and it is far cheaper to catch at the lab bench than after a batch has been dyed.
Testing also protects the link between the lab and the floor. A lab dip approved by the buyer was made with a particular dye lot. If production uses a different lot without checking, the approved recipe is no longer the recipe that produced the approved shade. In a dye house where about 4 in 10 orders are body fabric plus matching rib or collar, a small strength difference between lots can also show up as a mismatch between parts dyed on different days.
The quarantine and release flow
Good testing starts in the store, not in the lab. The idea is simple: no new lot is issued to production until the lab says it may be. The flow below is a common pattern.
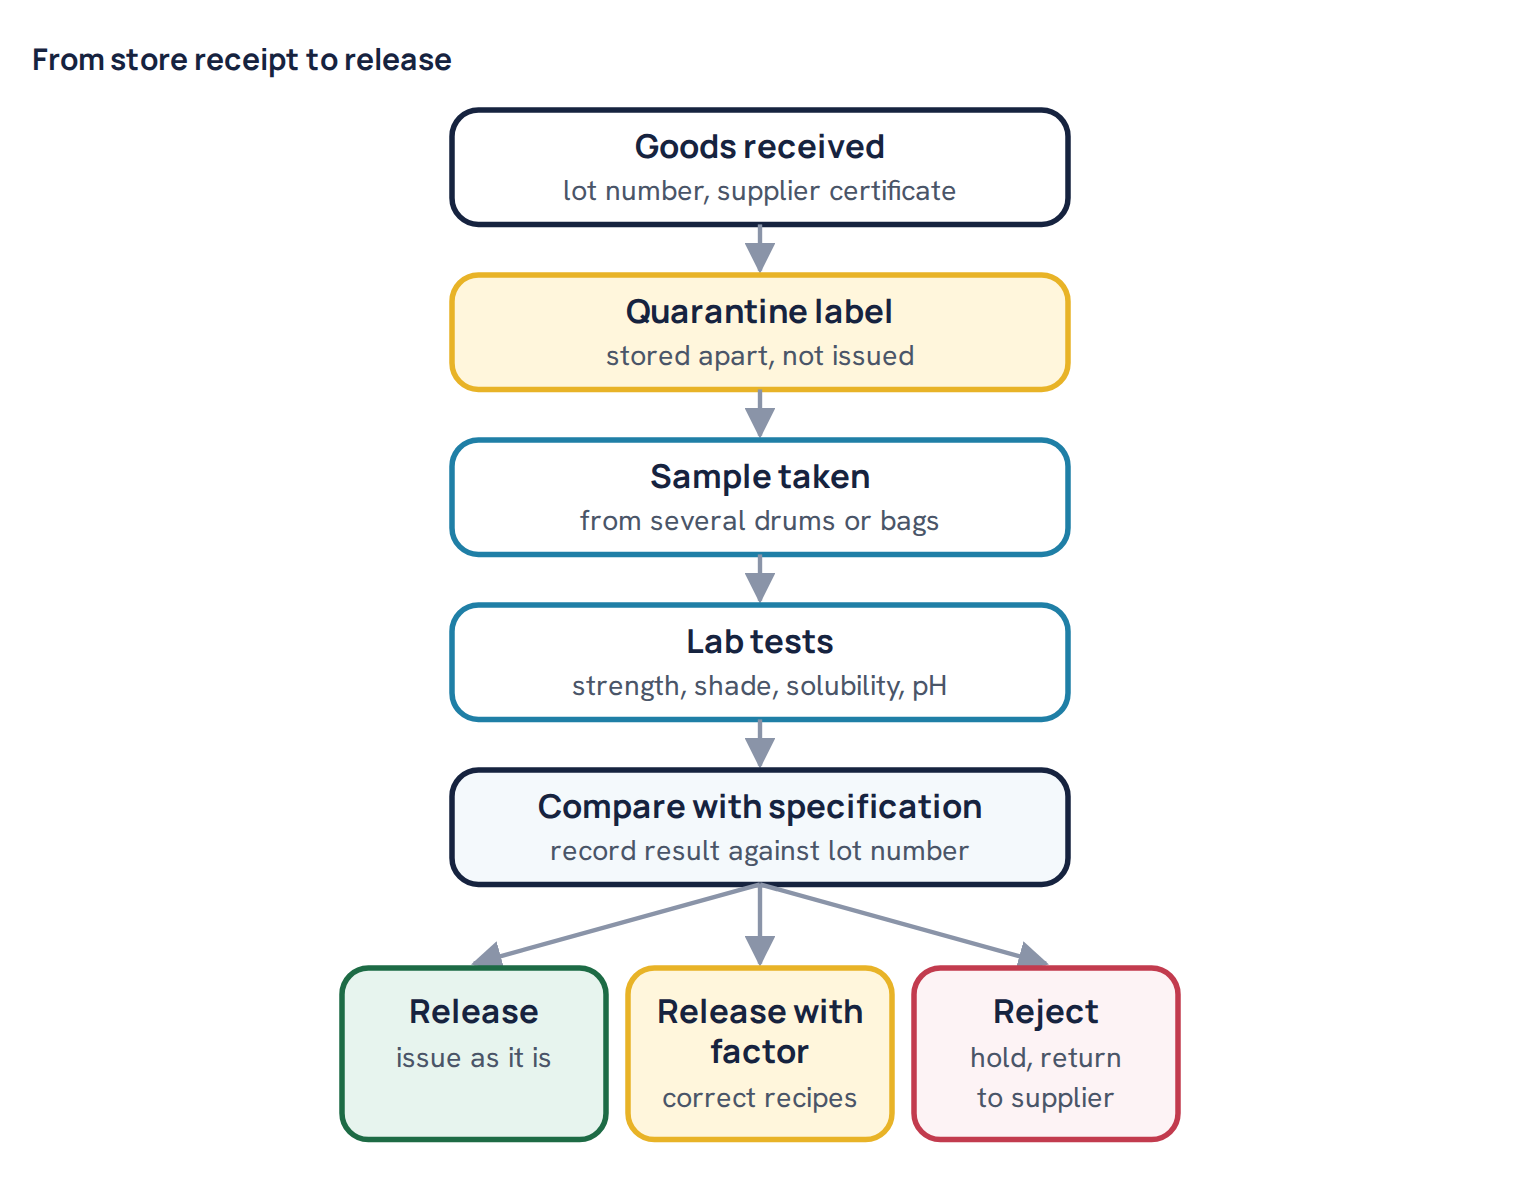
The key steps are these:
- Receive and label. The store records the product, the supplier lot number, quantity and date, and sticks a clear “quarantine” or “under test” label on every container.
- Sample properly. Take a sample from more than one drum or bag if the lot arrived in several containers. Powders can settle and separate, so take the sample from the middle of the container, not just the surface. Store a retained sample in a sealed, labelled jar for later disputes.
- Test against the standard. The lab compares the new lot with a retained standard sample of the same product. The standard should be stored cool, dry and sealed, and replaced or rechecked at intervals, because standards also age.
- Record and decide. Enter results in a register or system against the lot number: strength %, colour difference, solubility rating, pH, moisture, and the decision.
- Release. Change the label to “released” (or “released, factor 1.06”) and only then let the store issue it. Use older released lots first.
Common mistake: Testing a new lot but letting the store issue it before the result is signed off, because the floor is waiting. If a lot is urgent, test it first and fast, but do not skip the quarantine step. Once a weak lot is mixed into a production batch, the cause of an off-shade becomes very hard to trace.
Dye strength by comparative dyeing
The most reliable way to judge a dye lot is to dye with it. Comparative dyeing answers the question that matters on the floor: does this lot give the same colour on our fabric, with our process, as the standard lot?
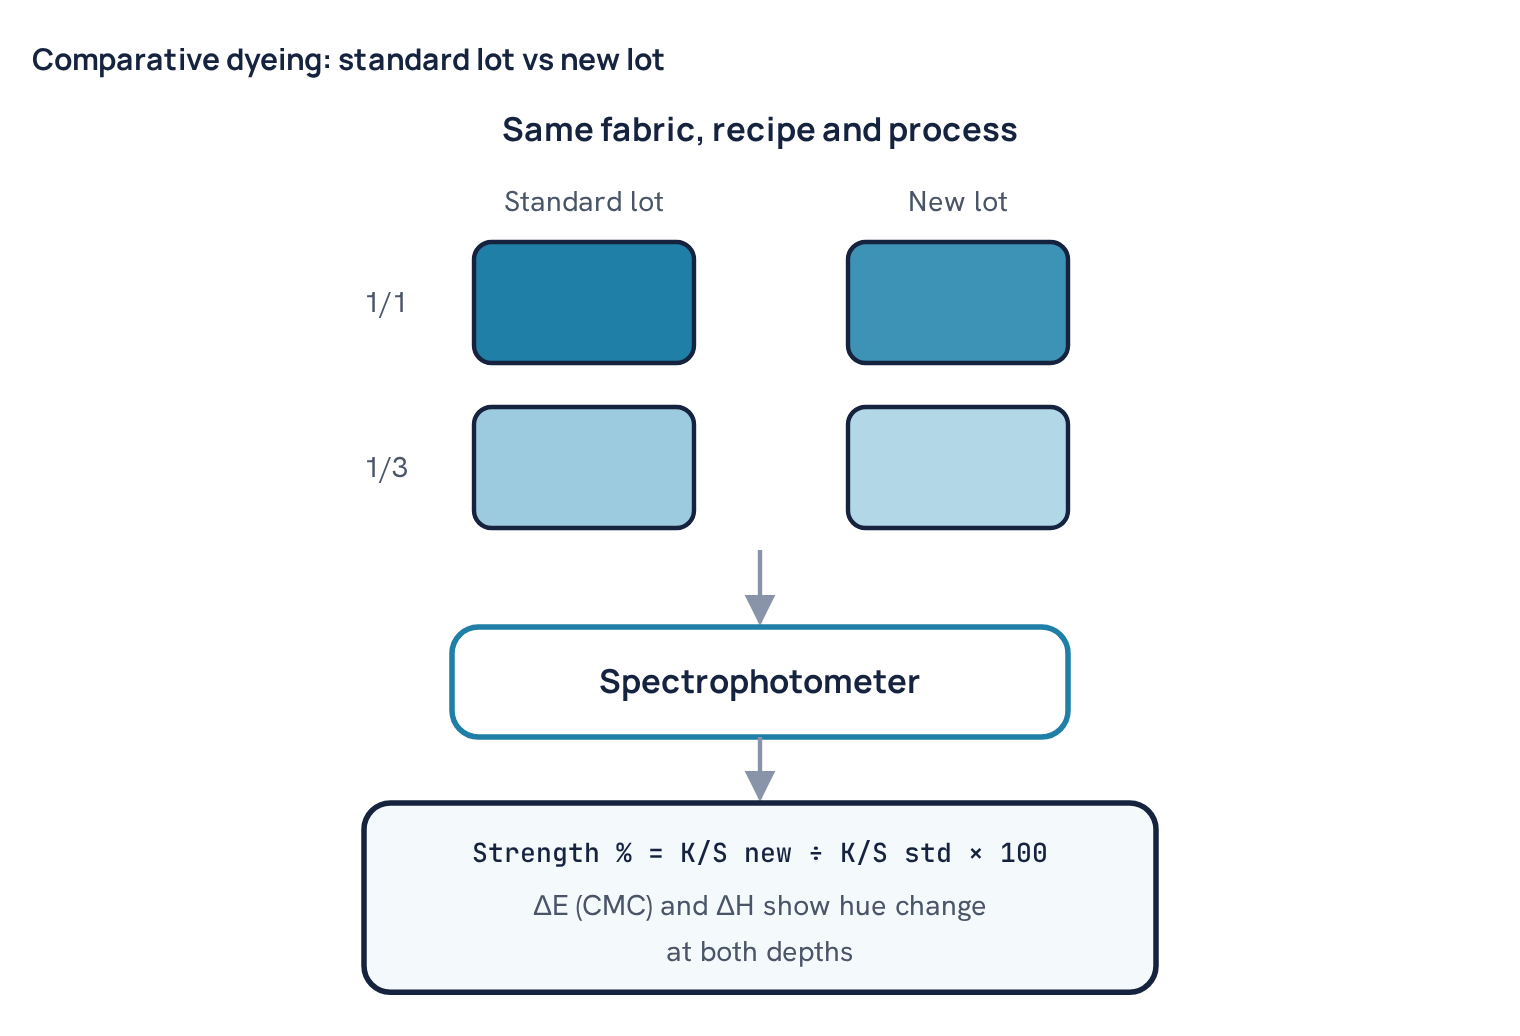
The method is a side-by-side dyeing:
- Prepare stock solutions of the standard lot and the new lot at exactly the same concentration, weighed on the same balance, at the same time. Careful stock preparation is covered in the article on dye stock solutions and pipetting.
- Use the same fabric for both, cut from the same roll and weighed to the same mass. A standard prepared cotton knit for reactive dyes, or polyester for disperse dyes, is typical.
- Dye both at the same recipe in the same machine run: same liquor ratio, same salt and alkali, same temperature profile and time. Only the dye lot should differ.
- Dye at two depths. A common choice is 1/1 standard depth (a medium shade that the dye is normally used at) and 1/3 standard depth (a lighter shade). Strength differences are easier to see in a pale shade, and hue differences from shading components often show more clearly in one depth than the other.
- Wash off, dry and condition both samples the same way before measuring.
Reading the result
The spectrophotometer measures reflectance and converts it to K/S, a value that rises roughly in proportion to the amount of dye on the fibre at low and medium depths. The software compares the new lot with the standard and reports a strength %, either at the wavelength of maximum absorption or as a weighted sum across the visible range. It also reports the colour difference, usually ΔE CMC, split into lightness, chroma and hue parts. The theory of these numbers is explained in the article on colour measurement, CIELab and ΔE.
Two separate questions must be answered:
- Is the strength acceptable? A typical acceptance window is about 95–105% of standard. Some mills use a tighter window such as 97–103% for key dyes, especially in dark shades and trichromatic combinations. It varies by mill and by dye.
- Is the shade acceptable after strength is allowed for? Most software can report a colour difference “at equal strength”, which removes the depth difference and shows only the hue and brightness change. If that remaining difference is small (many mills look for ΔE CMC within about 1.0, often tighter), a strength factor can correct the lot. If the hue itself has moved clearly, a strength factor cannot fix it.
Always look at the samples in the light cabinet as well. The instrument is better at numbers; the eye is better at noticing that something “looks dirty” or flat, which can point to a contaminant.
Common mistake: Using strength % alone to accept a lot. A lot can read 100% strength and still be noticeably redder or duller than standard. Check the hue difference (ΔH) at equal strength before releasing, especially for dyes used in navy, black and brown recipes where they are shading components.
Strength by solution absorbance
A faster screening method measures the dye in solution instead of on fabric. It uses a spectrophotometer that measures light passing through a liquid in a glass or quartz cell (a cuvette) rather than light reflected from cloth.
The idea comes from the Beer-Lambert law, written as A = ε × c × l. Here A is absorbance, ε is a constant for that dye at that wavelength, c is concentration and l is the path length through the cell. If the cell and the wavelength are the same, absorbance is proportional to concentration. So if you dissolve the standard and the new lot at exactly the same weight per litre, the ratio of their absorbances is the ratio of their strengths.
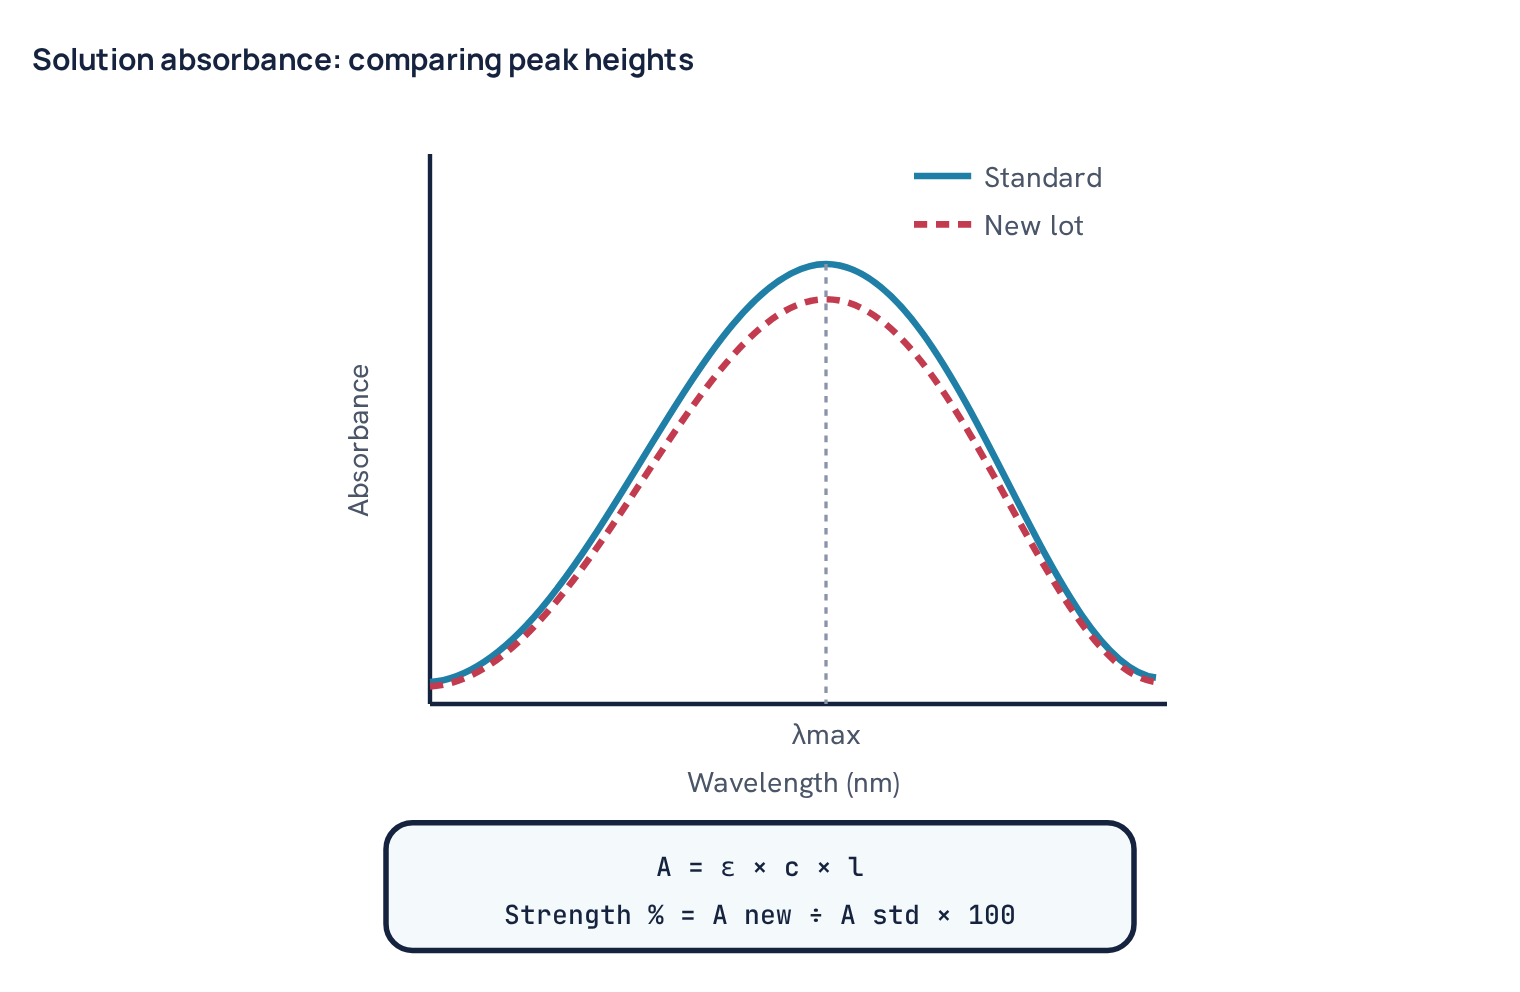
A practical procedure:
- Weigh the standard and the new lot accurately (for example 0.500 g each) and dissolve in distilled or deionised water to an exact volume.
- Dilute both by the same factor until the absorbance at the peak falls roughly between 0.2 and 1.0. Outside this range the readings become less reliable.
- Scan both across the visible range, note the peak wavelength (λmax), and compare peak heights. Also compare the shape of the curves.
This method is quick and repeatable, but it has limits. Disperse dyes do not dissolve in water, so they must be measured in a suitable organic solvent mixture, which needs care and ventilation. More importantly for reactive dyes, a hydrolysed reactive dye absorbs light just like a fresh one but can no longer fix to cotton. A lot that has partly hydrolysed in storage can read 100% in solution and still dye weak. For this reason, solution absorbance is best used as a quick screen, and comparative dyeing remains the final word for reactive dyes.
Solubility and dispersion tests
A dye can have perfect strength and still cause trouble if it does not dissolve or disperse properly. Undissolved particles cause specks and spots on the fabric, and poor dispersion in disperse dyes can lead to tarry deposits in the machine. Many dye spots and stains start this way.
Filter paper test for disperse dyes
Disperse dyes are fine particles held in water by dispersing agents. The filter test checks that the particles are fine and stay fine.
- Prepare a dispersion at a set concentration, for example 10 g/L, in water at a set temperature (often 60–70°C), adjusted to dyeing pH with acid.
- Pour it through a medium-grade filter paper placed on a funnel or a simple suction filter.
- Rinse with clean water and let the paper dry.
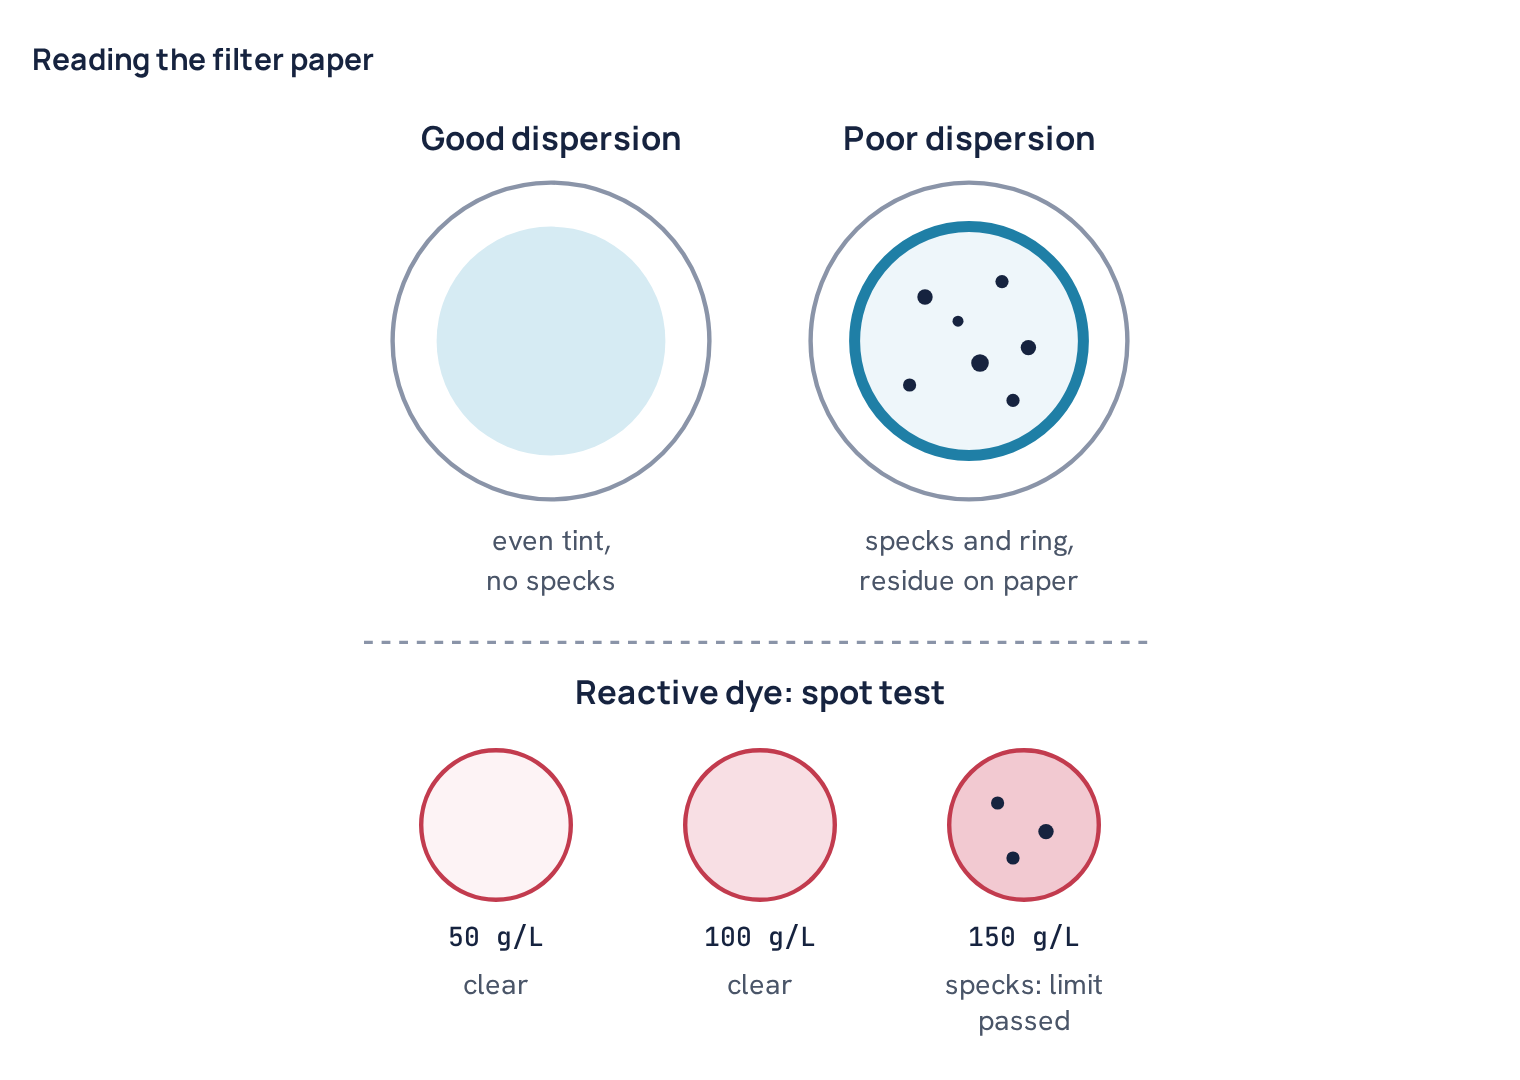
- Compare the paper with one made from the standard lot. A good lot leaves an even, light tint. A poor lot leaves visible specks, a ring of residue or a thick layer.
Some labs also run a high-temperature dispersion stability test: the dispersion is held at 130°C in a sealed lab dyeing pot for about an hour with blank fabric or alone, then filtered. Particles that grow (agglomerate) at high temperature show up as specks. This matters because that is the temperature at which the dye sits in a polyester dyeing bath.
Dissolving test for reactive dyes
Reactive dyes are water-soluble, but solubility falls with lower temperature and with salt in the water. For each dye, the lab can check that the new lot dissolves as well as the standard under fixed conditions:
- Prepare solutions at a series of concentrations, for example 50, 100 and 150 g/L, in water at a set temperature such as 25°C or 50°C. Do not dissolve reactive dyes in very hot water for long, as this starts hydrolysis.
- Stir for a set time, for example 5 minutes.
- Put a drop of each on filter paper, or filter a measured volume.
- The highest concentration that leaves no specks is the practical solubility. Compare it with the standard lot and with the concentration your dissolving tanks actually use.
A related check is solubility in the presence of salt, because some dyes come out of solution when salt is added before the dye is fully dissolved. If your dye house adds dye and salt close together, test the lot in a salt solution at the working g/L.
Dusting
Fine powder dyes can rise as dust when scooped and weighed. Dust that lands on fabric, scales or other containers gives tiny coloured spots and contaminates other dyes. A simple check is to tip a measured amount from a fixed height in a closed glass jar and compare the cloud and the settled film with the standard lot. Granular and liquid forms are usually low-dust.
Moisture and physical form
Moisture adds weight but not colour. A dye that has picked up moisture in transit or storage reads weaker by the same proportion, and it may cake into lumps that dissolve slowly.
- Moisture content. Weigh a sample (for example 2–5 g) into a dried dish, dry it in an oven at about 105°C to constant weight, cool in a desiccator, and weigh again. Moisture % = weight loss ÷ original weight × 100. Many powder dyes are supplied with a few percent moisture; compare with the standard lot and supplier data rather than an absolute figure.
- Physical form. Check that the form matches what was ordered: powder, granules, grains or liquid. Look for lumps, caking, colour change of the powder, or a strange smell.
- Liquid dyes and auxiliaries. Check density with a hydrometer, look for sediment at the bottom of the drum, and check that the liquid is uniform after gentle mixing. A liquid that has separated in storage can give a different strength from the top and the bottom of the drum.
Chemical checks
Basic chemicals are bought in large quantities and used at high g/L, so a purity drop has a big effect. Salt, soda ash, caustic soda, peroxide and acid all have simple tests that any dye lab can run with a burette, a balance and a few standard solutions. The purpose of each chemical is described in the article on dyeing auxiliaries; here we focus only on checking them.
Titration in brief
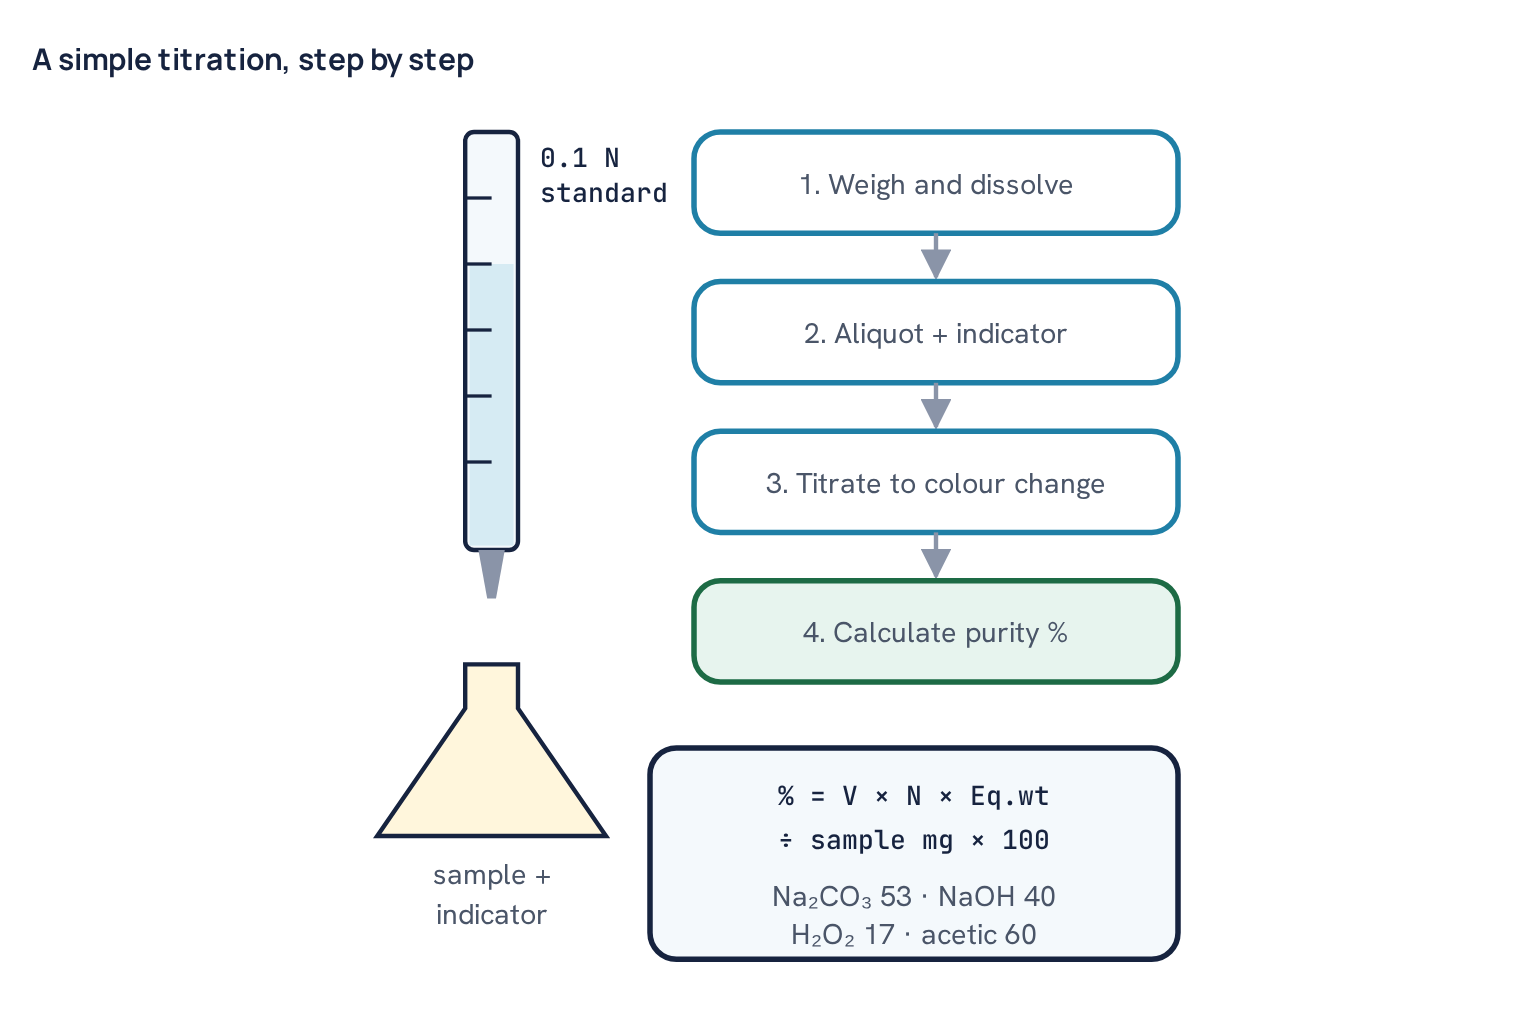
Titration means adding a standard solution of known strength from a burette, drop by drop, to a measured sample until an indicator changes colour. The volume used tells you how much active substance was in the sample. The general formula is:
Purity % = V × N × equivalent weight ÷ sample weight in mg × 100, where V is the titre in mL and N is the normality of the standard solution.
Soda ash purity
Weigh 2.650 g of soda ash, dissolve in distilled water and make up to 250 mL. Take 25 mL (containing 265 mg of sample), add methyl orange and titrate with 0.1 N hydrochloric acid until the colour turns from yellow to orange-pink. Sodium carbonate has an equivalent weight of 53 in this titration. A 100% pure sample would need 265 ÷ 53 ÷ 0.1 = 50.0 mL. If the titre is 49.2 mL, purity = 49.2 × 0.1 × 53 ÷ 265 × 100 = 98.4%. Good dyeing-grade soda ash is usually close to 99% as sodium carbonate, but check the supplier specification. Low results usually mean moisture pick-up or contamination.
Caustic soda strength
For flakes or pearls, weigh quickly (they absorb moisture and carbon dioxide from air), dissolve and titrate with standard acid using phenolphthalein, equivalent weight 40. For liquid caustic (lye), weigh a sample rather than measuring by volume, or measure the density and use a density table. Lye strength is often around 46–50% for bulk supply, but grades differ.
Hydrogen peroxide strength
Weigh about 1 g of the product, dilute to 250 mL with distilled water, take 25 mL, add dilute sulphuric acid and titrate with 0.1 N potassium permanganate until a faint pink colour remains for 30 seconds. The equivalent weight of hydrogen peroxide here is 17. With 100 mg of a 50% product in the aliquot, the titre would be about 50 ÷ 17 ÷ 0.1 ≈ 29.4 mL. Peroxide slowly loses strength in storage, especially if warm or contaminated, so drums that have stood for months are worth rechecking.
Acid concentration
Acetic acid and other organic acids are titrated with standard sodium hydroxide using phenolphthalein. For acetic acid the equivalent weight is 60. Formic acid uses 46. Also check that the product is clear and has no sediment.
Salt quality
Salt (sodium chloride or Glauber’s salt) is used at high g/L, so its impurities matter more than its exact purity:
- Insolubles. Dissolve a weighed amount (for example 100 g) in water, filter through a weighed filter paper, dry and weigh the residue. Sand and dirt cause specks and filter blockage.
- Iron. A simple colour spot test or a thiocyanate test shows iron as a reddish colour. Iron dulls shades and can catalyse peroxide breakdown.
- Hardness. Calcium and magnesium can be checked by EDTA titration on a salt solution. At 60–80 g/L of salt, even a small hardness in the salt adds noticeably to the hardness of the bath. The effect of hardness and iron is explained in the article on water quality in dyeing.
- pH of a 10% solution, which should be close to neutral for common salt.
Auxiliaries
Auxiliaries are mixtures, so the checks are about performance and consistency rather than purity.
- Sequestering agent: sequestering value. A common method titrates a solution of the product with a calcium salt solution in the presence of an indicator or a precipitating anion (such as carbonate or oxalate) until a lasting turbidity appears. The result is expressed as mg of calcium carbonate held per gram of product. Compare with the standard lot, and run the test at the pH and temperature at which you use the product, since many sequestering agents behave differently in alkali.
- Softener: ionic type. Mix a dilute solution of the softener with a dilute solution of a known anionic surfactant in one tube and a known cationic surfactant in another. A cationic softener forms a cloud or precipitate with the anionic test solution; an anionic one reacts with the cationic. A non-ionic product reacts with neither. This catches a wrong product or a mislabelled drum.
- Softener: stability. Dilute to working strength, then hold at the application temperature, add hard water or a little alkali or acid as in your process, and stir hard for a few minutes. Look for oil drops, cream separation or flocks. Unstable softener emulsions are a known cause of spots, especially silicone softeners on elastane blends. In our dye house about 37% of batches contain elastane, so this check is not a small matter.
- Levelling agent: foam. Shake a fixed volume of working-strength solution in a stoppered measuring cylinder for a fixed number of times, then read the foam height at once and after 5 minutes. High or stable foam causes problems in jet machines. Compare with the standard lot.
- pH and appearance. Measure the pH of a 1% or 10% solution (state which), and check colour, clarity, smell and viscosity. A product that arrives cloudy when the standard is clear, or that has a different colour, should be held for further testing.
| Product | Main checks | Typical acceptance (varies by mill) |
|---|---|---|
| Reactive / disperse / acid dye | Comparative dyeing, ΔE, solubility or dispersion | Strength 95–105%; ΔE CMC about ≤1.0 at equal strength |
| Soda ash | Titration with HCl, methyl orange | About 98–99%+ as Na₂CO₃ |
| Caustic soda | Titration or density | Within supplier grade, e.g. 46–50% for lye |
| Hydrogen peroxide | Permanganate titration | Within about ±1% of stated strength |
| Acetic acid | Titration with NaOH | Stated strength, clear, no sediment |
| Salt | Insolubles, iron, hardness, pH | Low insolubles, no visible iron, near-neutral pH |
| Sequestering agent | Sequestering value, pH | Close to standard lot value |
| Softener | Ionic type, stability, pH | Same ionic type, no separation |
| Levelling agent | Foam, pH, appearance | Foam not higher than standard |
Common mistake: Comparing only with the supplier’s certificate. A certificate is useful, but it tells you how the lot compares with the supplier’s own standard. It does not tell you how it behaves with your water, your fabric and your process. Always compare against your own retained standard.
Adjusting recipes by strength factor
When a dye lot is within the strength window but not exactly 100%, and its hue at equal strength is acceptable, the simplest response is to correct recipes by a strength factor. The idea is that you add more of a weak lot, or less of a strong lot, so that the amount of colour going onto the fabric stays the same.
Corrected % = Recipe % × 100 ÷ Lot strength %
The strength factor is 100 ÷ lot strength. A lot at 94% has a factor of 1.064; a lot at 104% has a factor of 0.962. The factor should be written on the release label and entered in the recipe system against that lot, so that every recipe using that lot is corrected the same way. The recipe arithmetic itself follows the normal rules in the article on dyeing recipe calculation.
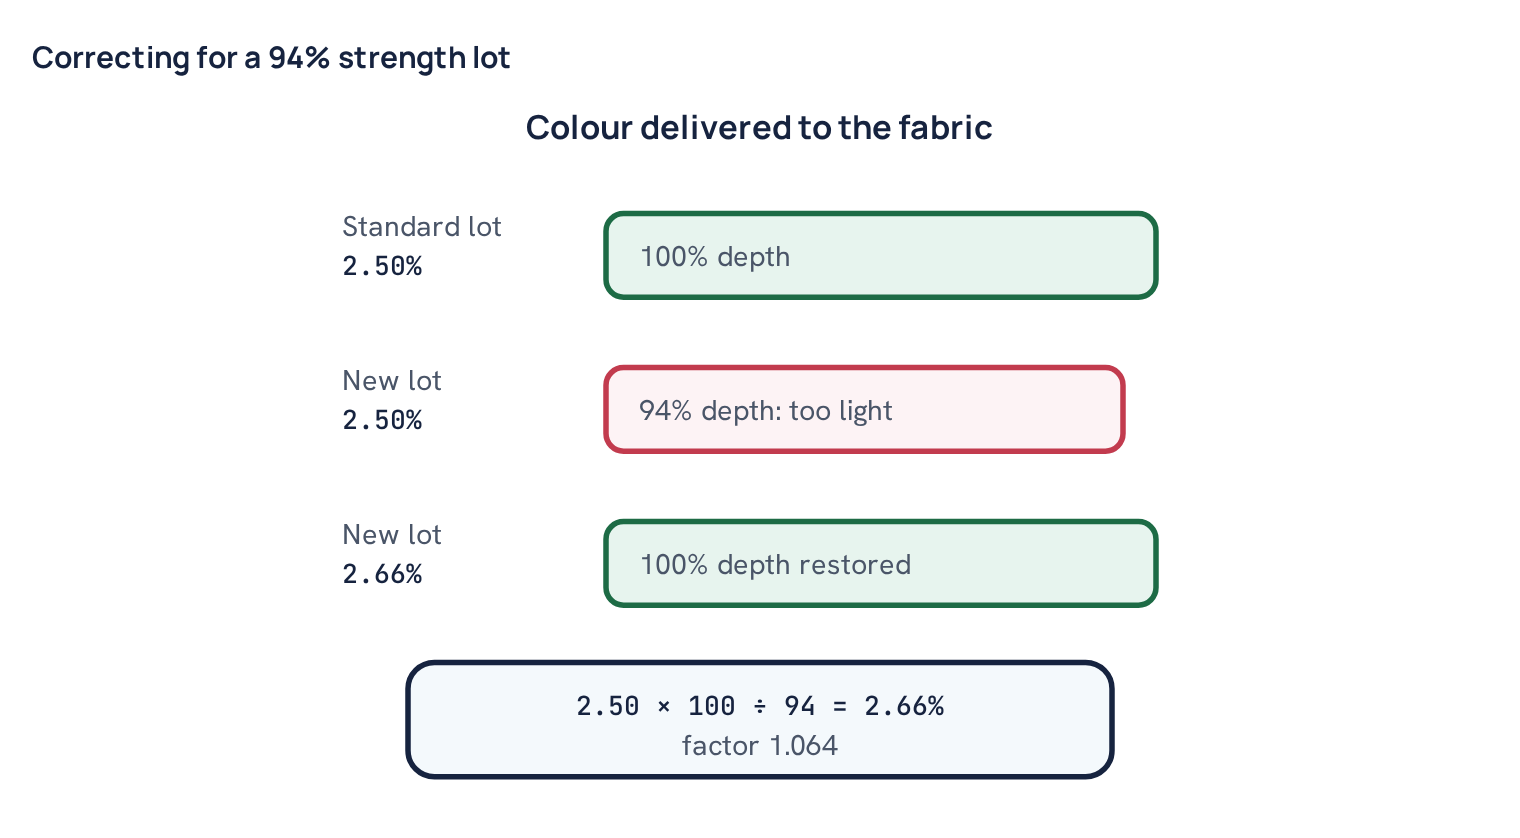
Worked example. A new lot of a reactive red is tested by comparative dyeing and reads 94% strength against the standard, with the hue at equal strength within limits. The lab releases it with a strength factor. A recipe for an 18 kg batch (about the median batch size in our dye house) calls for 2.50% of this red. Corrected % = 2.50 × 100 ÷ 94 = 2.66% (2.6596 before rounding). Dye weight at the old % = 18 × 2.50 × 10 = 450 g. Dye weight at the corrected % = 18 × 2.66 × 10 = 478.8 g, so about 29 g more red is weighed. On a 300 kg batch the same correction is 300 × 2.50 × 10 = 7,500 g against 300 × 2.66 × 10 = 7,980 g, a difference of 480 g. Without the correction, the red component would be 6% short, and in a three-colour shade that would shift both depth and hue. The yellow and blue in the recipe are not changed unless their own lots also carry factors.
Some points to keep in mind when using strength factors:
- Factors correct depth, not hue. If the new lot is bluer or duller, more of it will not make it redder or brighter. That needs a recipe change by lab dip, or rejection.
- Large factors are a warning. A lot outside the window (for example 90%) should normally be rejected or discussed with the supplier, not used with a big factor. A very weak lot can also behave differently in exhaustion and fixation.
- Check auxiliaries in depth-linked recipes. If salt and alkali are chosen from a table by total dye %, a corrected dye % that crosses a depth band may change the salt and alkali step. Most corrections are too small for this, but check it.
- Do not stack factors by mistake. If the recipe was already developed using the new lot in a lab dip, it does not need the factor again. Record which lot each lab dip used.
- Confirm in practice. For important colours, run a quick lab dip of a live recipe with the corrected lot before the first bulk batch. This is part of keeping lab-to-bulk right first time.
Common mistake: Applying the strength factor in the lab but not in the bulk recipe, or the other way round. The factor must follow the dye lot everywhere it is used: lab dips, bulk recipes and additions. If the store issues two lots of the same dye at once, the person weighing must know which factor belongs to which container.
Keeping records that work
An incoming test is only useful if someone can find it later. When a bulk shade goes wrong, one of the first questions is “which lot of each dye was used?” A good record links each container to its test result and each batch card to the lots it consumed.
- Keep one line per lot: product, supplier, lot number, date received, quantity, tests done, results, decision, strength factor, tester and approver.
- Keep the dyed comparison swatches (both depths, standard and new lot) on a card or in a file, labelled with lot numbers.
- Keep a retained sample of each lot until it is fully used and a little beyond, in a sealed container.
- Track results over time for each supplier. A supplier whose lots drift between 96% and 104% needs closer attention than one that stays near 100%.
- Recheck standards and long-stored stock at fixed intervals. Reactive dyes, peroxide and some liquid auxiliaries change with age and heat.
Incoming testing is not glamorous work, and on a busy day it can feel like a delay. But it is the cheapest quality control a dye house can buy. A weak dye lot found in an afternoon of lab work costs a few beakers and a few swatches. The same lot found after twenty production batches costs reprocessing, stripping, lost delivery dates and an unhappy buyer.
Questions
Why test a dye lot if the supplier sends a certificate?
The certificate compares the lot with the supplier’s own standard. Your lab compares it with your retained standard, on your fabric, water and process, which is what decides the bulk shade.
What is an acceptable dye strength for a new lot?
Many mills accept about 95–105% of standard, and some use a tighter window for key dyes. The hue at equal strength must also be close, often within about ΔE CMC 1.0, but limits vary by mill.
Is solution absorbance enough to test reactive dye strength?
It is a useful quick screen, but hydrolysed reactive dye still absorbs light while it can no longer fix to cotton. Comparative dyeing on fabric is the final test for reactive dyes.
How do I correct a recipe for a weak dye lot?
Multiply the recipe % by 100 and divide by the lot strength %. For a 94% lot, 2.50% becomes 2.50 × 100 ÷ 94 = 2.66%.
Which chemicals should a dye lab check on arrival?
At least soda ash, caustic soda, hydrogen peroxide and acid by titration, salt for insolubles, iron and hardness, and key auxiliaries for pH, appearance, stability, foam or sequestering value against the standard lot.

Textile engineer with 14+ years in dyeing and fabric development. He writes every guide on Dyeing Solution from real production work. Full profile