Why knit fabric comes out darker at the edges, along fold lines or at one end of the batch, how to measure it, and the stenter, padding and dyeing settings that prevent it.
At a glance
L / C / Rmeasure across the width
±2–3 °Ctypical stenter width spread
~37%of our batches contain elastane
Stentermost common source
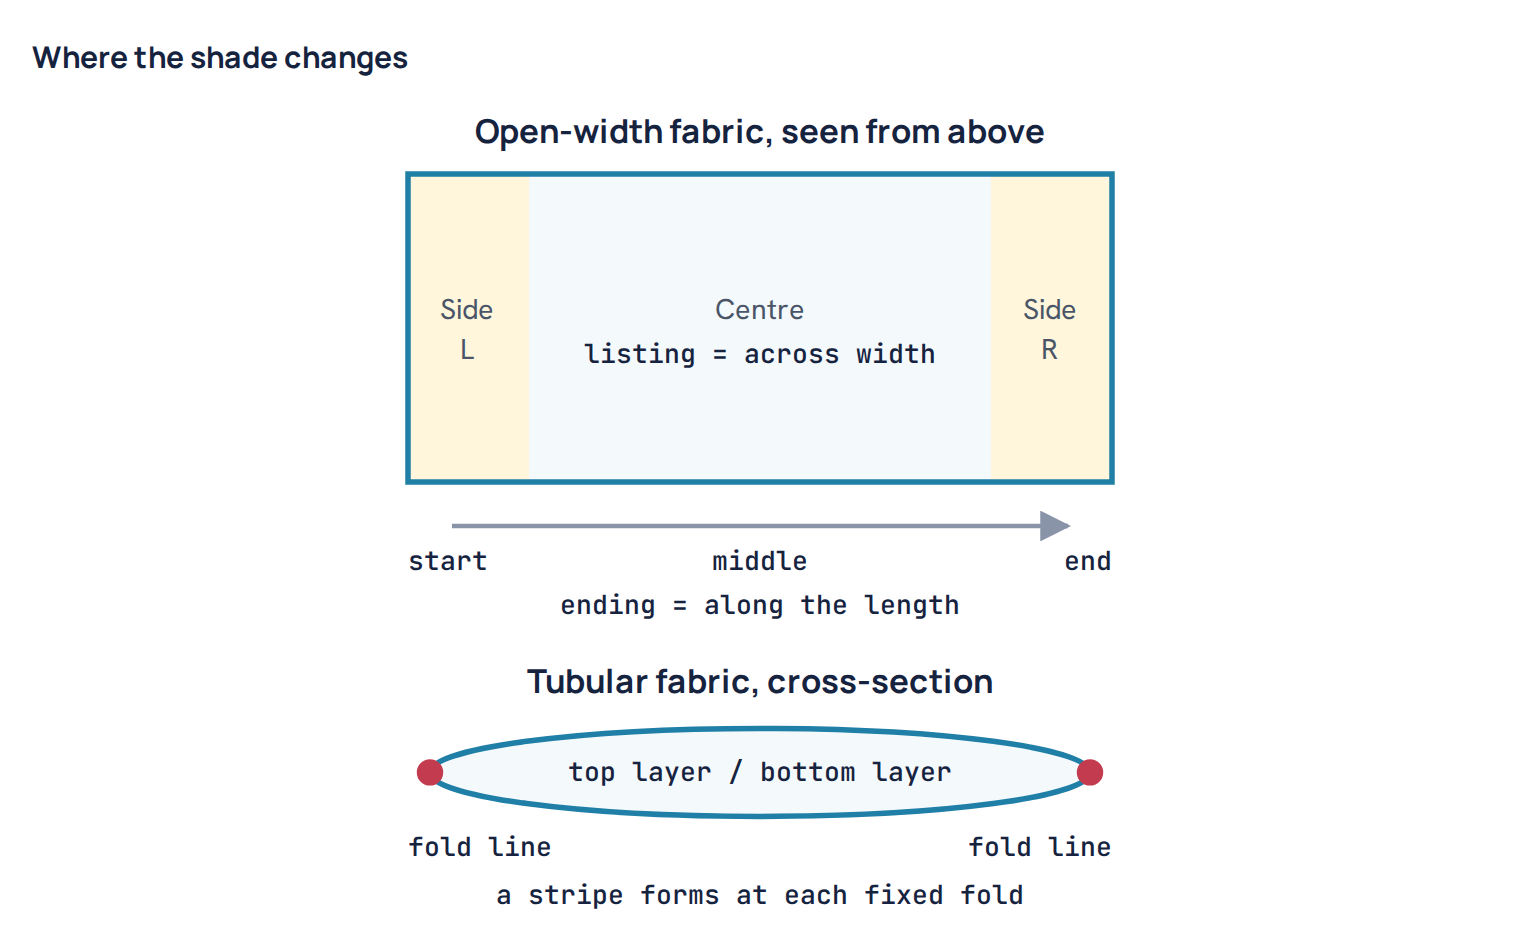
Listing is a shade change across the width of the fabric. One side is darker than the centre, or both edges are lighter than the middle, or a tubular fabric shows a clear stripe along each fold line. A related fault, called ending or tailing, is a shade change along the length: the start of the batch does not match the end. Neither fault shows in a small lab swatch, so it is often found late, at the cutting table, when panels from the left and right of the same roll are sewn side by side in one garment. This article explains how to see and confirm listing, what causes it in knit dyeing and finishing, how to prevent it with practical settings, and what to do once a batch is already faulty.
What listing looks like on knit fabric
There are three common patterns. Each points to a different part of the process, so it pays to name the pattern exactly before looking for a cause.
Side-centre-side (SCS) variation
The fabric is opened out and the two selvedge zones look different from the centre. Sometimes both edges are darker, sometimes one edge only. The change is usually gradual, a soft band 5 to 20 cm wide, not a sharp line. A one-sided change often points to a machine that is hotter, wetter or under more pressure on one side. A symmetric change, with both edges the same, often points to something that acts on the edges, such as faster drying at the edges or edge curl.
Fold-line marks in tubular fabric
Tubular single jersey, rib and interlock are often dyed, dried and compacted as a flat tube. The tube has two folds. If the folds stay in the same place for a long time, a narrow lighter or darker stripe forms along each fold. Because the folds are 180 degrees apart, the fault repeats at the same position on both sides of the tube, and when the tube is slit it appears as two lines at a fixed distance across the open width.
Ending, or start-to-end variation
The shade drifts along the length. The first metres are lighter or darker than the last metres. In exhaust dyeing this is less common, because the whole rope circulates in the same bath. It is very common in continuous and semi-continuous work: pad-batch, pad-dry, and stenter finishing, where the liquor in the trough changes as the run goes on.
How to confirm it
A roll that looks uneven on the inspection machine is not proof of listing. Light angle, fabric tension and folds can all fool the eye. Confirm the fault in a fixed order.
- Light box, same face, same angle. Cut a full-width strip and lay it flat in a standard light cabinet under the buyer’s main light source, usually D65. Look straight down, then at a low angle. A true shade difference stays at every angle. A lustre or surface difference changes as you tilt the strip.
- Cut-and-compare. Cut squares from the left edge, centre and right edge, about 10 cm by 10 cm. Lay the edge pieces next to the centre piece, all in the same direction. Then swap them around. If the same piece always looks darker, the difference is real.
- Face and back. Check both sides. If the face shows the fault but the back does not, the cause is likely on the surface: softener, migration during drying, or heat on one face. If both sides show it equally, the cause is in the fibre itself, such as heat-setting or dye uptake in the bath.
- Several light sources. View under D65, TL84 or a store light, and incandescent A. If the shade difference appears under one light only, you may be looking at a recipe with different dyes on different zones, which is a metamerism problem, not only a depth problem.
- Spectrophotometer. Measure each piece several times, folded to make it opaque, with the same number of layers. Report the colour difference of each side against the centre in the same system the buyer uses, usually CMC (2:1). The colour measurement guide explains how to read the lightness, chroma and hue parts of the difference.
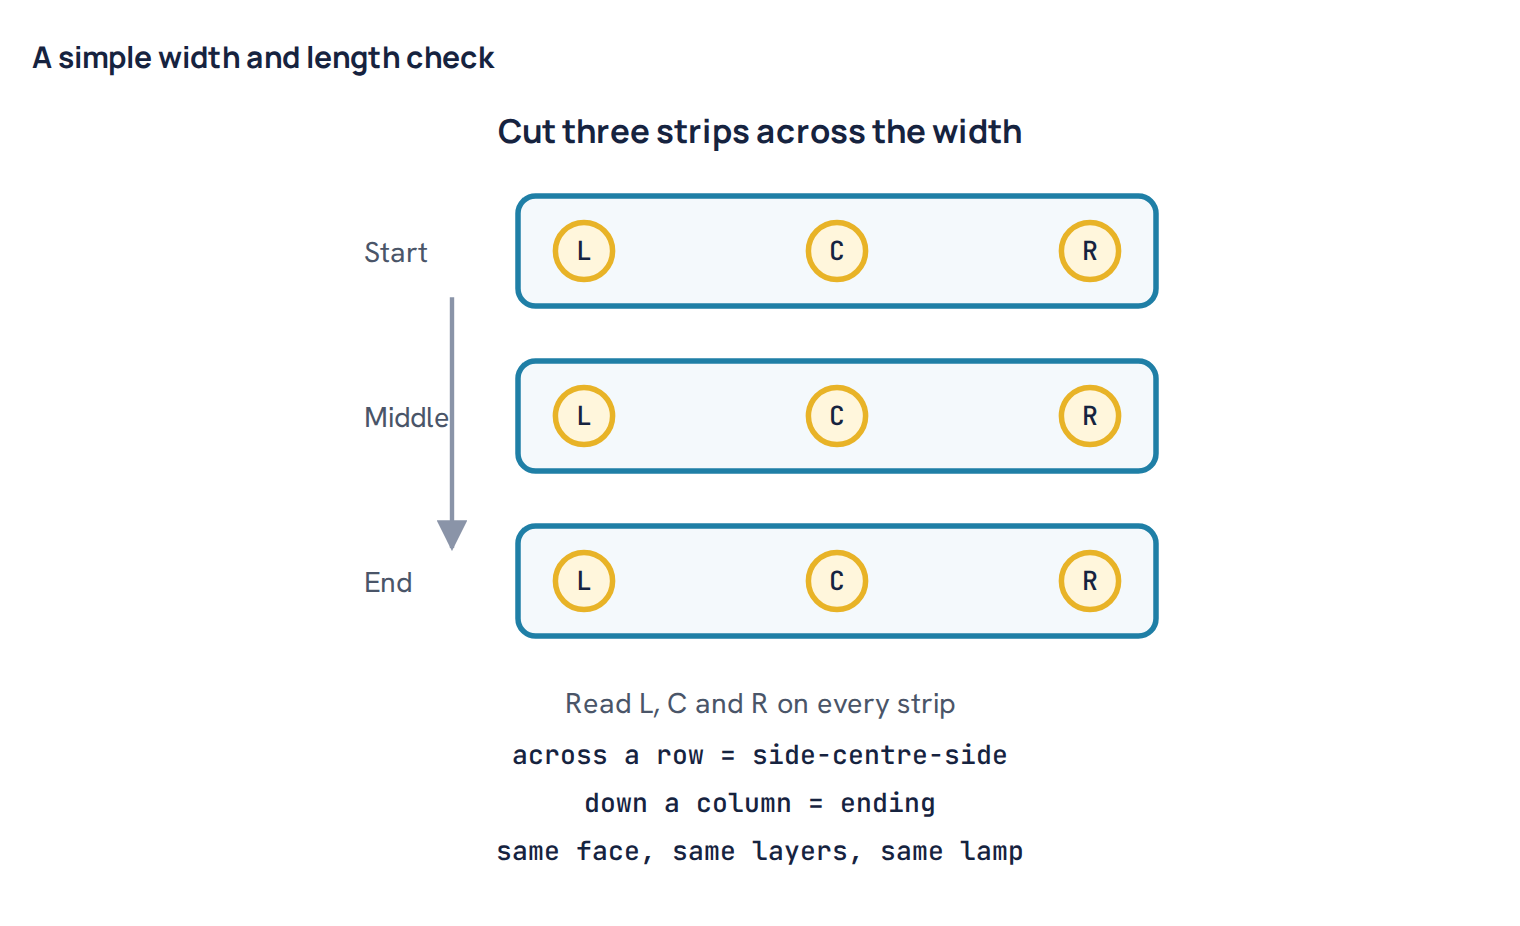
Worked example. Suppose a strip from the middle of a roll gives these differences against the centre: left edge 0.4 and right edge 1.3 (CMC 2:1), with the right edge darker. If the buyer’s side-centre-side limit is 1.0 (limits vary, often 0.8 to 1.0 for this test), the roll fails on one side only. A one-sided failure sends you first to the machine that treats the two sides differently: one stenter side running hotter, a mangle loaded harder on one end, or a fabric that ran off-centre. You then cut strips at the start and end. If the right edge is darker in all three strips, the cause was steady through the run. If it gets worse toward the end, look for something that drifted, such as trough liquor or a burner.
Telling listing apart from look-alike faults
Several faults can be mistaken for listing. The main clue is the shape and position of the shade change.
- Barré runs in bands across the width, repeating along the length with the knitting course pattern, because of yarn lots or knitting tension. Listing runs along the length. See the barré article for that fault.
- Crease and rope marks are random lines or a net-like pattern, often lighter or darker and with a sharp edge. Fold-line listing is two straight lines at fixed positions. The crease marks guide covers the random type.
- Uneven or patchy dyeing gives cloudy patches with no fixed position. Listing sits in the same place across the width for metres at a time. A fault with no fixed position belongs to the uneven dyeing family.
- Lot-to-lot shade variation is one whole batch against another. Ending is within one batch. The fixes are different, as explained in the lot-to-lot article.
- Lustre or nap difference from compacting, raising or stenter pins changes with viewing angle and almost disappears when the fabric is measured folded flat.
Causes, from most common to least
In knit dyeing, the true cause is usually not the dye bath. Exhaust machines circulate the whole rope through the same liquor, so the fabric is mixed well. Most listing comes from a step where the fabric is open or flat and different parts of the width see different conditions: heat-setting, padding, drying and stenter finishing. Fold lines from tubular processing come next. Dye-bath problems are real but less common.
1. Uneven heat-setting before dyeing (finishing group)
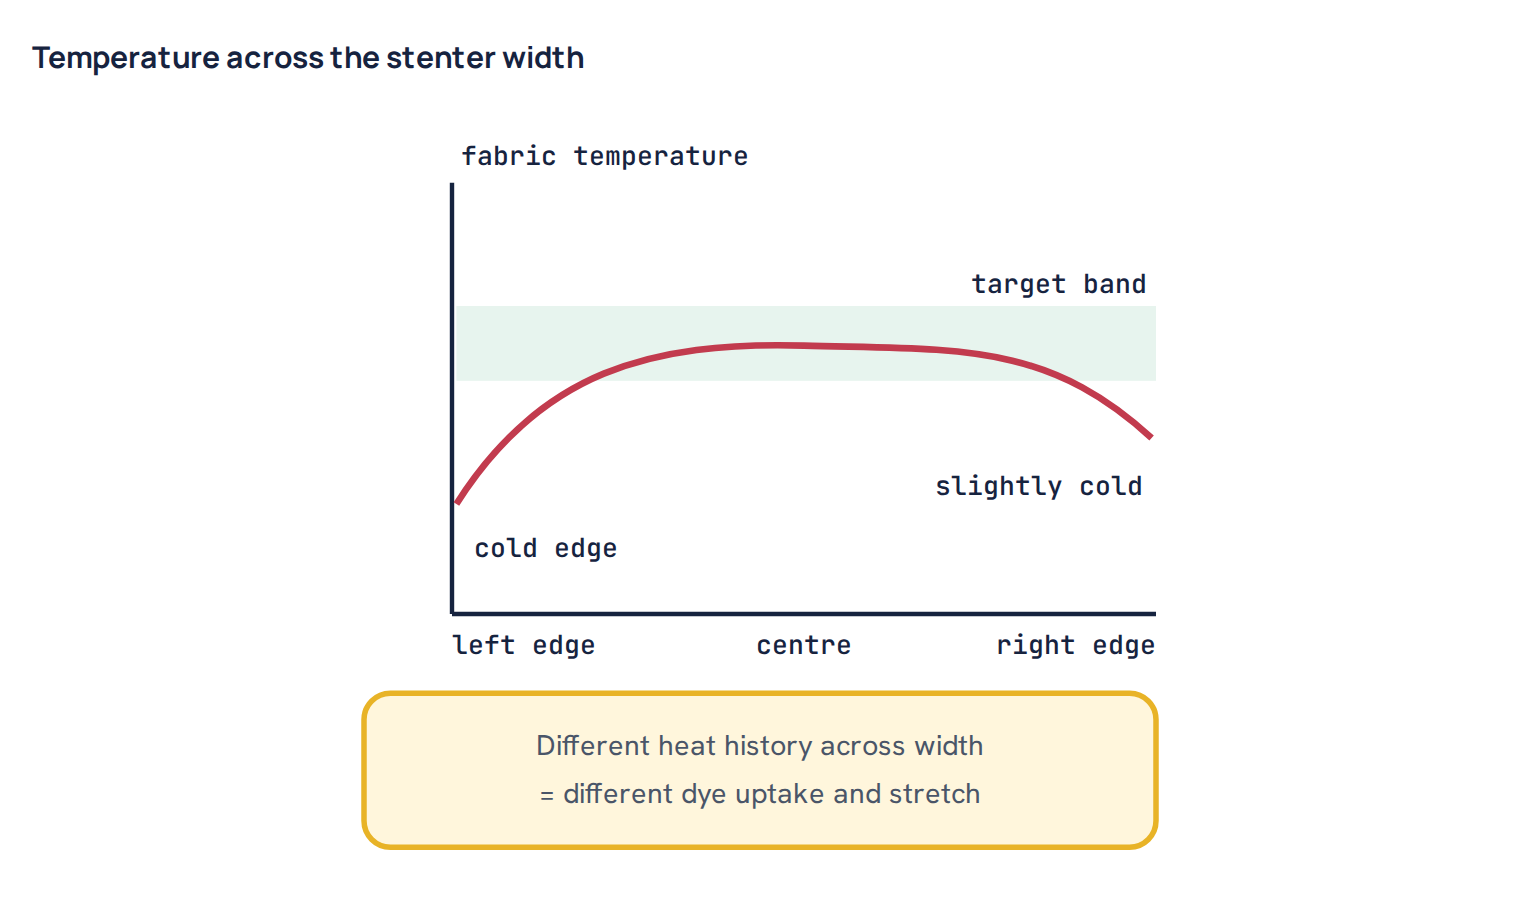
Fabrics with polyester, nylon or elastane are heat-set on a stenter before or after dyeing to fix width and stop curling. Heat-setting changes the inner structure of the synthetic fibre. Its crystal content and the openness of its amorphous zones change with temperature and time. Disperse dye uptake on polyester depends strongly on that structure, so a part of the width that saw a different temperature will dye to a different depth. Depending on where in the temperature range you are, the change can make that zone lighter or darker. The dye can only enter through those open zones, so their size controls the depth.
This matters a lot in daily work. In our dye house records, about 37% of batches contain elastane and about 24% contain polyester, so more than a third of the work passes through a heat-setting step where width evenness counts. Typical causes on the stenter are:
- Temperature profile across the width. Blocked nozzles, a weak fan on one side, a burner that is out of balance, or a fabric run off-centre so one edge sits near a cooler wall.
- Dwell time. If the edge zone is held in clips or pins with a different contact, or the fabric enters at an angle, the edges see a shorter or longer effective time at full temperature.
- Overfeed and width stretch. Uneven overfeed or a width that is pulled more at one edge changes the stitch density and the fibre tension during setting. The tighter zone looks and dyes differently.
- Edge curl. Single jersey curls at the edges. A curled edge is two or three layers thick in the hot air, so it heats more slowly and sets less.
2. Stenter finishing after dyeing (finishing group)
The final stenter can create listing on a fabric that left the dye machine perfectly level. Softeners, especially cationic types, can shift the shade slightly darker or change its hue, and some cause yellowing on whites and pastels when overheated. If the pad mangle gives more softener pick-up on one side, that side looks different. If one side of the stenter runs hotter, light-sensitive or heat-sensitive shades can change there too, and some disperse dyes can sublime or move in the hot zone. Silicone and other finishes can also change the surface lustre. A good clue: listing that appears only on the face, or only after finishing, while the fabric sample taken before finishing was level.
3. Tubular fold lines and rope position (fabric and machine group)
Most knit fabric in exhaust dyeing runs as a tube in rope form. The tube is flattened in the rope, at the reel, in the squeezer, in the dryer and in the compactor. If the folds stay in the same place, those two lines get more pressure, less liquor exchange and a different drying history. In a rope, a fold that keeps the same position through the critical stage of dye uptake can take less dye. In drying and compacting, a hard pressed fold can show as a lustre line or a slightly different shade. Rib and Lycra (elastane) rib fabrics are more prone because they are thick and springy and hold their folds.
Rope position matters too. If the machine is overloaded, or the rope travels too slowly so each part of the fabric passes the nozzle too rarely, the rope stays packed in the chamber in the same shape for a long time. That increases fold and crease risk. Each point of the rope should pass the nozzle often; many dye houses aim for a full rope turn every 2 to 3 minutes, though the right figure depends on the machine and fabric.
4. Pretreatment across the width (pretreatment group)
If scouring and bleaching are done in a continuous open-width range, the same width problems apply. Uneven padding pressure gives more chemical on one side. Uneven drying after pretreatment can leave one side with more residual peroxide, alkali or size. The result is a difference in absorbency and whiteness across the width, which then becomes a shade difference after dyeing. For cotton, also check that the fabric was evenly wet out before dyeing. A dry edge on a fabric that enters an exhaust bath at the start of dye addition will strike differently. Hard water and iron can also act unevenly if they deposit at fold lines during drying; both change dye uptake where they deposit.
5. Continuous and pad processes (dyeing process group)
Pad-dry and pad-batch dyeing are where listing and ending are most likely. Three mechanisms dominate.
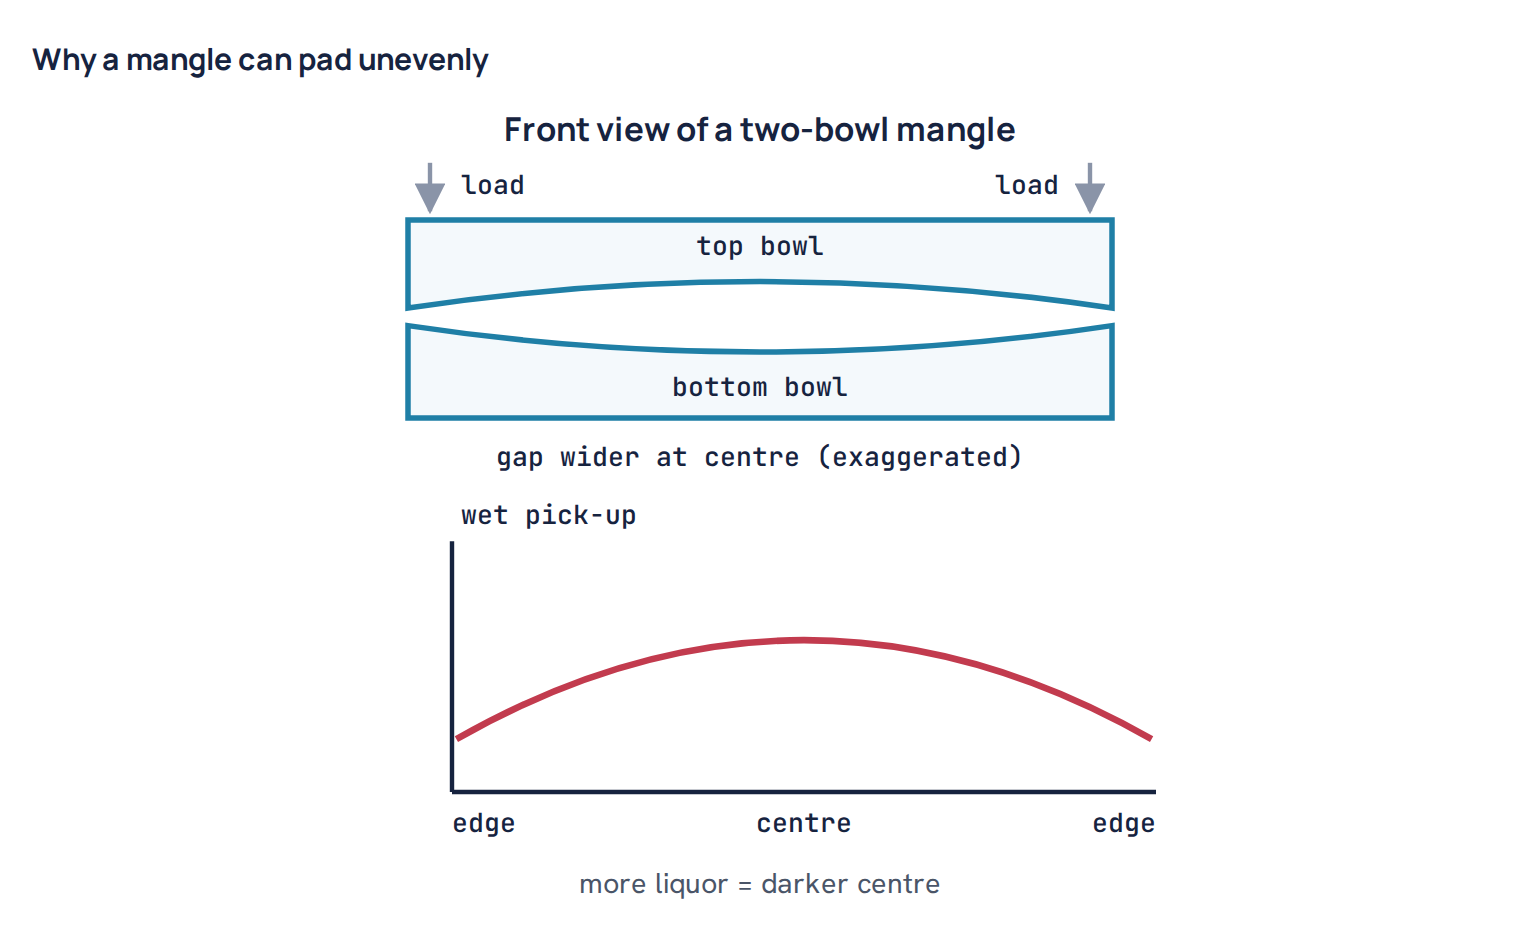
Pad mangle nip pressure. The two bowls of a mangle are pressed together by load at their ends. Under load, each bowl bends a little, like a beam. The gap at the centre then becomes slightly larger than at the edges, so the centre carries more liquor and dyes darker. Mangle makers correct this with crowned or deflection-controlled bowls, but only for a set pressure. If the pressure is changed, or the rubber cover is worn or has hardened unevenly, the correction is lost. One side may also be loaded more than the other.
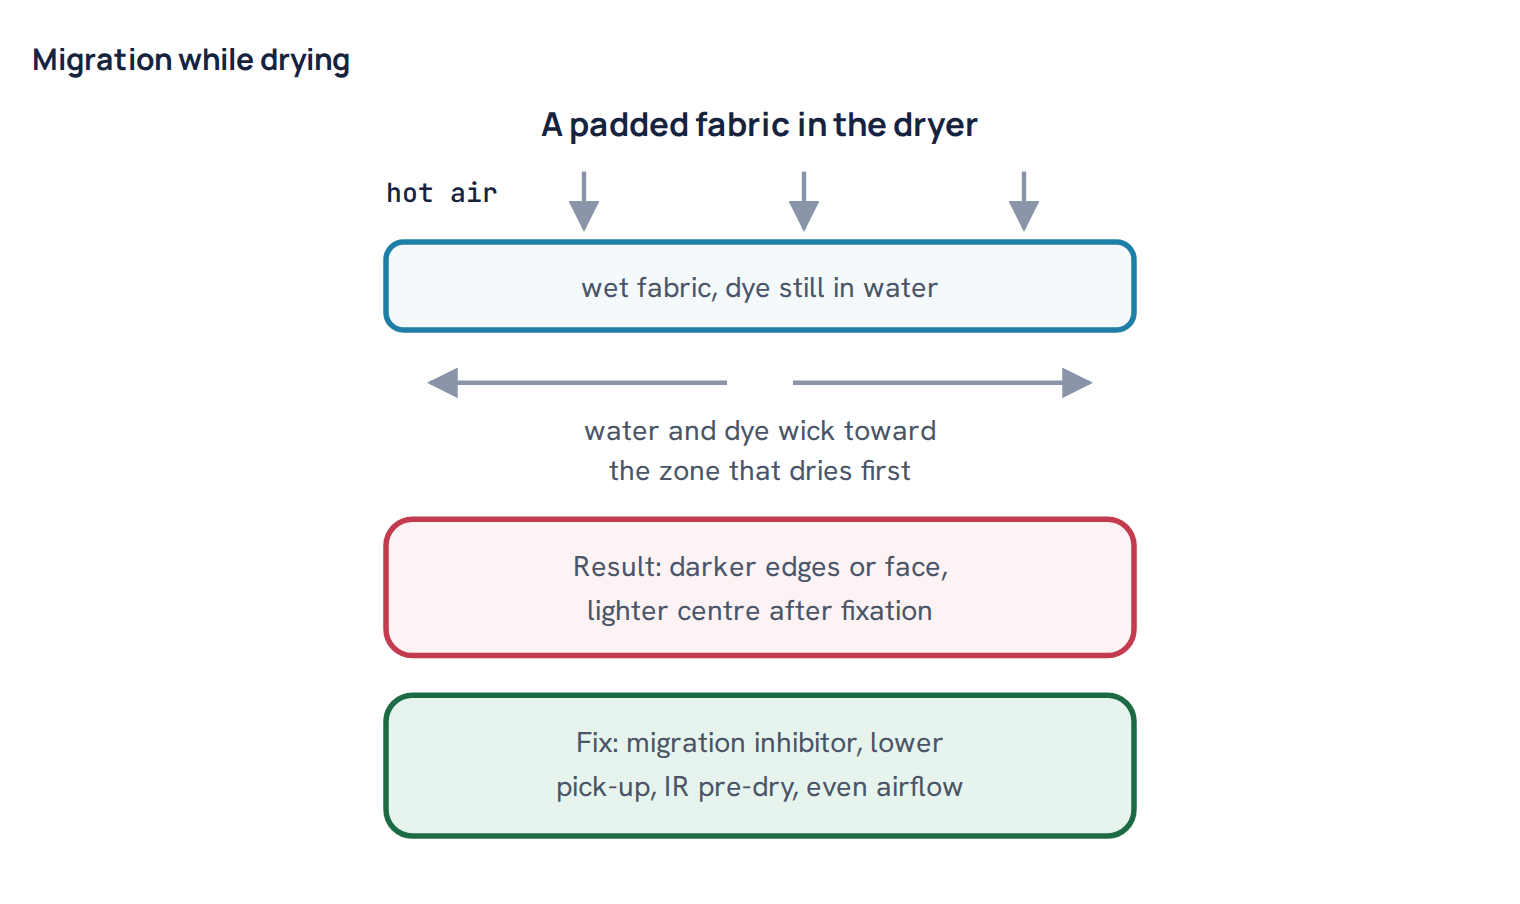
Dye migration during drying. After padding, the dye is still in the water held by the fabric. When the fabric is dried, water moves by capillary action toward the place where it evaporates, and it carries unfixed dye with it. If one zone dries first, such as the edges, the face nearest a hot burner, or a zone with stronger airflow, dye collects there. The result is darker edges or a darker face, and a lighter centre or back. Migration is worst with high wet pick-up, dyes of low substantivity, and fast, uneven drying. It is a key concern in pad-dry processes for disperse dyes on polyester blends.
Tailing and ending in pad-batch. In cold pad-batch with reactive dyes, the dye and alkali are mixed just before the trough. As the run goes on, the fabric can take dye from the trough faster or slower than the feed replaces it, so the trough concentration drifts. Dyes with higher substantivity are taken up preferentially at the start, and the trough becomes weaker in them, so the start is darker than the end, or the hue drifts. Hydrolysis of reactive dye in the mixed alkaline liquor adds to the drift over time. A large trough volume and warm liquor make tailing worse.
6. Exhaust dyeing recipe and process (dyeing process group)
In exhaust dyeing, a fast strike can lock in any difference in absorbency or fold position before the rope has turned enough times to even it out. Too fast a heating rate in the critical zone, salt or alkali added too quickly, or dyes with very different strike rates in one recipe make this worse. The general rules in the level dyeing article apply here: control the strike and give the dye a chance to migrate.
7. Liquor flow and temperature in the machine (machine group)
This is the least common source of true listing in jet and overflow machines, but it happens. A partly blocked nozzle or a rope that is wider than the nozzle can give uneven liquor contact across the flattened rope. In multi-chamber machines, one chamber may have weaker flow. A slow heat exchanger or poor circulation can give a temperature gradient in the bath, which matters most for polyester in the 90 to 130 °C range where disperse dyes go on fast. In open-width beam or jigger dyeing, flow and temperature across the width are more critical, and edge-to-centre listing from jiggers is a well-known fault when the edges cool on each pass.
8. Elastane fabrics: a special case
Elastane fabrics combine several risks. They must be heat-set evenly, they curl at the edges, and they are often finished open width. Elastane itself takes some dye, and its uptake changes with heat history. Over-setting one side also weakens the elastane there, so the fault can show as both a shade and a stretch difference. When a light-coloured elastane single jersey shows streaks or a side-to-side change, heat-setting evenness is one of the first things to check, before the recipe. The polyester-elastane process article gives the normal route and setting order.
Common mistake: Blaming the dye machine first. A listing fault on an elastane or polyester fabric is far more often from the heat-setting stenter. Before changing the recipe, cut a strip from the greige or heat-set fabric and dye it in the lab across its full width.
A quick diagnostic checklist
- Name the pattern: one side, both edges, two fixed fold lines, or start against end.
- Measure L, C and R on strips from the start, middle and end of the batch.
- Check face and back. Face-only faults point to finishing or migration.
- Check a sample taken before final finishing, if one was kept. Level before and uneven after means the stenter or softener.
- For synthetic and elastane fabric, check the heat-setting record: temperature, speed, overfeed, width, and which side was toward the machine operator.
- Do a full-width lab dyeing of a heat-set strip. If the strip dyes uneven in the lab, the fabric was uneven before it entered the dye machine.
- For tubular fabric, measure the distance between the lines and compare it with half the tube circumference. If it matches, they are fold lines.
- For pad processes, run a nip imprint test and check trough liquor concentration at the start and end of the run.
- Check machine load, rope speed and nozzle setting against the standard for that fabric.
Prevention: settings and checks
The figures below are typical starting points. Exact values vary with fabric, fibre, machine and buyer standard, so set your own limits from your own trials.
Stenter and heat-setting
- Calibrate the width profile, not only the set point. Check fabric temperature at left, centre and right with a contact probe, temperature-indicating strips, or a data logger running through the machine. Many mills aim for a spread of no more than about 2 to 3 °C across the width.
- Use the right heat-setting window. Polyester-elastane is often set at about 185 to 195 °C for 30 to 60 seconds; cotton-elastane at about 185 to 195 °C for a shorter time; nylon-elastane lower, around 175 to 185 °C. These vary with fabric weight and machine, so confirm with stretch and shrinkage tests.
- Clean nozzles and filters on a fixed schedule. Lint build-up blocks airflow on one side first.
- Keep the fabric centred and the overfeed even on both sides. Use edge guiders and decurlers so single jersey enters flat.
- Check pad pick-up on the stenter padder the same way as on a dye pad, because softener listing is a pick-up problem.
Pad mangle and continuous dyeing
- Run a nip imprint test with pressure-sensitive paper or a carbon-paper imprint at working pressure. The imprint should be an even band from edge to edge.
- Measure wet pick-up on cut pieces from both edges and the centre. A common target is a spread within about ±2% of the mean pick-up.
- Keep wet pick-up as low as practical, since lower pick-up means less water to migrate.
- Use a migration inhibitor in pad-dry liquors, at the dose given by the supplier, and confirm it is compatible with the dyes and the binder system.
- Pre-dry gently and evenly, for example with infrared pre-drying, before hot-air drying. Avoid hitting wet fabric with very hot air on one face.
- For pad-batch, keep the trough small, feed dye and alkali at a fixed ratio by metering pump, keep the liquor cool, often around 20 to 25 °C, and choose dyes with similar substantivity. Batch the roll on a slowly turning beam under cover so liquor does not drain to one side.
Tubular processing and exhaust dyeing
- Do not overload the machine. Follow the machine’s rated load per chamber for that fabric weight.
- Keep rope speed up so each point of the fabric passes the nozzle often; many dye houses aim for a full rope turn every 2 to 3 minutes. Divide the rope length by the fabric speed to check it.
- Change the fold position in drying and compacting, or slit before finishing if the fabric allows. Slitting and finishing open width removes fold lines completely.
- Control the strike: slow heating in the critical zone, staged salt and alkali dosing, and compatible dyes in the recipe.
Common mistake: Calibrating the stenter thermostat and assuming the fabric is even. The set point measures air at one probe. Only measurements on the fabric at both edges and the centre show the real profile.
Common mistake: Topping up a pad-batch trough with a fresh, full-strength mix halfway through the run. The shade jumps at that point and the batch shows a clear step, not a smooth tail. Feed continuously at a fixed ratio instead.
Correcting a faulty batch
Correction depends on where the listing came from. A fault made in finishing can often be removed. A fault built into the fibre by heat-setting cannot be removed by re-finishing, because the fibre structure has already changed.
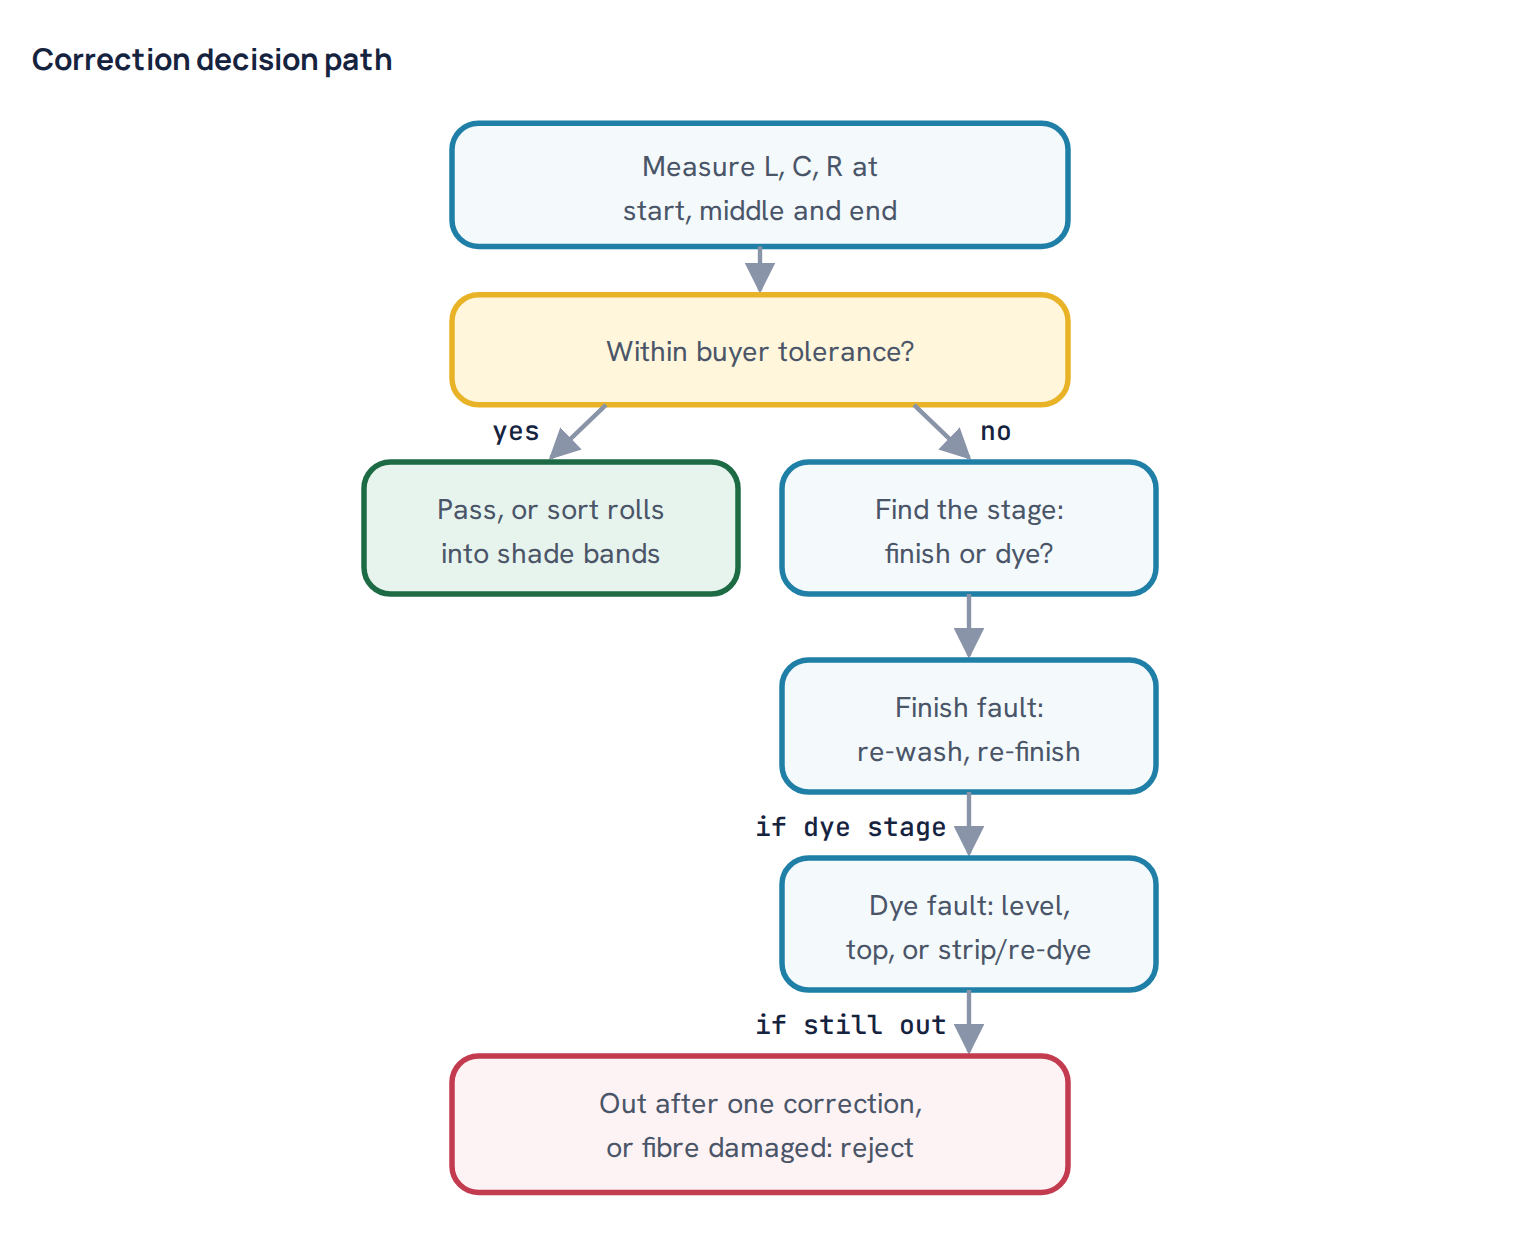
- Finishing faults. If softener pick-up or stenter heat caused the listing, wash off the softener with a mild detergent wash, check that the shade is level again, and re-finish on a calibrated stenter with checked pick-up.
- Fold-line marks. Light fold lines from drying or compacting can often be removed by re-wetting, re-drying with the fold moved, and compacting again. Lines formed during dye uptake usually need a levelling treatment.
- Levelling in the dye bath. For polyester, a high-temperature run at about 130 °C with a levelling agent lets disperse dye migrate, and can even out moderate differences. For reactive dyes on cotton, the fixed dye does not migrate, so levelling helps little once fixation is done.
- Topping. Adding a small amount of dye to bring the whole batch to shade does not remove listing, because both sides take more dye. It only helps if the light zone was simply under-dyed and the overall shade is still on the light side.
- Strip and re-dye. Partial or full stripping, followed by re-dyeing, usually to a slightly deeper shade, is the strongest correction. The stripping guide covers the reactive case. Heat-set listing on polyester often survives stripping, because the fibre still has different uptake on each side.
- Slit and sort. If the fault is mild and the buyer agrees, rolls can be sorted into shade bands, or the cutting room can be told to cut matching panels from the same zone. This needs clear marking on each roll.
Stop and reject when the batch is still outside tolerance after one planned correction, when the hand feel, bursting strength or stretch recovery has dropped below specification, or when the cause is heat-set structure that no wet treatment can change. Sending such a batch round again only adds cost and damage.
What to record so it does not repeat
- The pattern found and the side-to-centre readings at start, middle and end, with which side was the operator side.
- Heat-setting data: temperature set point, measured fabric temperature at L, C and R, speed, dwell time, overfeed and width.
- Pad data: pressure, nip imprint result, wet pick-up at L, C and R, trough volume and liquor temperature.
- Dye machine data: load, rope speed or turn time, nozzle setting, heating rate and dosing times.
- Finishing data: softener type and dose, pick-up, stenter temperature and whether the fabric was finished tubular or open width.
- The correction used and its result, so the next engineer knows what worked.
Over time this record shows which machine and which side cause most listing. That is often a single stenter or mangle, and fixing it removes most of the problem at its source.
Questions
What is listing in fabric dyeing?
Listing is a shade difference across the width of the fabric, such as darker edges than centre, one side different from the other, or stripes along the fold lines of tubular fabric. A shade change from the start to the end of a batch is called ending or tailing.
How do you measure side-centre-side shade variation?
Cut full-width strips from the start, middle and end of the batch and measure the left edge, centre and right edge with a spectrophotometer. Report each side against the centre in the buyer’s colour difference system, usually CMC (2:1).
Why are the fold lines of tubular fabric a different shade?
The folds stay in the same place in the rope, dryer and compactor, so those lines get more pressure, less liquor exchange and a different drying history. Moving the fold position, keeping the rope turning fast and slitting before finishing all help.
Can stenter heat-setting cause shade variation?
Yes. If one part of the width runs hotter or colder, polyester and elastane set differently there and later take a different amount of dye. Check the fabric temperature at both edges and the centre, not only the set point.
Can a listing fault be corrected?
Finishing-related listing can often be washed off and re-finished, and disperse-dyed polyester can be levelled at high temperature. Listing from uneven heat-setting usually survives re-dyeing, so it is sorted, accepted by agreement or rejected.

Textile engineer with 14+ years in dyeing and fabric development. He writes every guide on Dyeing Solution from real production work. Full profile