How to confirm patchy, cloudy or streaky shades on cotton, polyester-elastane and CVC knits, trace the real cause, correct a faulty batch and stop it coming back.
At a glance
80–130°Ctypical critical zone for disperse dyes on polyester
30–60 mintypical progressive alkali dosing time for reactive dyes
1–3 mincommon target fabric cycle time in a jet
37%share of our batches that contain elastane
Uneven dyeing is the fault every knit dyer has seen. The shade matches the standard on average, but the fabric shows clouds, patches, streaks, or areas that are a little darker or lighter than the rest. Sometimes the face and the back do not match. Once a cutter spreads that fabric and cuts panels from different places, the garment shows it straight away. This article covers how to confirm the fault, how to tell it apart from faults that look similar, the causes ranked from most to least common, a quick checklist, settings that prevent it, how to correct a faulty batch, and what to record so the same fault does not come back. It covers cotton dyed with reactive dyes, polyester and polyester-elastane dyed with disperse dyes, and CVC blends that need both.
What uneven dyeing looks like
“Uneven” is a family of patterns, not one fault. Name the pattern correctly, because each one points to a different part of the process.
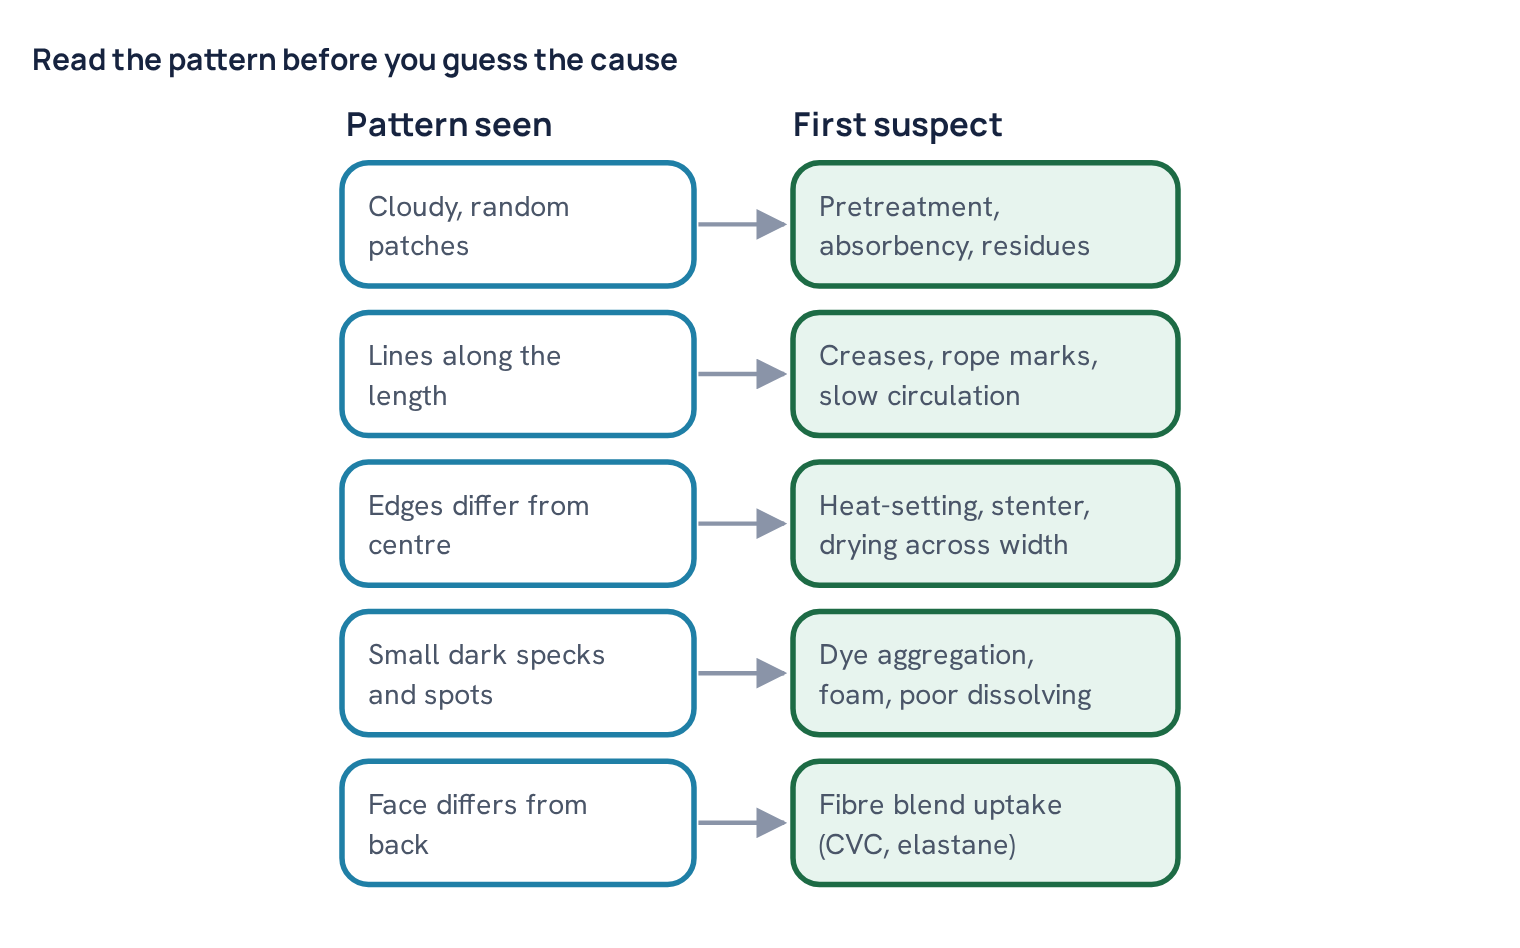
- Patchy or cloudy shade. Soft-edged areas of different depth spread at random across the fabric. They often look like clouds or a map. This usually starts before the dye goes in: poor or uneven pretreatment, or residues left on the fabric.
- Streaks. Lines of darker or lighter shade, usually running along the length of the fabric. Sharp lines often come from creases or rope marks. Softer, wider streaks can come from poor circulation, where one part of the rope stays folded in the same place for too long.
- Darker or lighter areas in one zone. One end of the roll, one edge, or one side of a tube is different. Edge-to-centre difference has its own name, listing, and an end-to-end difference is called ending.
- Face versus back difference. The technical face is lighter or darker than the back, or a different hue. On blends this is often a fibre issue: polyester and cotton, or polyester and elastane, take dye at different rates, and the knit structure decides which fibre shows on which side.
- Specks and small dark spots. Many small concentrated marks. These are usually dye aggregation, undissolved dye or foam, and are covered in more detail in the separate article on dye spots.
The theory behind all of these is the balance between strike and migration: how fast dye goes onto the fibre, and whether dye already on the fibre can move to even itself out. If you want that background first, read level dyeing: strike, migration and uneven shades. This article stays on the practical fault-finding side.
How to confirm the fault
Many complaints of “uneven” turn out to be a lighting problem, a folding problem, or a different fault. Before changing anything in the process, confirm what you actually have.
- Light box, flat and unfolded. Open the fabric flat on an inspection table or in a light box under daylight (D65). Look at it from about an arm’s length, then step back. Clouds are easier to see from a distance; specks and fine streaks are easier to see close up.
- Cut and compare. Cut pieces of the same size from the suspect area and from a normal area, from both edges and the centre, and from the start and end of the roll. Lay them side by side in the same direction. Then rotate one piece by 180° and compare again. If the difference disappears when you rotate, it was a pile, lustre or viewing-angle effect, not a dyeing fault.
- Face and back. Check both sides. A patch visible on both sides points to the dyeing itself. A mark only on the face can be a surface effect, a finishing mark or a fibre exposure difference.
- More than one light. Look under D65, then shop light (TL84 or similar) and incandescent (A). If two areas match under one light and not under another, the two areas carry different dye ratios. That is useful: it tells you one dye in the recipe went on unevenly, not the whole shade.
- Measure. If you have a spectrophotometer, read several points and compare colour difference and depth. Numbers end arguments about “how bad” a batch is.
Also check whether the fabric was folded while still warm or damp. Fabric that sat folded can show temporary lines that disappear after conditioning. Wait until the fabric has cooled and conditioned before you judge it.
Faults that look like uneven dyeing
Several other faults are reported as “uneven” by the floor or the buyer. Separating them early saves a lot of wasted correction work.
- Barré. Horizontal bands along the course direction that repeat at a regular spacing. This is a yarn or knitting fault (yarn lot, count, tension, feeder), not a dyeing fault, and redyeing rarely removes it. See barré in knit fabric.
- Crease marks. Sharp lines, often branched or at an angle, set into the fabric during wet processing. They are a form of streak with a mechanical cause. See crease marks in knit dyeing.
- Listing. Edges darker or lighter than the centre along the whole length. It is often caused by heat-setting, drying or padding, not by the dye bath.
- Lot-to-lot variation. Each batch is even, but two batches do not match each other. That is a reproducibility problem, not levelness.
- Metamerism inside a batch. Areas match under one light and not another. As noted above, this can be a sign of uneven uptake of one dye, so it belongs in this family.
Causes, from most common to least
The order below reflects what is generally seen in knit dye houses: most uneven batches trace back to fabric preparation and to how fast the dye was allowed to go on, and fewer to exotic causes. Your own records may rank them differently, which is exactly why recording matters.
| Rank | Cause | Group | Typical sign |
|---|---|---|---|
| 1 | Uneven absorbency, residual peroxide, alkali, oil or size | Pretreatment | Cloudy patches, random |
| 2 | Fast strike: salt or alkali added too fast | Recipe and process | Patches, rope-shaped streaks |
| 3 | Heating too fast in the critical zone | Recipe and process | Patches on polyester, hue shifts |
| 4 | Poor circulation, low reel speed, overloading, tangling | Machine | Streaks, darker folded areas |
| 5 | Uneven heat-setting of polyester-elastane | Fabric and yarn | Listing, broad patches |
| 6 | Crease and rope marks | Machine and handling | Sharp lines |
| 7 | Dyes with different strike in one recipe | Recipe | Hue changes between areas |
| 8 | Hard water, foam, dye aggregation | Water and chemicals | Dull patches, specks |
| 9 | Uneven drying or stenter temperature | Finishing | Edge or zone difference |
Pretreatment and absorbency
Dye can only go on evenly if water reaches every part of the fibre at the same speed. Cotton that has been scoured unevenly still carries natural wax and oil in some areas. Those areas wet slowly, take dye late and end up lighter. Knitting oil on polyester and elastane does the same job against disperse dye. Size or spin finish on some yarns behaves similarly.
Residues cause their own patches. Residual hydrogen peroxide after bleaching can attack some reactive dyes in the bath and gives lighter, duller areas wherever the peroxide was concentrated. Residual alkali from scouring raises the pH locally, so fixation starts in those areas before the salt has done its job. Both problems are worst in the folds of the rope, where the rinse water reached least. The fix is simple but must be done every time: rinse well, neutralise, use a peroxide-killing enzyme or agent, and test before dyeing.
Fast strike in reactive dyeing
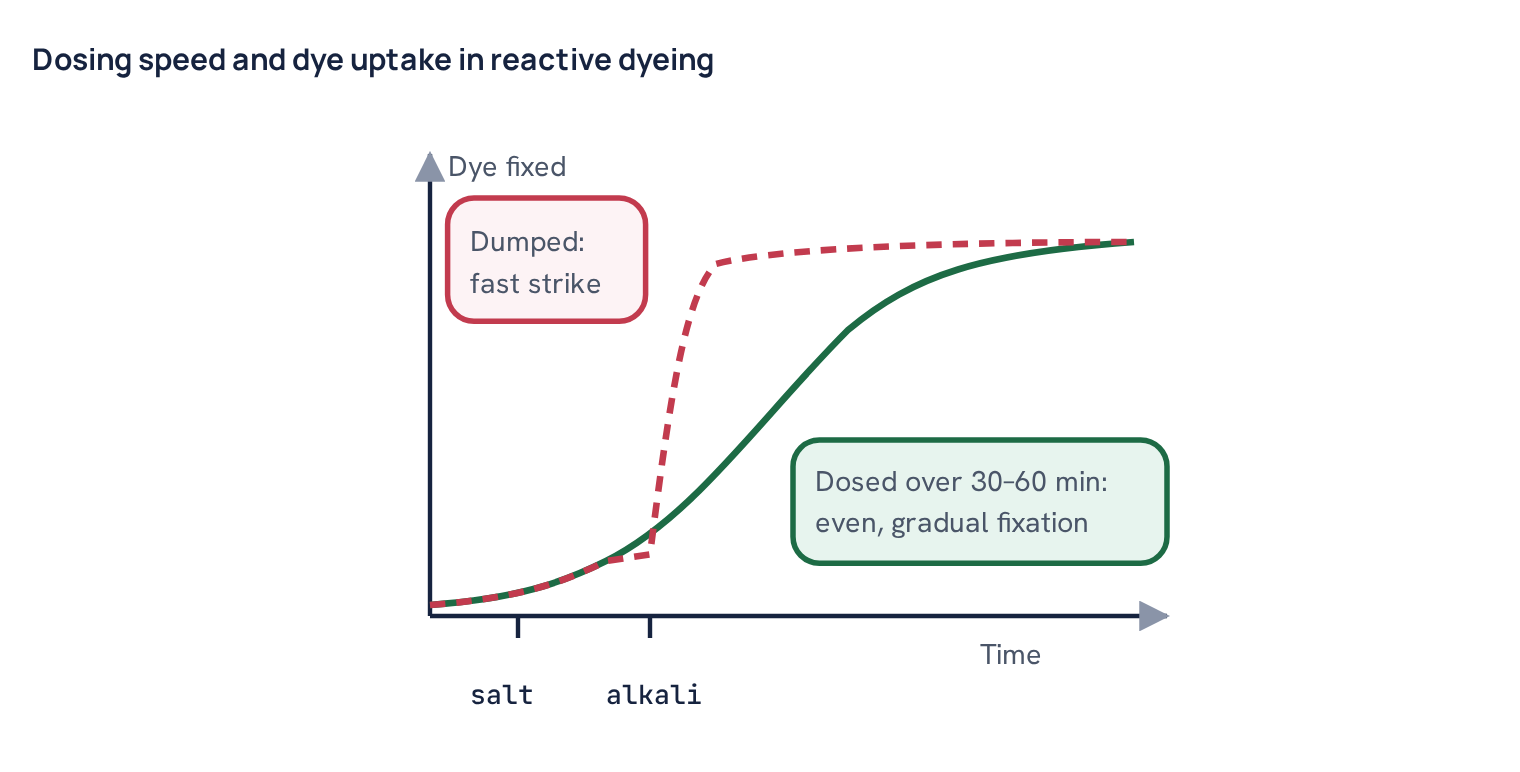
For cotton with reactive dyes, salt pushes dye onto the fibre and alkali makes it react. Once the dye has reacted it cannot move again. If the salt goes in all at once, the part of the rope passing through the nozzle at that moment takes a burst of dye. If the alkali goes in all at once, that uneven pattern is fixed in place within minutes. The machine then has no chance to even it out. Progressive or linear dosing over a set time spreads the strike across many fabric cycles, so every part of the rope sees the same conditions. More on the chemistry is in the article on how reactive dyes work.
Heating rate in the critical zone on polyester
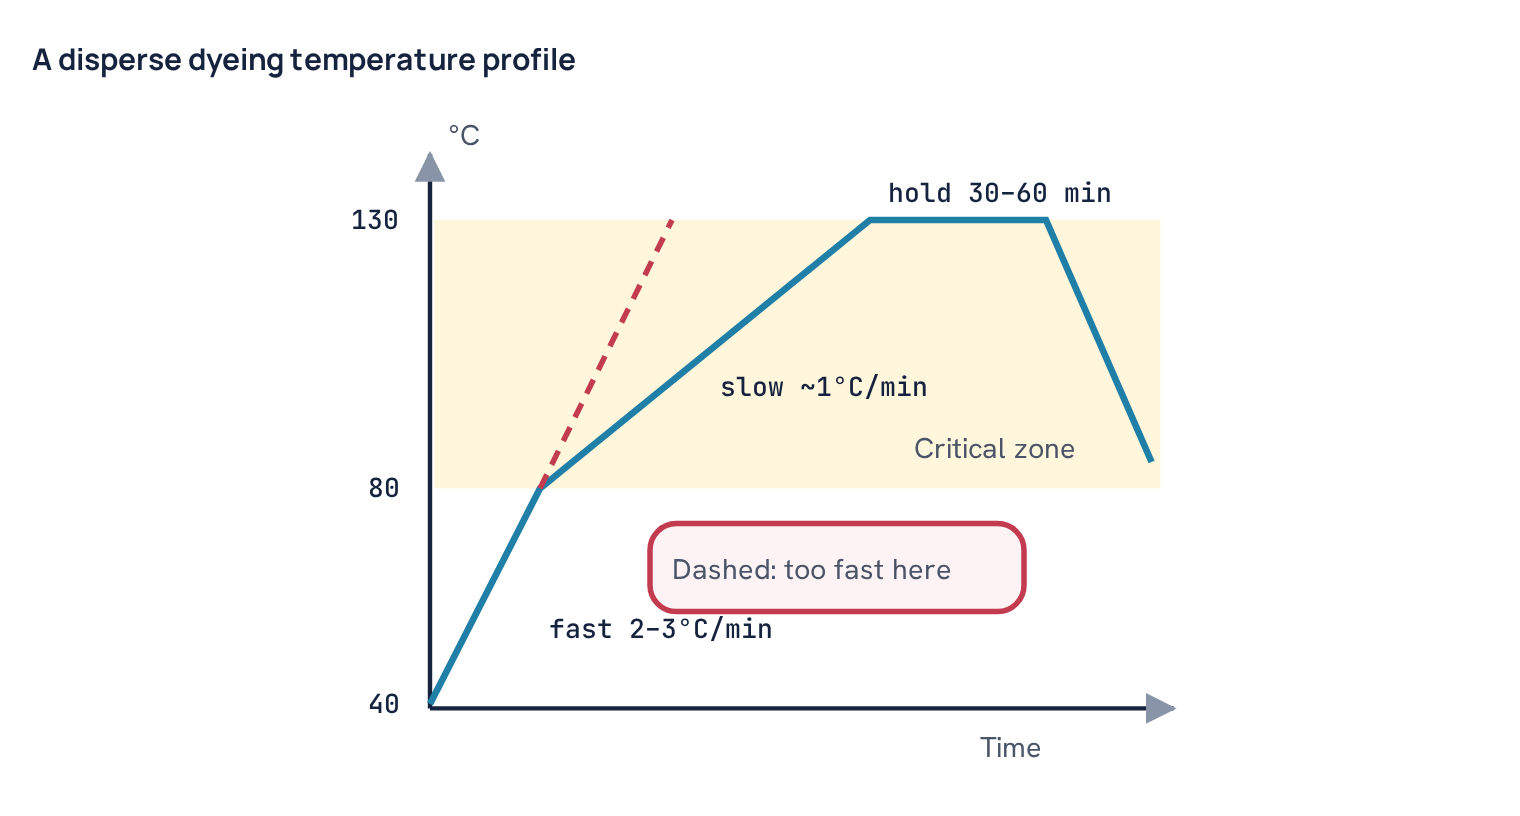
Disperse dyes go onto polyester mainly as the fibre structure opens with temperature. For most dyes the bulk of uptake happens roughly between 80 and 130°C. This is the critical zone, and its exact range varies with the dye and the fibre. If the machine heats fast through this zone, uptake becomes rapid in whatever part of the rope is best exposed. Some disperse dyes can migrate during a hold at top temperature and partly correct this, but large-molecule dyes with high fastness migrate poorly, so the early unevenness stays. On polyester-elastane the hold temperature is often limited to protect the elastane, which reduces migration further.
Dye compatibility in the recipe
A recipe of three dyes is only level if the three dyes go on at about the same time. If the blue in a green starts to strike at a lower temperature than the yellow, the areas that took dye early end up bluer, and the areas that took it late end up yellower. The batch is then not only patchy in depth but also in hue, and it looks worse under some lights than others. For disperse dyes, mix dyes of the same energy class and similar strike temperature. For reactive dyes, pick dyes from one compatible range with similar reactivity and similar response to salt.
Common mistake: correcting a shade in the lab by adding a small amount of a “convenient” dye from another range. It matches in the beaker, where heating is perfectly even, then splits into patches of different hue in bulk.
Machine: circulation, reel speed and loading
In a jet or soft-flow machine, the rope passes through the nozzle, where it meets fresh liquor, then rests in the storage chamber. Levelness depends on every part of the rope passing the nozzle many times while the dye is going on. The measure for this is cycle time: how long it takes one point on the rope to make a full round. A common target is about one to three minutes, though it varies by machine and fabric. Low reel speed, low nozzle pressure or too much fabric in the chamber all make the cycle longer. An overloaded chamber also packs the rope tightly, so folds stay in place and become streaks, and the rope can tangle and stop moving at all. A badly underloaded machine has its own problems: the rope can run loosely and twist.
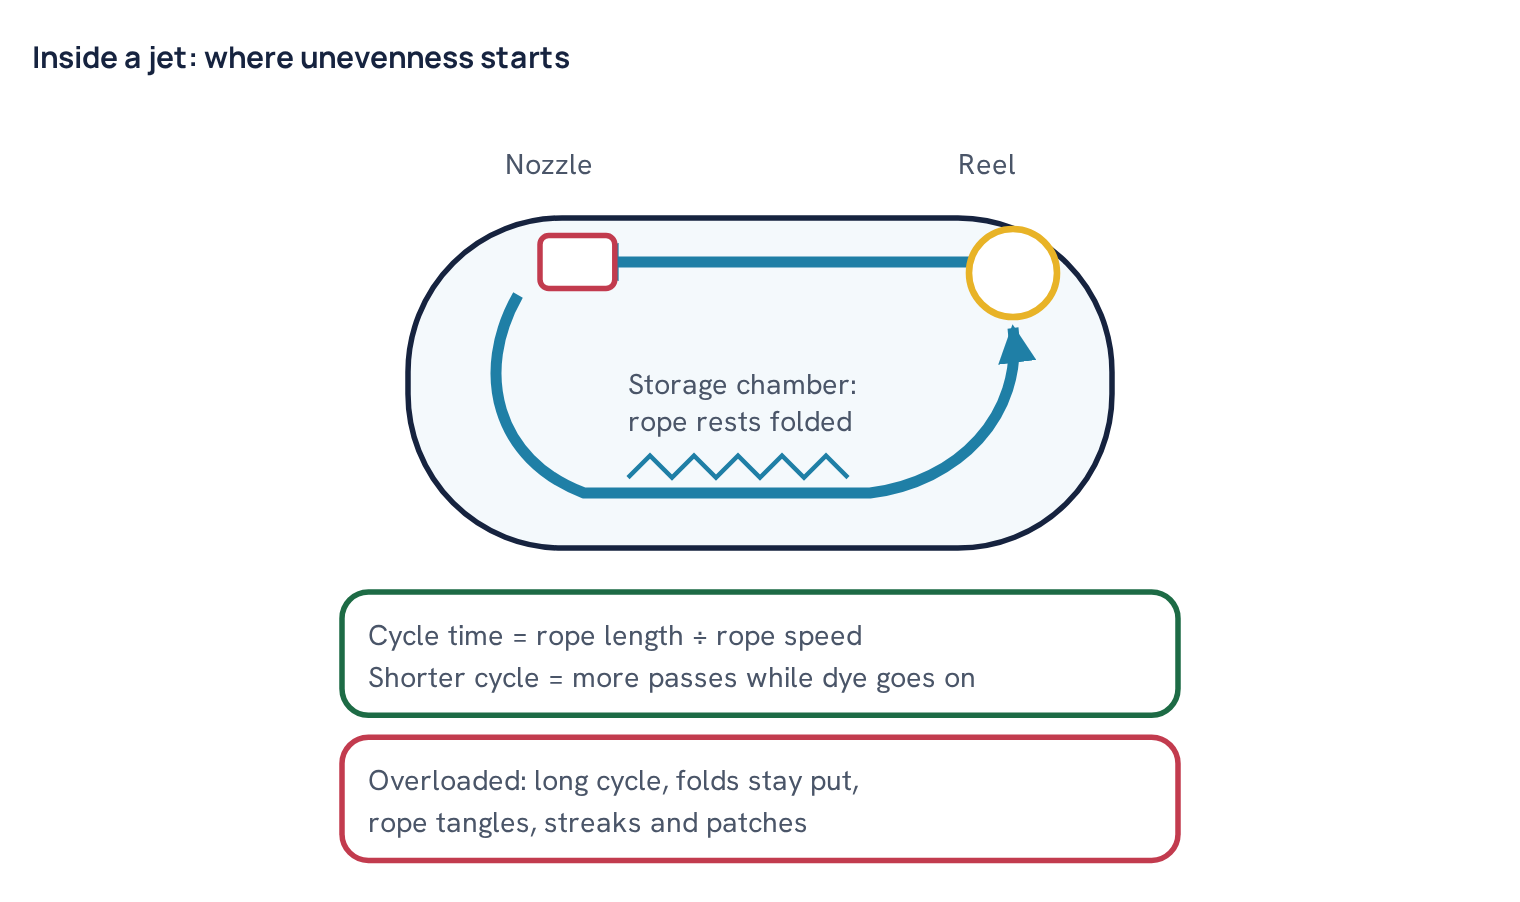
Worked example. A two-tube jet is loaded with 250 kg of single jersey at 180 g/m², tubular, with an open width of 1.8 m. Each metre of fabric weighs 180 × 1.8 = 324 g. Total rope length is 250,000 ÷ 324 ≈ 772 m, so about 386 m per tube. At a reel speed of 250 m/min, the cycle time is 386 ÷ 250 ≈ 1.5 minutes, which is comfortable. If the same machine is pushed to 330 kg, each tube carries about 509 m and the cycle time rises to about 2 minutes, and that is before the reel starts slipping on a heavier, tighter rope. Alkali dosed over 40 minutes then reaches each point of the rope about 20 times instead of about 26. You can check your own figures with the dyeing machine cycle time calculator.
Fabric and yarn: heat-setting and blends
Heat-setting stabilises polyester and polyester-elastane fabric before dyeing. It also changes the fibre’s internal structure, and that changes how fast disperse dye goes in. If the stenter runs hotter on one side, if the dwell time changes when the speed changes, or if the fabric is set with uneven overfeed or tension, the fabric now has zones that dye differently. No dyeing step can fully remove that difference. Typical heat-setting for polyester-elastane is around 185–195°C for a short dwell, but the right setting varies with the elastane type and the fabric, so follow the fabric’s own development record.
Blends add a second layer. In CVC, cotton and polyester are dyed with two dye classes in two stages, and either stage can be uneven on its own. In plated elastane fabrics, the elastane takes some disperse dye at lower temperature and holds it less firmly than polyester; where the knit stretches or the elastane is more exposed, the shade can look different. This is a large share of the work in a knit dye house: in our records, about 37% of batches contain elastane and about 24% contain polyester. See the polyester-elastane knit dyeing process for the full sequence.
Water, foam and dye aggregation
Calcium and magnesium in hard water can reduce the solubility of some reactive dyes and upset dispersing agents for disperse dyes. The result is dull patches and specks where dye has clumped. Foam traps air in the rope, so parts of the fabric are not in contact with liquor; those areas take dye later and end up lighter. Disperse dyes that are not well dispersed, or dyes added too fast to a hot bath, form aggregates that deposit as darker spots. See water quality in textile dyeing for hardness limits and testing.
Finishing: drying and stenter
Some unevenness appears only after finishing. A stenter with uneven temperature across its width can give different final shade at the edges, especially on polyester, where some disperse dyes move to the fibre surface at high temperature (thermomigration), helped by certain softeners. Damp fabric that dries unevenly can also show water marks. If the fabric looked level when it came out of the dyeing machine, suspect finishing first.
Common mistake: judging a batch straight from the machine and again after the stenter without keeping a cut piece from the first check. When the shade changes in finishing, you then cannot prove where the fault came from.
A real case: patches and streaks on polyester-elastane
This case comes from our development dye house, and its investigation was still open when this was written. It is here to show how to think through a fault, not as a confirmed answer.
The fabric was a light single jersey of polyester filament (75 denier) with elastane (30 denier), around 150 g/m², dyed as a single open-width roll of about 15 kg in a pale green shade. That batch size is typical of development work; across our development and sample batches the median is about 18 kg, and small batches are harder to keep perfectly even. After dyeing, the face showed darker, bluer green patches and streaks. The streaks looked like crease lines running across the face.
The first things an engineer checks on a fault like this are:
- Heat-setting evenness. Were the stenter temperature, speed and overfeed steady across the width and along the length? A strip of remaining heat-set greige can be dyed in the lab with a single structure-sensitive disperse dye to see whether the fabric itself has zones.
- Crease and rope marks. Do the streaks follow the lines along which a rope folds, or the way the roll was handled before dyeing? Were they there, faintly, before dyeing?
- Levelling and heating rate. How fast did the machine pass through the critical zone, and was a levelling agent used? Pale shades show every small difference in strike.
- Dye compatibility. The darker areas were bluer, not just deeper. In a mixed green that suggests the blue component went on faster than the yellow in those areas. Do the two dyes share an energy class and a similar strike temperature?
- Elastane versus polyester uptake. Did the elastane take more of one dye than the other, and is more elastane showing in the marked areas because of stretch or creasing?
Each check either rules a cause in or out. Changing several things at once in the next batch would hide which one mattered.
Quick diagnostic checklist
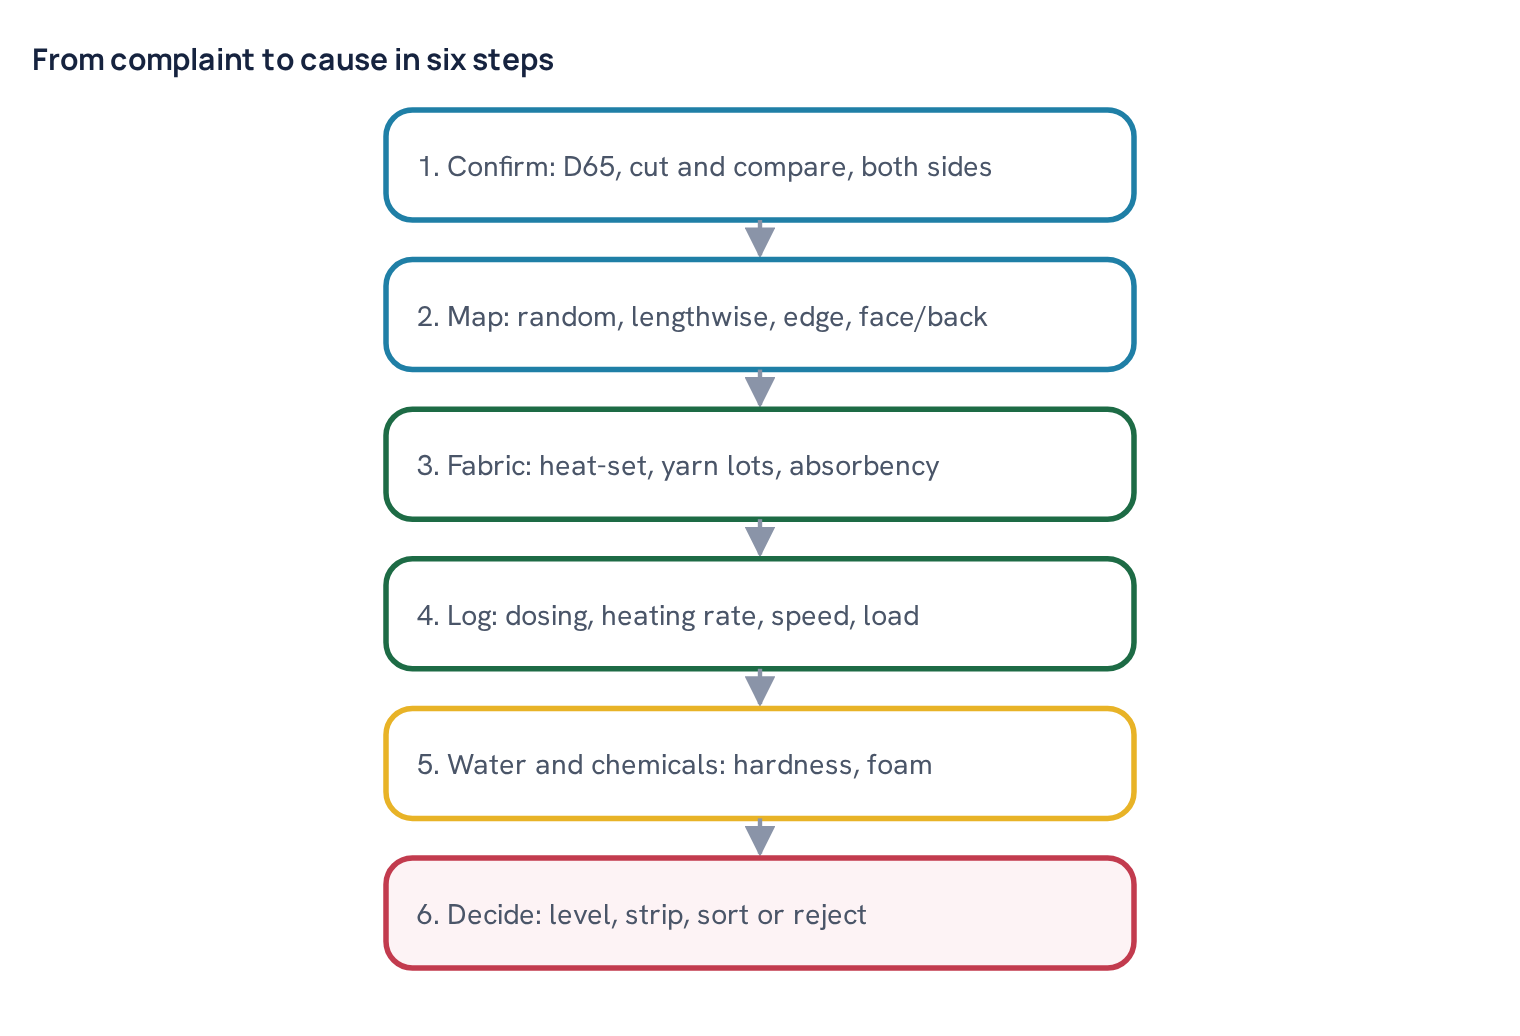
- Confirm the fault under D65 with cut pieces, on both face and back, and under a second light.
- Describe the pattern in words and with a photo: random clouds, lengthwise streaks, edges, one end, face only.
- Check the greige and heat-set records: yarn lots, heat-setting temperature and speed, any known width or GSM variation.
- Check pretreatment results for this batch: absorbency, residual peroxide, fabric pH after neutralising.
- Read the machine log: load in kg, liquor ratio, reel speed, nozzle pressure, actual heating rate, salt and alkali dosing times.
- Check recipe compatibility: do all dyes share one range or energy class?
- Check water hardness on the day, antifoam use, and how dyes were dissolved and added.
- If the shade changed after finishing, check stenter temperature across the width and the softener used.
Prevention: settings that keep shades level
Prevention is cheaper than any correction. The ranges below are common starting points; every dye house tunes them for its own machines, dyes and fabrics, and dye makers’ guidance differs, so treat them as typical, not fixed.
| Control point | Typical target | Why it matters |
|---|---|---|
| Absorbency before dyeing | Drop sinks in about 3–5 s or less | Even wetting, even strike |
| Residual peroxide | Nil or trace on test strip | Protects reactive dyes |
| Fabric pH before reactive dyeing | About 6–7 | No early local fixation |
| Water hardness | Often below about 50 ppm as CaCO3 | Dye solubility, dispersion |
| Salt addition (reactive) | 2–3 portions over 10–20 min | Gradual exhaustion |
| Alkali dosing (reactive) | Progressive, about 30–60 min | Even fixation |
| Heating in critical zone (disperse) | About 1–1.5°C/min, varies | Controlled strike |
| Dye bath pH (disperse) | About 4.5–5.5 | Dye stability |
| Fabric cycle time | About 1–3 min | Many passes during strike |
| Machine load | Within rated capacity for that fabric | Free rope movement |
Beyond the numbers, a few habits matter. Dissolve reactive dyes completely and add them through the dosing tank, not straight into a hot machine. Pre-disperse disperse dyes in warm water with dispersing agent and add them before heating. Use a levelling agent that suits the dye class, at the dose the shade needs; pale shades need more help than dark ones. Run the fabric in the machine for a few minutes before any chemicals go in, so the rope is fully wet and moving freely. Choose a machine sized for the batch instead of squeezing a small development lot into a large vessel or a large lot into a small one. For blends, follow the established process for that blend, such as the CVC or polyester-elastane routes, rather than adapting a 100% cotton or 100% polyester recipe.
Common mistake: shortening the dosing time or speeding up the heating curve to hit a production target. The batch finishes faster but too often comes back for reprocessing, which costs far more time than it saved.
Correcting a faulty batch
The right correction depends on the dye class and how bad the fault is. Do not reach for stripping first; try the mildest option that can work.
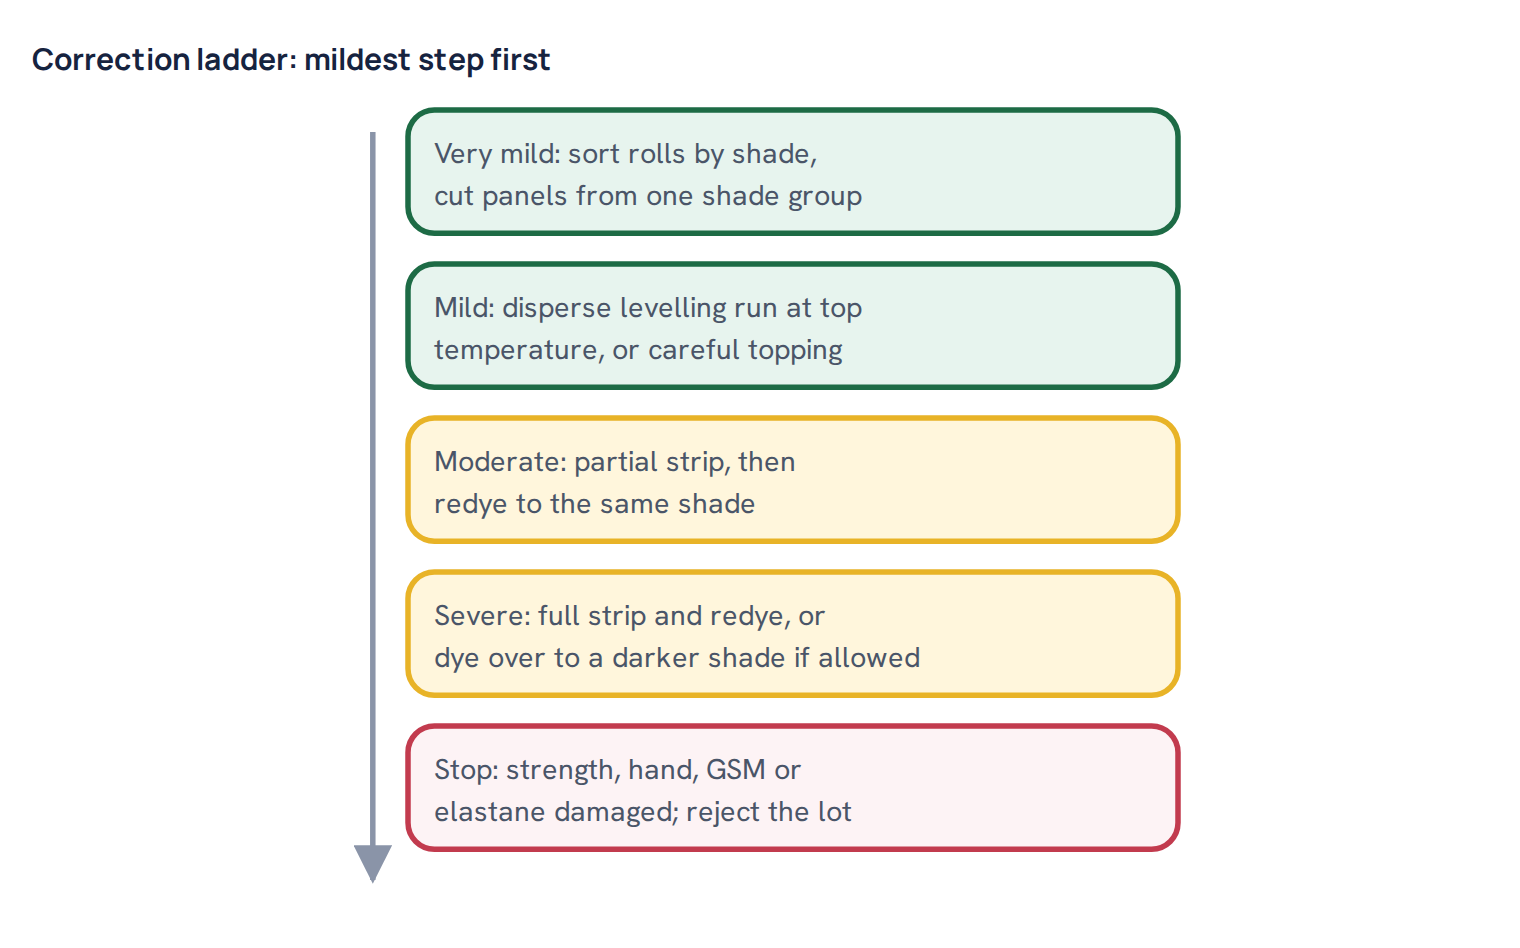
- Reactive on cotton. Fixed reactive dye is bonded to the fibre and will not migrate, so a levelling run does little. A light, even pattern can sometimes be hidden by topping with a small addition, but topping usually adds dye where the fibre is most receptive and can make patches worse. The reliable route is a partial or full strip with a reducing agent and alkali, or an oxidative strip for some dyes, followed by redyeing. See stripping reactive dyed cotton knit.
- Disperse on polyester and polyester-elastane. Many disperse dyes can migrate, so a run at top temperature with a migration-promoting levelling agent, and sometimes a little extra dispersing agent, can even out a mild fault. A stronger correction is a partial reductive strip at high temperature, then redyeing. Watch the elastane: every extra high-temperature cycle reduces its stretch and recovery.
- CVC. Find out which component is uneven before correcting. Cut a sample and strip the cotton part only, or the polyester part only, in the lab. Then correct only that stage.
- Sorting. When the fault is mild and evenly spread between rolls rather than within them, sorting rolls into shade groups for cutting, with the buyer’s agreement, can save the lot without any wet reprocessing.
Know when to stop. If two corrections have not fixed the batch, if burst strength, hand feel, width or GSM have moved out of tolerance, if the elastane has lost recovery, or if the cost of further work exceeds the value of the fabric, reject the lot and redye fresh fabric. Repeated reprocessing also tends to raise pilling and lower fastness.
What to record so it does not repeat
An uneven batch that is corrected and forgotten will come back. Record enough to see a pattern across many faults, not just this one.
- Fabric construction, fibre blend, GSM, width, and all yarn lots used.
- Heat-setting temperature, speed, overfeed and width, for polyester and elastane fabrics.
- Pretreatment test results: absorbency time, residual peroxide, fabric pH.
- Machine, load in kg, liquor ratio, reel speed, nozzle pressure and calculated cycle time.
- Recipe with dye ranges or energy classes, levelling agent, and the actual dosing and heating profiles from the machine controller.
- Water hardness on the day and any foam or antifoam notes.
- The fault pattern in words, a photo, and spectrophotometer readings from several positions.
- The correction applied, how many cycles it took, the final result, and the confirmed or suspected cause.
After a few months, sort these records by cause. If most uneven batches trace back to pretreatment, put effort there before buying new levelling agents. If they cluster on one machine, check its pump, nozzle and heat exchanger. The aim is simple: every fault should teach the dye house something it does not have to learn twice.
Questions
What is the most common cause of patchy dyeing in knit fabric?
Uneven pretreatment is the most common cause: poor or uneven absorbency, or residual peroxide, alkali, oil or size left on the fabric. Fast addition of salt or alkali, and heating too fast through the critical zone, come next.
How do I tell uneven dyeing from barré?
Barré shows as horizontal bands in the course direction that repeat at a regular spacing, because it comes from yarn or knitting. Uneven dyeing is usually random clouds, lengthwise streaks or zone differences with no regular repeat.
Can an uneven reactive-dyed batch be levelled?
Not by a simple levelling run, because fixed reactive dye is bonded to the cotton and cannot migrate. The usual correction is a partial or full strip and redye, or dyeing over to a darker shade if the buyer allows.
Why does polyester-elastane fabric dye patchy even with a good recipe?
Uneven heat-setting creates zones in the polyester that take disperse dye at different rates, and no dyeing step fully removes that. Elastane also takes some disperse dyes differently from polyester, and its temperature limits reduce migration.
When should a faulty batch be rejected instead of reprocessed?
Stop when two corrections have failed, or when strength, hand, width, GSM or elastane recovery have moved out of tolerance. At that point redyeing fresh fabric is usually cheaper and safer.

Textile engineer with 14+ years in dyeing and fabric development. He writes every guide on Dyeing Solution from real production work. Full profile