How ISO 15487 and AATCC style appearance tests judge colour change, cross-staining, fuzz, seams and shape after home washing, why CVC knits fail on loose dye, and how to prepare, prevent and fix.
At a glance
29appearance results in our lab reports
3 failsall on CVC, all from loose dye
3 to 5wash cycles most buyers ask for
4-5most common cross-staining requirement
A colour fastness test tells you how a dye behaves on a small swatch. An appearance-after-washing test asks a bigger question: after a few washes at home, does the whole product still look right? The assessor looks at the colour, at any staining from a dark part onto a light part, at fuzz and pills on the surface, at seams, at smoothness and shape, and at prints or other decoration. It is the closest a lab test comes to what the customer sees after a month of use. This article explains the principle behind the ISO 15487 and AATCC style assessments, how to prepare a sample, how to read the result, why knit fabric in blends like CVC fails, and what to do when a batch fails.
What the test is
An appearance test is not one measurement. It is a set of visual judgements made on the same specimen after it has gone through repeated domestic washing and drying. The washing part is borrowed from the home laundering procedures used for shrinkage testing. The assessment part uses the familiar grey scales, a few three-dimensional reference replicas, and the trained eye of the assessor.
Three method families are common in knit testing:
- ISO 15487. A method for assessing the appearance of garments and other textile products after domestic washing and drying. The washing and drying themselves follow ISO 6330, which defines the lab washer programs, temperatures, reference detergents, load size and drying options.
- AATCC 143. The American method for the appearance of apparel and other finished products after repeated home laundering. It works on the same idea: wash, dry, repeat, then judge against the original.
- AATCC 135 with appearance remarks. AATCC 135 is a dimensional change (shrinkage) method for fabrics. Many labs record appearance observations during the same washes, so the report shows colour change, cross-staining and fuzz notes next to the shrinkage figures. Most of the appearance results in our lab reports came this way.
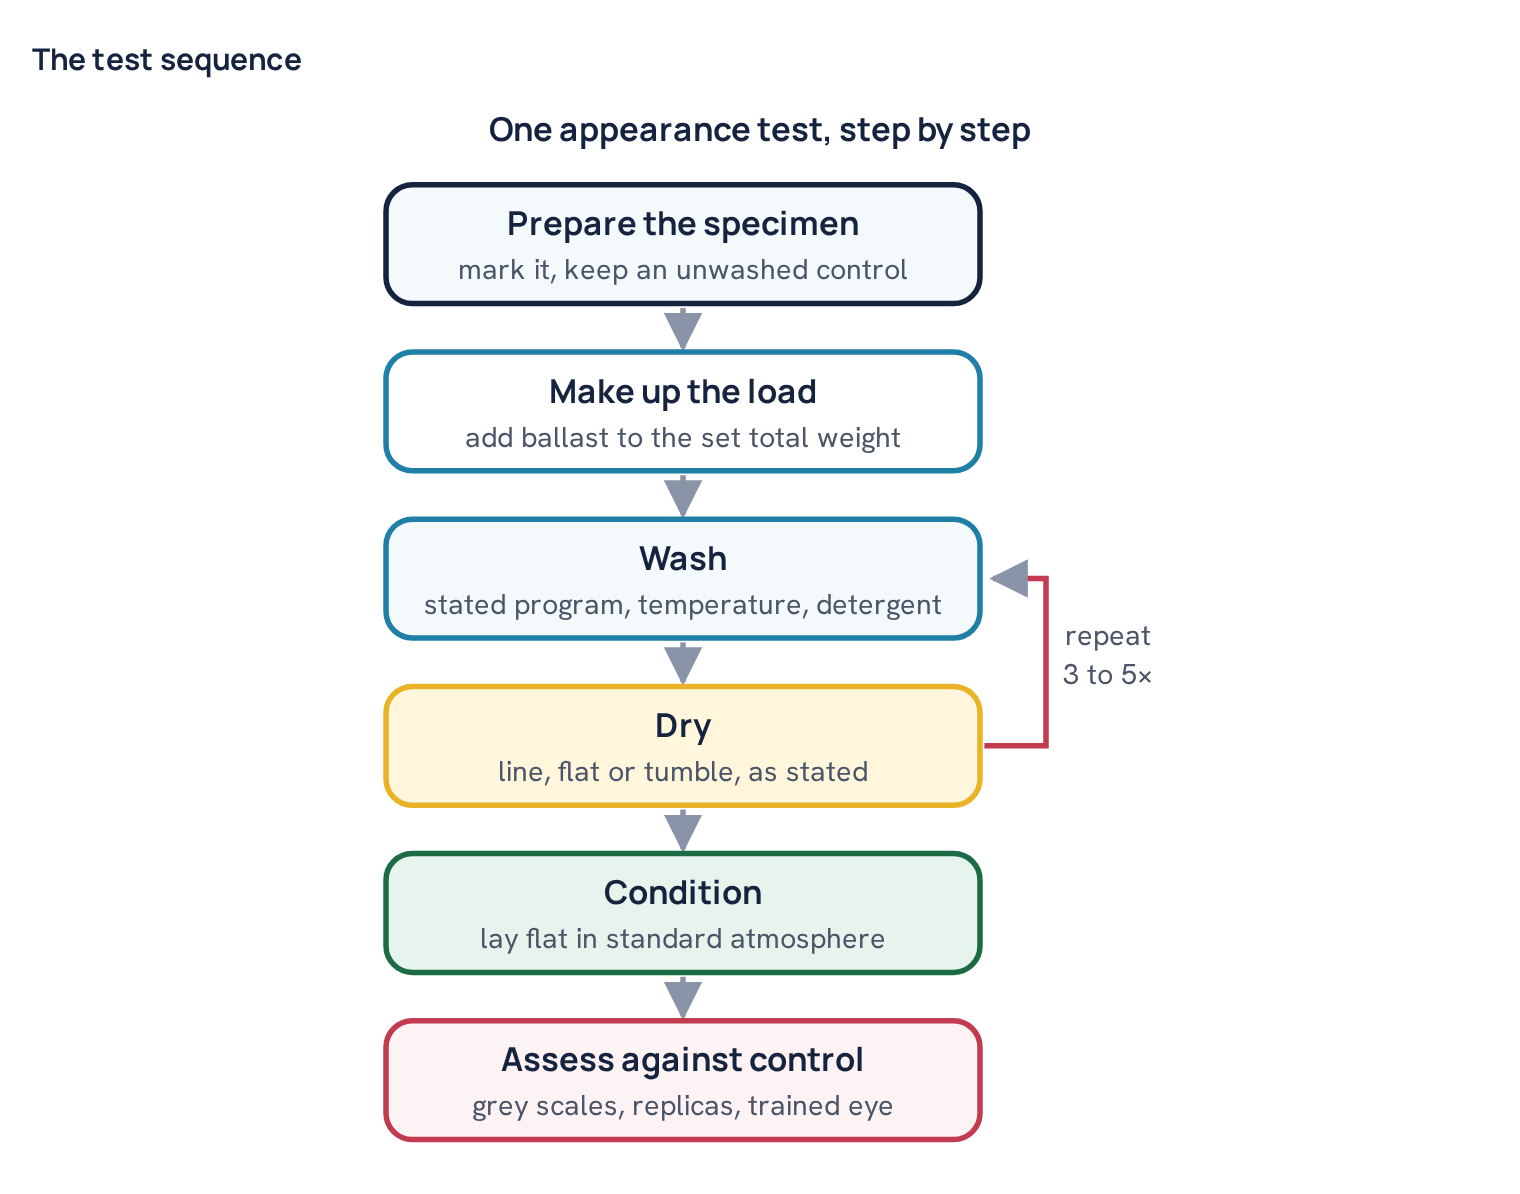
Whatever the method, the logic is the same. You keep one piece unwashed as a control. You wash and dry the test piece the stated number of times. Then you compare the two side by side, property by property.
What is assessed
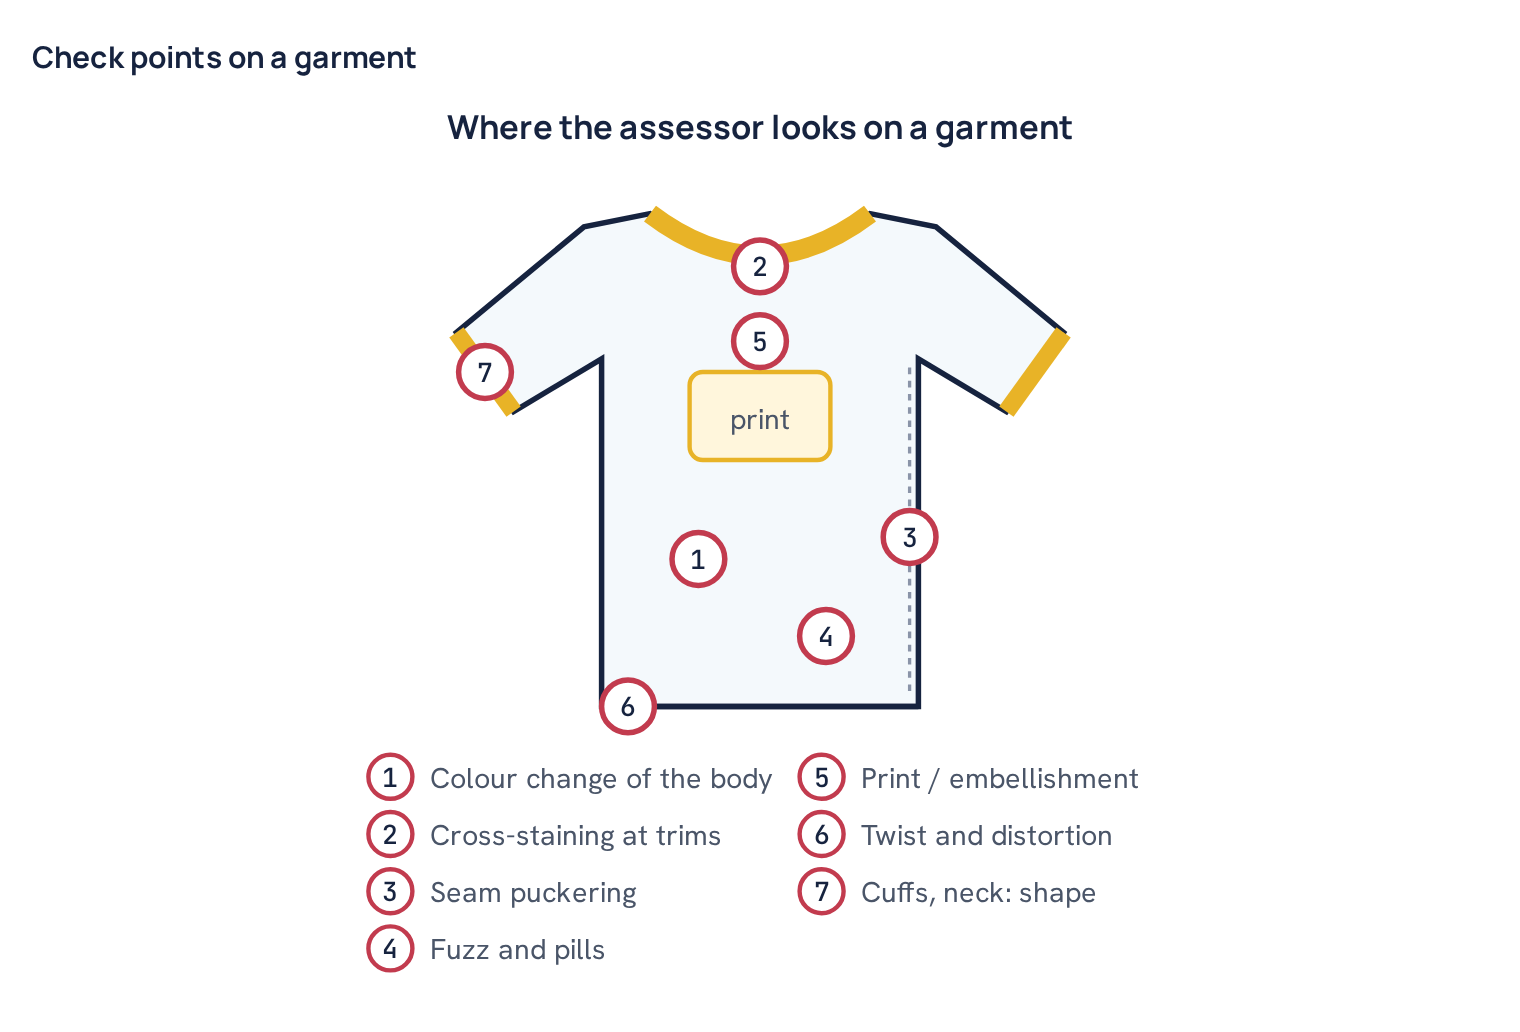
A full appearance report can cover up to eight points. Not every buyer asks for all of them, and fabric tests usually cover fewer than garment tests.
- Colour change. The washed piece is compared with the control using the grey scale for colour change. Grade 5 means no change, grade 1 means a severe change. Fading, a shift in tone, or a dull, greyish look all count.
- Cross-staining. Where a garment has parts in different colours, such as a dark body with a white rib collar, or a yarn-dyed stripe with white bands, the light part is checked for staining from the dark part. It is graded with the grey scale for staining.
- Multifibre staining. Some buyers attach a multifibre strip (small bands of acetate, cotton, nylon, polyester, acrylic and wool, or a similar set) to the specimen during washing. The staining on each band shows how much dye leaves the fabric and which fibre types pick it up.
- Fuzzing and pilling. The surface is checked for raised fibre ends (fuzz) and small balls of tangled fibre (pills). In most reports this is a written remark such as “slight fuzzy effect”, sometimes with a grade.
- Smoothness. For woven shirts this is graded against smoothness replicas. For most knits it is a remark about wrinkles or a rough, cockled look.
- Seam appearance. Seams are checked for puckering, compared with seam replicas. Puckering often comes from thread shrinkage, high thread tension or panels that shrink differently.
- Distortion. Twisting of side seams, spirality, curling hems, flared rib cuffs and a stretched or wavy neckline.
- Print and embellishment. Cracking, peeling, fading of prints, lifting of transfers, loose embroidery, and damage to buttons, zips or labels.
How the test is done
Washing and drying conditions
The conditions should match the care label. A product labelled for a 30 °C wash should be tested at 30 °C, not 60 °C. In our lab reports the common conditions were:
- AATCC normal cycle at 41 ± 3 °C, tumble dry low, three washes.
- ISO 6330 normal program at 30 °C or 40 °C with a reference detergent, sometimes with perborate bleach added, then line dry or tumble dry.
- One ISO 6330 normal program at 60 °C with tumble drying, on a CVC fleece.
The lab washer runs with a fixed total load. Under ISO 6330 the total dry load is usually made up to about 2 kg with ballast pieces. Under AATCC it is a little lighter. The load matters: too few pieces and the specimen gets more mechanical action, too many and it gets less. Detergent type matters too. Perborate is an oxygen bleach. It can attack some reactive dyes and make colour change and staining worse, so a test “with perborate” is harder than one without.
Number of cycles varies. Three and five washes are the most common. Some buyers ask for one wash for a quick check, others for ten or more for workwear and school uniforms.
How to prepare a sample
Good sample preparation decides whether the result tells you anything about real garments. These points apply to most buyers’ requirements, but always read the test request first.
- Garment test. Send at least two complete garments of the same size and colour: one to wash, one to keep as the control. Some labs ask for three. Do not remove labels, trims or prints, because they are part of what is tested.
- Fabric test. Cut a large panel, commonly around 50 cm × 50 cm, from a place free of selvedge marks, splices and creases. Overlock or zigzag the edges so the piece does not fray or curl in the washer. Keep a matching unwashed piece from the same roll.
- Mock-up for cross-staining. If the garment will have a dark body and a light trim, but the garment is not yet sewn, make a mock-up. Sew a piece of the light fabric or trim onto the dark fabric along one edge and in the middle. This is the only fabric-level way to see real contact staining before bulk.
- Use bulk materials. The trim, rib, sewing thread and print must come from the same production as the main fabric. A lab-dip rib or a sample print can behave quite differently.
- Finish fully. The specimen must have gone through all finishing steps: softening, stentering, compacting, and any curing for prints. Testing before the final heat step can hide the problem of dye moving back to the surface, which is explained below.
- Mark and record. Mark length and width direction, note the side that faces out, and record shade, construction and finish. Some labs measure for shrinkage at the same time, so mark the benchmarks if they ask.
Common mistake: Testing the dark fabric on its own when the garment will have a white or light rib. The colour change and multifibre staining may pass, but the real problem, contact staining on the trim, is never tested. Make a mock-up whenever dark and light parts will be sewn together.
Conditioning and assessment
After the last cycle the specimen is laid flat and conditioned in a standard atmosphere, usually for several hours, so that it reaches a stable moisture level. Wet or warm fabric looks darker and smoother than dry fabric, so assessing too early gives a wrong grade.
The assessor then places the washed specimen next to the unwashed control under standard lighting, often a daylight simulator in a viewing booth or an overhead-lit viewing area. Colour change and staining are graded with the grey scales. Smoothness and seams are compared with replicas from a set viewing distance. Fuzz, pills, distortion and print condition are described in words. Some methods ask for more than one observer and an average grade.
For colour change and staining, it helps to understand the wash fastness test itself. Our article on how to test colour fastness to washing explains the grey scales in more detail.
How to read the result
Grey scale grades run from 5 (no change, no staining) down to 1 (severe). Half grades are written as 4-5, 3-4 and so on. Some labs write them as 4.5 and 3.5, which mean the same thing. Remarks are written in words: “slight colour change”, “slight fuzzy effect”, “satisfactory”, “unsatisfactory due to staining”.
Typical requirements vary by buyer and product, but common ranges are:
| Property | Typical requirement | Notes |
|---|---|---|
| Colour change | 3-4 to 4-5 | 3.5 is common on AATCC-based reports; some ask 4 or better |
| Cross-staining | 4 to 5 | 4-5 is most common; 5 means no visible staining at all |
| Multifibre staining | 3-4 to 4 | Often the same as the wash fastness requirement |
| Fuzz and pilling | No more than slight | Usually a remark, sometimes a pilling grade |
| Seams, smoothness | Grade 3 or better | More used on wovens than knits |
| Print, trims | No cracking, peeling or damage | Pass or fail by description |
What our lab reports showed
We collected 29 appearance-after-washing results from the knit lab reports that reached our desk. That set is small, and it leans towards problem cases, because reports come to us more often when something needs attention. So the fail rate here is higher than in normal production. With that in mind, the pattern is still useful.
- 21 results used AATCC 135 with appearance remarks, and 8 used ISO methods (mainly ISO 15487 with ISO 6330 washing).
- 14 of the 29 were cotton-polyester (CVC) fabrics, half of them with elastane. The rest were cotton, cotton-modal and cotton-viscose.
- Colour change was 4 or better on 28 results, and one CVC jersey reached 3.5 with “moderate colour change”. All of these passed.
- 24 reports noted a “slight fuzzy effect”. None failed because of it.
- Three results failed, and all three were CVC. Two failed on cross-staining (grades 3-4 and 3 against a requirement of 5). One CVC fleece failed on multifibre staining after a 60 °C wash.
So in our data, colour change and fuzz were rarely the problem. Loose dye was. And it came from the blend that carries two dye classes.
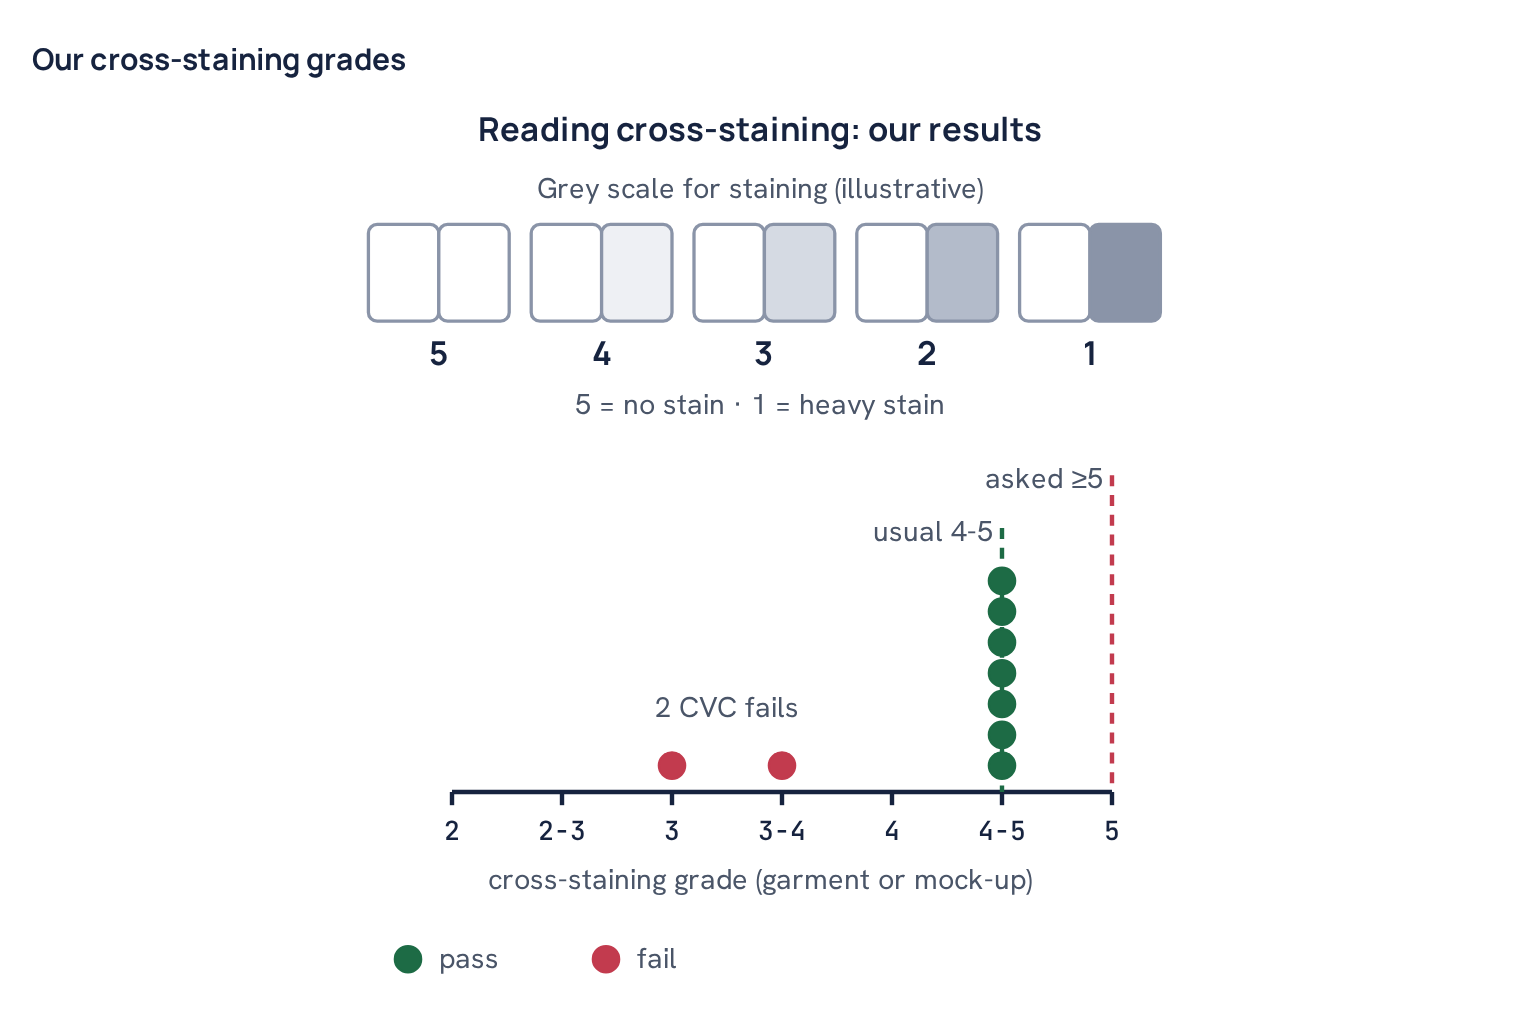
Worked example. A 320 GSM CVC sample was tested to ISO 15487 after a 30 °C normal wash with reference detergent and perborate, then line dried. The report reads: colour change 4; cross-staining 3; multifibre staining cotton 4, others 4-5; slight fuzzy effect. The requirement was colour change 4 or better, cross-staining 5, staining 3-4 or better. Read it line by line. Colour change 4 meets 4, so it passes. Multifibre staining at 4 and 4-5 is better than 3-4, so it passes. Cross-staining 3 is two full grades below 5, so the whole test fails. The useful clue is the gap: the free multifibre strip stayed nearly clean, but the light part sewn to the dark part was clearly stained. That points to contact staining where the wet dark and light parts lie together, plus dye that comes off more easily under pressure, rather than a large amount of dye in the wash liquor. Note also that a requirement of 5 for cross-staining is very strict: it means no visible stain at all.
Common mistake: Thinking a good multifibre result means cross-staining will pass. The multifibre strip floats loosely in the liquor. A light trim sewn to a dark panel stays in close, wet contact with it through spinning and drying. Contact staining can be much worse than liquor staining.
Why knit fabric fails: cross-staining
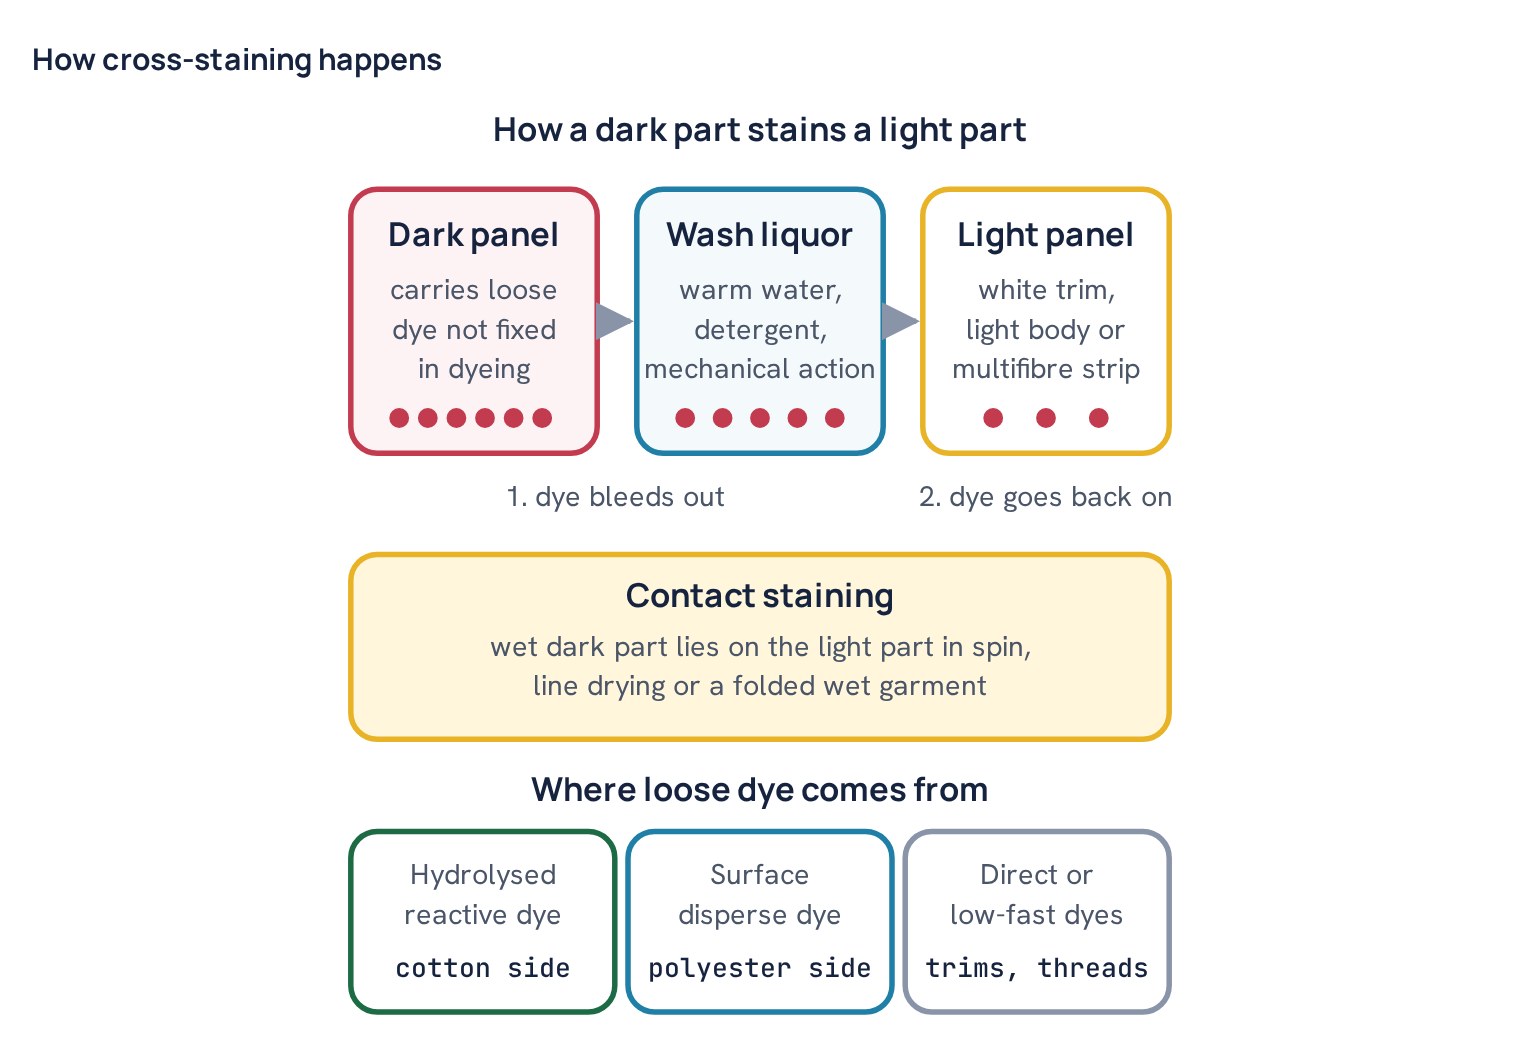
Cross-staining needs two things: dye that can leave the dark part, and a light part that can take it up. The dye leaves the dark part in two ways. It can bleed into the wash liquor and then deposit or be absorbed on the light part. Or it can transfer directly where the two parts touch while wet, for example in the spin cycle, on the line, or when a wet garment lies folded. A dark body with a white rib, a yarn-dyed stripe with white bands, and a dark garment with a white print border are the usual risk cases.
Loose reactive dye on cotton
Reactive dyes fix to cotton by a covalent bond. But part of every reactive dye reacts with water instead of the fibre. This hydrolysed dye cannot fix any more. It sits in the fibre held only by weak forces, and it comes out in the first washes. Good soaping at high temperature after dyeing removes it. If soaping is short, at too low a temperature, or in hard water, some hydrolysed dye stays behind. Deep shades carry more of it. The result is cotton staining on the multifibre strip and on any light cotton trim. Our article on staining fails in wash, perspiration and water fastness covers this side in more depth.
Disperse dye on CVC
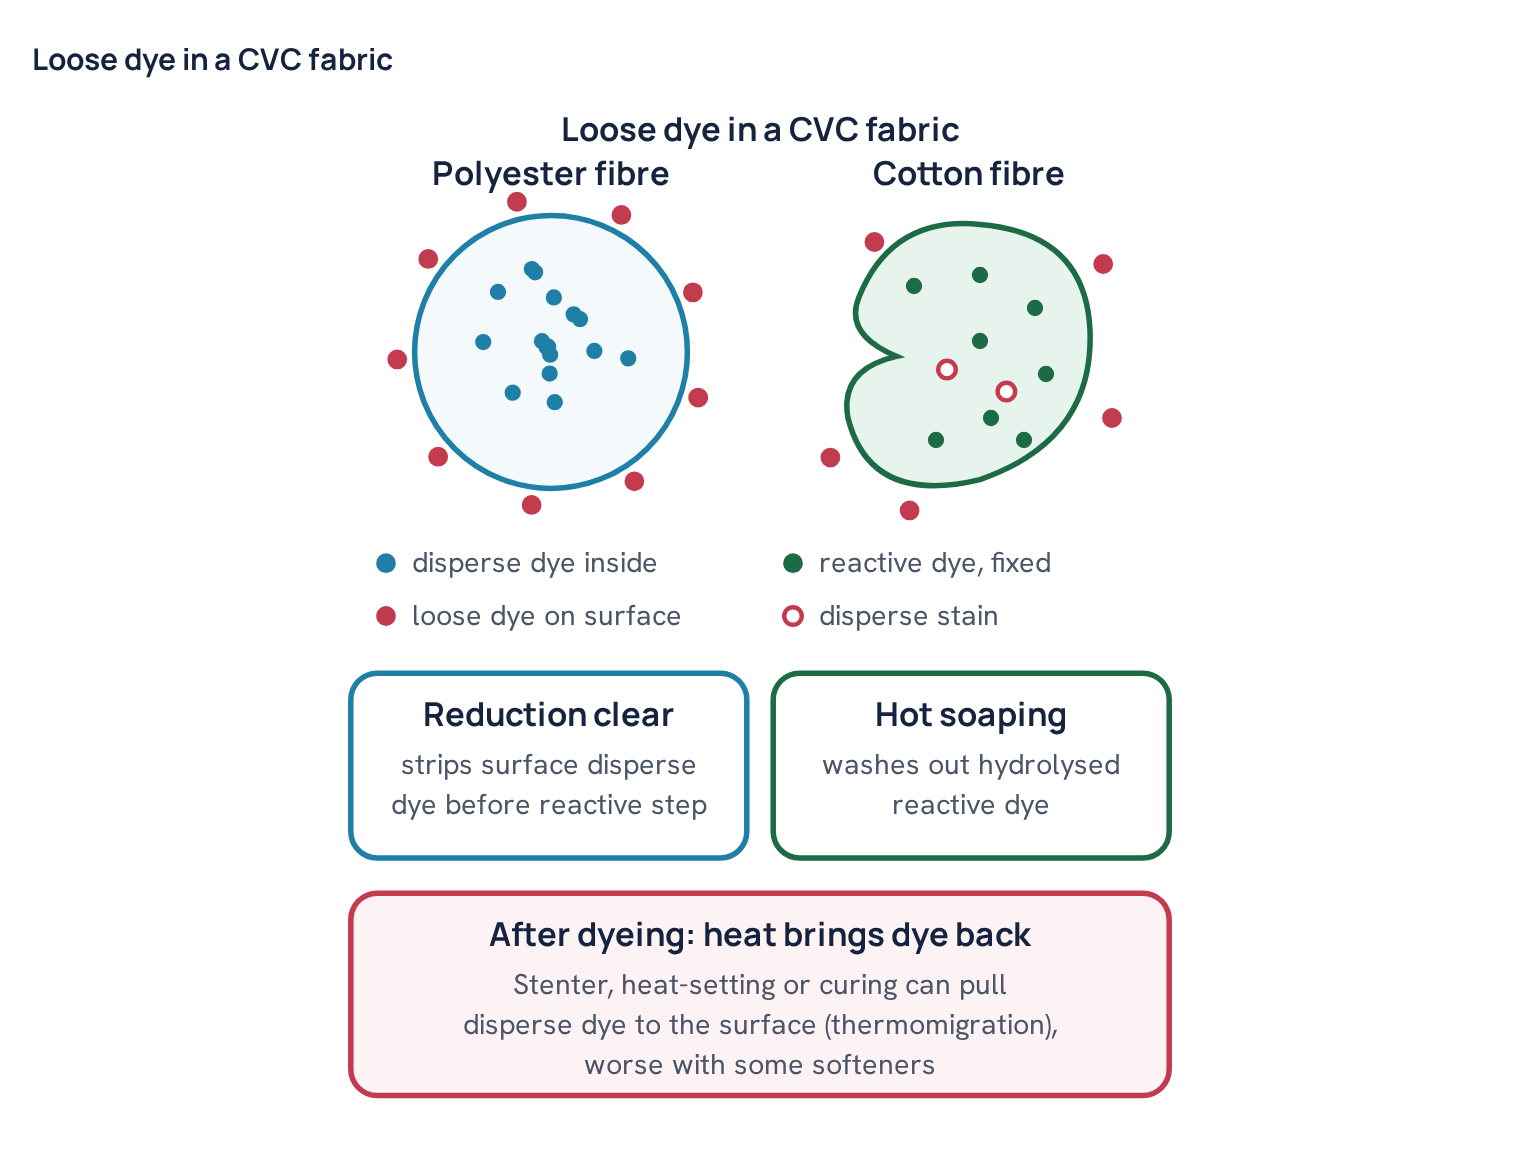
CVC is a cotton-rich blend with polyester. The polyester part is dyed with disperse dyes and the cotton part with reactive dyes, usually in two baths. Disperse dye has its own loose-dye problem. During high-temperature dyeing most of it diffuses into the polyester. But some stays on the fibre surface, and some is picked up by the cotton, which disperse dye stains but does not truly dye. That surface and cotton-held disperse dye washes off easily and stains nylon, acetate and polyester readily. See how disperse dyes work on polyester for the mechanism.
There is a second, later source. When the finished fabric is heated at the stenter, in heat-setting or in print curing, disperse dye can move from inside the polyester back to the surface. This is called thermomigration. Some softeners and finishes make it worse, because the dye dissolves in the finish film on the fibre surface. So a CVC fabric that was cleared well after dyeing can still bleed after finishing. This is why the specimen must be fully finished before testing.
Our fleece fail shows the disperse fingerprint well. After a 60 °C wash with tumble drying, the multifibre strip showed nylon 3, acetate 3-4, polyester 3-4, cotton 3-4 and wool 4. Nylon and acetate staining is the classic sign of loose disperse dye. Cotton staining at the same time shows that loose reactive dye was also present. And 60 °C is a hard wash for a coloured CVC fleece. If the care label allows only 30 or 40 °C, the test should not be run at 60 °C. The CVC fabric dyeing process article explains where clearing and soaping fit in the sequence.
Why knit fabric fails: fuzz and pills
Knit fabric is made of loops of spun yarn, and spun yarn has many short fibre ends. In washing, the fabric rubs against itself, the drum and other pieces. The rubbing pulls fibre ends out of the yarn and the surface becomes fuzzy. With more rubbing, the loose ends tangle into small balls. These are pills.
What happens next depends on the fibre. Cotton fibres are weak, so cotton pills tend to break off, and a cotton fabric often looks fuzzy but not heavily pilled. Polyester fibres are strong, so a polyester pill stays anchored to the surface. That is why CVC and other polyester blends can show more visible pills than 100% cotton. Brushed fleece and loop-back terry start with a raised surface, so some fuzz is expected and buyers judge them differently.
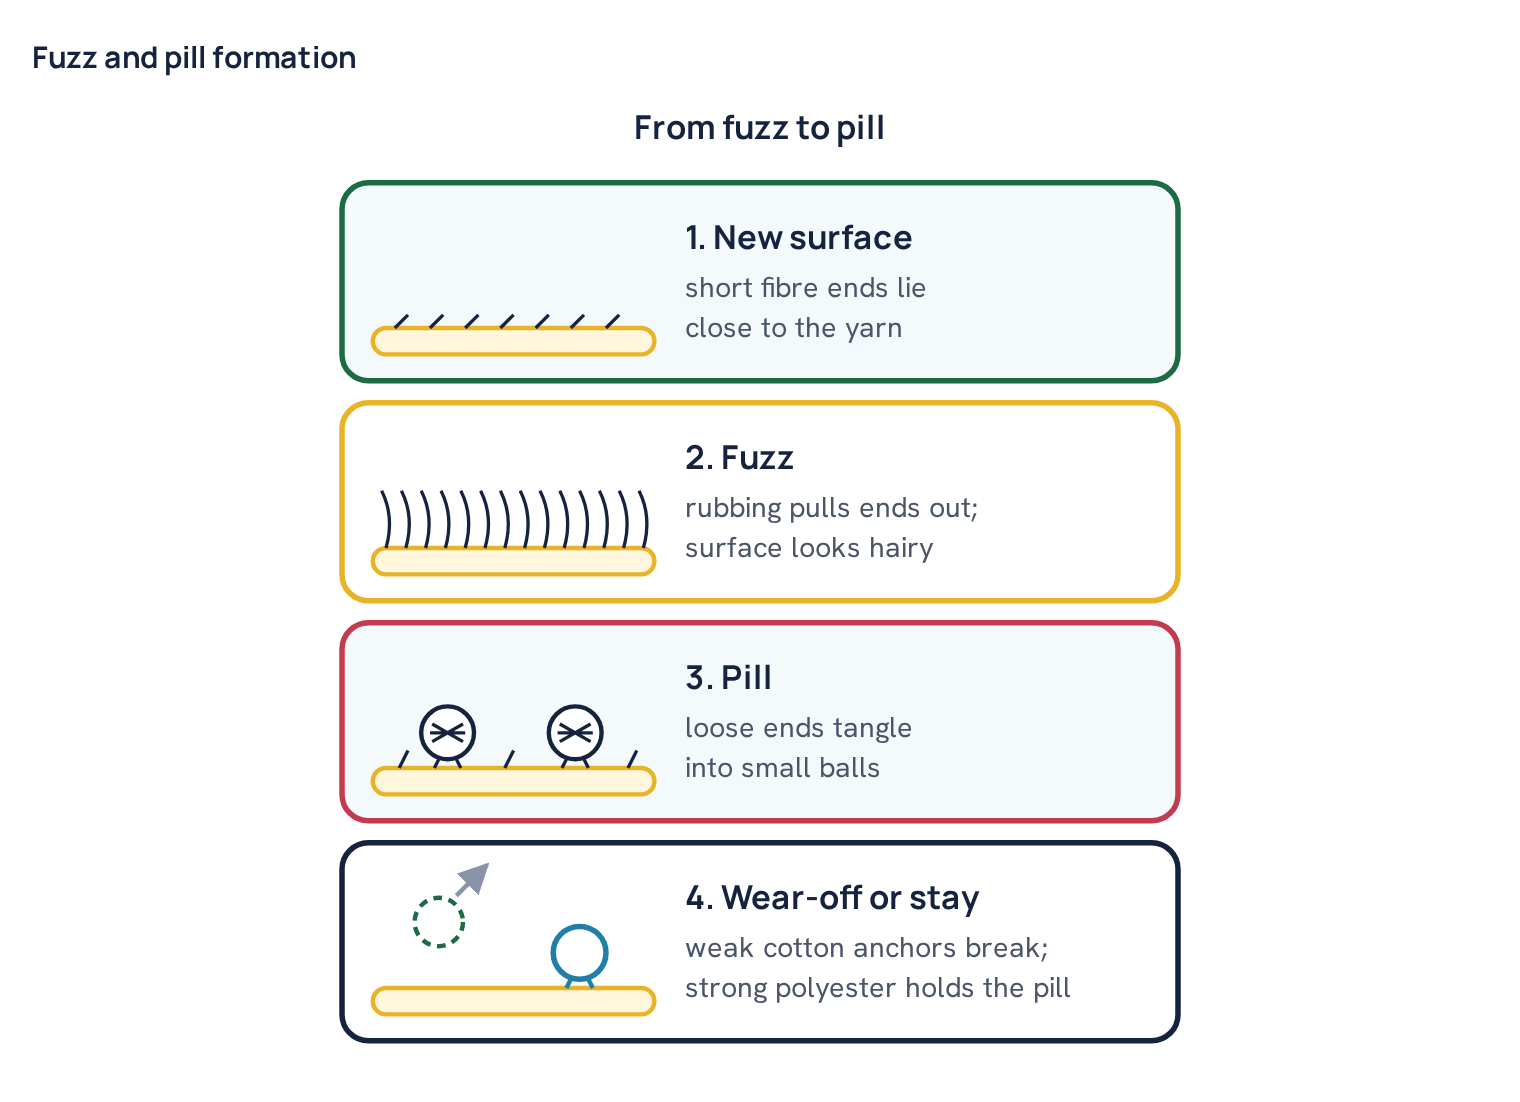
Fuzz gets worse with hairy or loosely twisted yarn, long stitch length (an open, loose knit), short-staple fibre, strong mechanical action in washing, and some silicone softeners, which make fibres slide out of the yarn more easily. In our reports “slight fuzzy effect” appeared on 24 of 29 results and was accepted as normal. Heavy fuzz or visible pills after three washes would be a different matter.
Other appearance problems
Colour change. Fading after washing comes from the same loose dye that causes staining, plus dyes that are sensitive to oxidising bleach (perborate) or to alkaline detergent. A change in tone can also come from finishes that wash off, such as a softener that made the shade look deeper. Optical brighteners on whites can also change with repeated washing.
Distortion and twist. Single jersey in particular can twist after washing, which moves the side seams. This is spirality, and it is tested separately; see how to test spirality of knit fabric. Shrinkage that differs between body and rib makes necklines wavy and cuffs flared.
Seam puckering. Puckering appears when the sewing thread shrinks more than the fabric, when thread tension is high, or when two panels of different fabric shrink by different amounts. Matching the shrinkage of all panels, which is checked in the shrinkage test, prevents much of it.
Print and embellishment. Prints crack if the ink is under-cured or too stiff for a stretchy knit. Transfers lift if the pressing time or temperature was wrong. Disperse dye that migrates from polyester can also bleed into a white print, which is a form of cross-staining.
Common mistake: Washing at a higher temperature or with stronger drying than the care label states “to be safe”. The test should match the label. A coloured CVC tested at 60 °C with tumble drying is being judged against a use it will never see, and it may fail for no real reason.
Causes table
| What you see | Likely cause | Quick check |
|---|---|---|
| Cotton band stained, light cotton trim stained | Hydrolysed reactive dye not soaped off | Hot soap a swatch and retest; staining should drop |
| Nylon and acetate stained most | Surface disperse dye on CVC or polyester | Check reduction clearing record and stenter temperature |
| Cross-staining poor, multifibre good | Contact staining between wet dark and light parts | Mock-up test of the actual body and trim |
| Staining appears only after finishing | Thermomigration at stenter or curing; softener choice | Test before and after stenter |
| Colour change with perborate only | Oxidation-sensitive dye | Repeat without perborate to confirm |
| Heavy fuzz or pills | Hairy yarn, loose knit, polyester in blend, softener | Check yarn, stitch length, compare with and without softener |
| Twisted side seams | Spirality from yarn twist and knit structure | Spirality test on the fabric |
| Seam puckering | Thread shrinkage, tension, panel shrinkage mismatch | Shrinkage test on each panel and thread |
Prevention checklist
Most appearance fails are decided in the dye house and finishing, long before the garment is sewn. Use this list at development and in bulk.
- Plan the colour combination. At development, flag every dark body with a light trim or stripe. Ask for the cross-staining requirement early, and make a mock-up test before bulk.
- Choose dyes for wet fastness. For deep shades on CVC, use disperse dyes with good wash fastness and low thermomigration, and reactive dyes with good fixation. Dye selection varies by supplier, so check their data.
- Clear the polyester side. After disperse dyeing in medium and deep shades, reduction clear with sodium hydrosulphite and caustic soda before the reactive step. Temperatures around 70–80 °C for 15–20 minutes are common, but follow your own tested process.
- Soap the cotton side well. Use hot soaping, enough rinses and a clean final bath. A neutral final pH helps.
- Control heat after dyeing. Keep stenter and curing temperatures as low as your shrinkage and setting targets allow. Choose softeners that do not promote thermomigration on deep CVC shades.
- Use a fixing agent only with care. A cationic fixing agent can improve wet fastness of reactive dyes, but it can change the shade and lower light fastness. Treat it as support, not as a cure for poor soaping.
- Reduce fuzz. Use lower-hairiness yarns, the right stitch length, and an enzyme (cellulase) biopolish on cotton where the buyer allows it. See dyeing auxiliaries explained for what each chemical does.
- Match panels. Check the shrinkage of body, rib and trims, and use sewing thread with low shrinkage.
- Test the finished state. Test after full finishing, at the care-label conditions, with bulk trims.
Common mistake: Assessing the washed specimen while it is still damp, or under ordinary room light without the control beside it. Damp fabric looks darker and stains look weaker. Always condition first, and always compare against the unwashed control under standard light.
What to do with a failed batch
A fail is a starting point for investigation, not a verdict on the whole batch. Work through these steps in order.
- Confirm the test matched the order. Check the method, temperature, detergent, perborate, drying, number of cycles and requirement against the care label and the buyer’s standard. A 60 °C wash on a product labelled 30 °C is not a fair test, and a cross-staining requirement of 5 is stricter than most.
- Find which side bleeds. Wash a piece of the dark fabric alone with a multifibre strip under the test conditions. Staining mostly on nylon and acetate points to disperse dye. Staining mostly on cotton and viscose points to reactive dye. Both together means both need attention.
- Check the process records. Look at soaping temperature and number of rinses, whether reduction clearing was done, the stenter temperature, and the softener used.
- Re-process fabric in hand. If reactive dye is loose, a hot soaping and rinse on the finished fabric usually improves staining. If disperse dye is the problem on CVC, a full reduction clear at this stage can damage the reactive shade, so use a milder after-wash suitable for the reactive dyes, then re-finish at a lower temperature or with a different softener. Check the shade again after any re-processing.
- Retest before shipping. Retest a fully finished, re-processed sample under the same conditions. Make a new mock-up if the fail was cross-staining.
- For sewn garments, re-processing is harder. Options include a careful garment wash, changing the trim to a tone-on-tone colour for future orders, or a care label change, but all of these need the buyer’s agreement. Do not ship a failing batch without a written decision.
- Feed back to development. Record the combination, shade depth and cause, so the next order with a dark CVC body and a white rib starts with the right dye selection and clearing.
If a related wash fastness or rubbing test also failed, see wet rubbing fastness fail causes and remedies, because the same loose dye often causes both.
Summary
An appearance-after-washing test judges the whole product after repeated home washing: colour, staining between parts, surface, seams, shape and decoration. The method is simple, but the preparation must be right: bulk materials, full finishing, care-label conditions, an unwashed control, and a mock-up whenever dark and light parts are sewn together. In our reports, colour change and fuzz were rarely the cause of failure. Loose dye on CVC was. Clear the polyester side, soap the cotton side, keep finishing heat under control, and test the combination early, and most appearance fails never happen.
Questions
What is an appearance after washing test?
It is a visual assessment of a garment or fabric after repeated home-style washing and drying. Colour change, cross-staining, fuzz and pills, seams, smoothness, shape and prints are judged against an unwashed control.
What is cross-staining?
Cross-staining is staining of a light part of a garment, such as a white rib collar, by dye that comes off a dark part during washing. It is graded with the grey scale for staining, where 5 means no stain.
Why do CVC fabrics fail cross-staining more often?
CVC carries two dye classes. Loose disperse dye on the polyester surface and hydrolysed reactive dye on the cotton can both wash off, and heat at the stenter can bring disperse dye back to the surface after clearing.
How should I prepare a sample for this test?
Use fully finished bulk fabric, trims and prints, wash at care-label conditions, and keep an unwashed control. If dark and light parts will be sewn together, test a mock-up of the real combination.
Can a batch that failed cross-staining be saved?
Often yes, if it is still fabric. Find whether reactive or disperse dye is bleeding, then re-soap or after-wash, re-finish with less heat or a different softener, and retest before shipping.

Textile engineer with 14+ years in dyeing and fabric development. He writes every guide on Dyeing Solution from real production work. Full profile