How the ISO 105-X11 hot pressing test works, how to read dry, damp and wet grades, and why CVC fleece fails on wet staining through thermomigration, poor clearing and softener choice.
At a glance
15 sPressing time at each test
200°CCotton setting; our reports used it
3 of 3Our CVC fleece reports failed
Wet 2-3Worst wet staining vs required 4
Colour fastness to hot pressing tells you what happens to a dyed fabric when somebody irons it. A hot iron, a heat press or a steam press puts heat, pressure and often moisture on the fabric for a few seconds. If the dye is not stable under that heat, the shade changes, or colour moves out of the fabric and marks whatever touches it: the ironing board cover, a white collar, a printed label, or a light part of the same garment.
For 100% cotton dyed with reactive dyes, this test is usually easy to pass. The problems start when polyester is in the blend. Disperse dye in polyester can move and even turn into vapour at ironing temperatures. That is why the test is common for CVC and PC fleece, sportswear and any garment that will meet a heat press for a transfer or a logo.
This article explains the test in plain words: what it is, how it is done, how to read the result, why knit fabric fails it, and how to prevent and fix a fail. It is built around our own lab reports. Out of the 316 knit lab reports that reached our desk, only three included hot pressing fastness, and all three failed. All three were CVC fleece, and all three failed on the same point: staining in wet pressing. The set is very small and it is skewed to problem cases, because reports that pass often never reach a development desk. So read our results as a clear example of one failure pattern, not as a fail rate.
What the test measures
The international method for this test is ISO 105-X11, “colour fastness to hot pressing”. AATCC 133 covers the same idea under the name “colour fastness to heat: hot pressing”. Both methods work on the same principle. A specimen of the dyed fabric is pressed between heated plates, in contact with a piece of undyed cotton cloth, at a set temperature, for a set time, under a set pressure. Afterwards the lab assesses two things:
- Colour change of the specimen. Did the shade go lighter, darker, duller or change hue?
- Staining of the cotton cloth. Did dye move out of the specimen and mark the cotton?
Both are graded on the grey scales from 1 to 5, where 5 means no change or no staining and 1 means a very strong change or very heavy staining. Half grades such as 3-4 and 4-5 are used.
The test is quick and cheap, but it is not gentle. Ironing temperatures are far above dyeing temperatures for cotton, and they are above the temperature where the polyester structure opens and lets disperse dye move. In a real household, an iron set to “cotton” can reach about 200°C. A specimen that has to survive that temperature with wet cloth on top is under real stress.
How the test is done
Here is the principle in our own words. Always follow the current edition of the standard and the requirement sheet you were given; details such as the padding and the conditioning rules matter.
Equipment and specimen
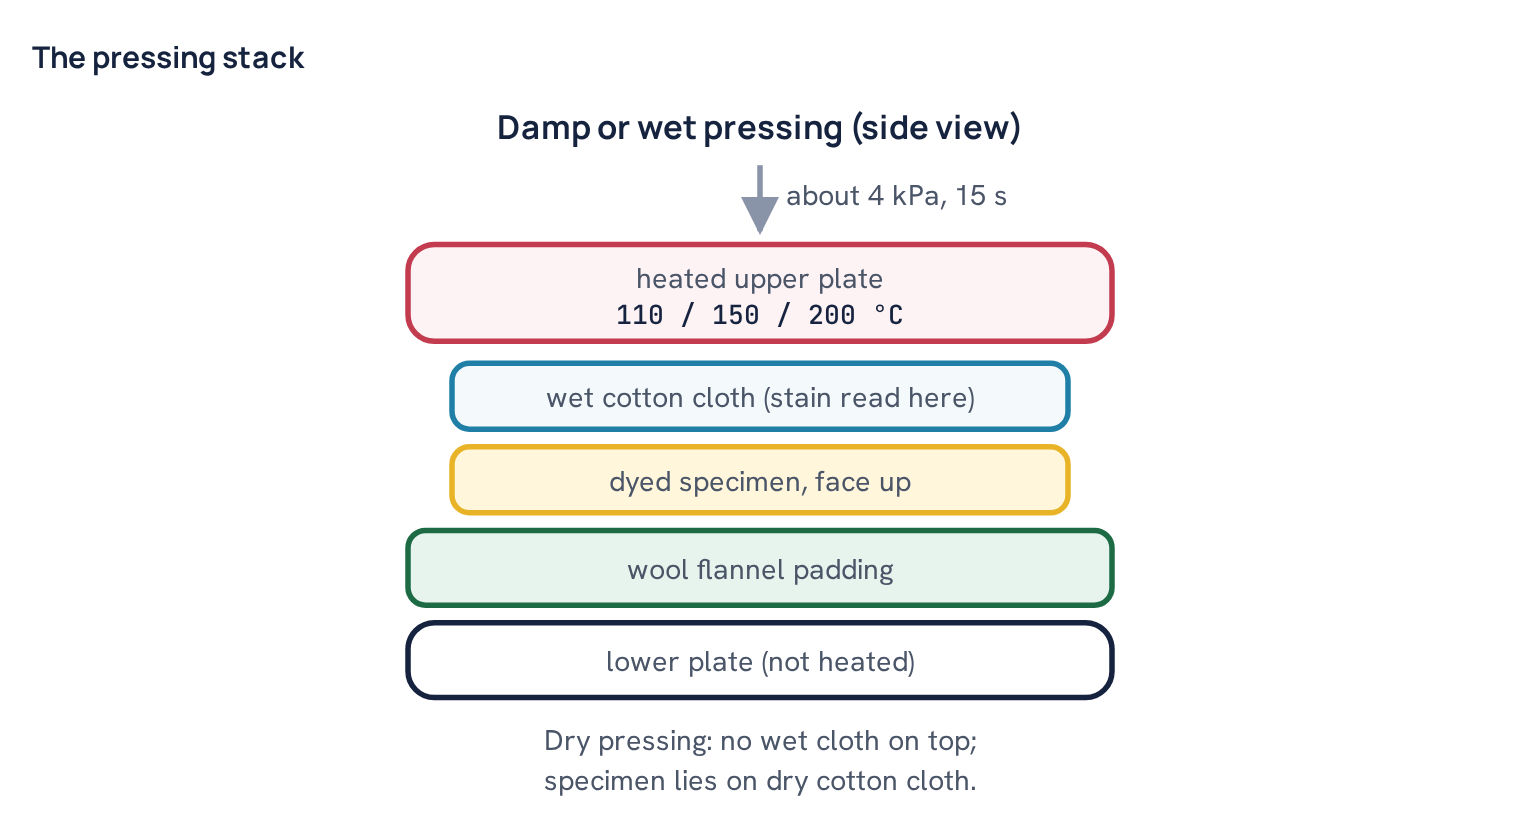
The heating device has two smooth, flat plates. The lower plate is not heated; it carries a soft padding, usually a layer of wool flannel, so that pressure spreads evenly. The upper plate is heated and controlled to the test temperature. The device applies a light, even pressure of about 4 kPa, which is close to the pressure of a hand iron. The specimen is a strip of the dyed fabric, typically about 40 mm by 100 mm. The adjacent fabric is a piece of undyed, bleached cotton cloth of the same size.
The specimen and the cotton cloth are conditioned in the standard atmosphere before testing. That means 20°C and 65% relative humidity, held long enough for the fabric to reach a stable moisture content. Fleece and other heavy fabrics need more time than single jersey.
Three ways of pressing
The standard describes three procedures. The buyer’s requirement normally states which ones apply.
- Dry pressing. The dry specimen is laid on dry cotton cloth on the padding and pressed with the hot plate for 15 seconds. This copies ironing dry fabric with no steam.
- Damp pressing. The dry specimen is laid on the padding and covered with a piece of cotton cloth that has been wetted in water and squeezed to about its own mass of water. Then it is pressed for 15 seconds. This copies ironing through a damp pressing cloth.
- Wet pressing. The specimen itself is wetted and squeezed to about its own mass of water, covered with the wet cotton cloth, and pressed for 15 seconds. This copies pressing a wet or freshly washed garment, and it is the hardest of the three for staining.
Temperature by fibre
The standard gives three test temperatures: about 110°C, 150°C and 200°C, each controlled to about ±2°C. The temperature should match the fibre, in the same way that an iron has different settings. As a general guide, cotton and linen are tested at the highest setting, while wool, silk, viscose, polyester and polyamide are usually tested at the middle setting, and heat-sensitive fibres such as acetate at the lowest. For blends, the lower temperature that suits the most sensitive fibre is the logical choice. In practice, buyers write the temperature in their requirement, and it varies by buyer and by product.
All three of our reports were run at 200°C for 15 seconds on CVC fleece. 200°C is the cotton setting. For a fabric where the shade on the polyester part is made with disperse dye, 200°C is a severe condition, much harsher than the middle setting that the fibre guide would point to. This does not make the result wrong; it is what the buyer asked for. But it explains part of why the fabric failed, and it is worth knowing when you discuss the requirement.
Assessment: immediately and after conditioning
Colour change is assessed twice. The first assessment is made immediately after pressing, while the specimen is still warm. The second is made after the specimen has rested in the standard atmosphere, usually for 4 hours, and has taken back its normal moisture. Many dyes change shade reversibly when hot and dry, an effect called thermochromism. The colour often comes back after conditioning. A shade change that remains after 4 hours is a real, permanent change.
Staining is assessed on the cotton cloth with the grey scale for staining, under standard lighting, comparing the stained cloth with a piece of the original undyed cotton. For damp and wet pressing, it is the wet cloth placed on top of the specimen that is graded.
How to read the result
A full hot pressing result has up to nine grades: colour change immediately and after conditioning, plus staining, for each of dry, damp and wet pressing. Most reports compress this to a short line such as “change 4-5 (dry, damp, wet); staining damp 4-5, wet 2-3”.
Typical requirements are colour change 4 to 4-5 and staining 3-4 to 4. Some buyers ask only for dry and damp; others include wet. Requirements vary by buyer, product and end use, so always check the sheet.
When you read a result, ask four questions:
- Is the problem colour change or staining? Colour change points to unstable dye or a reversible heat effect. Staining points to dye that can leave the fibre.
- Which pressing mode failed? If only wet fails, water and steam are helping the dye move. If dry also fails, the dye sublimes or migrates without help.
- Did the grade improve after conditioning? If the change recovers, it was thermochromism. If it stays, the shade truly changed.
- What is the fibre? In a CVC or PC blend, both the disperse dye on polyester and the reactive dye on cotton can stain. You need to know which one did.
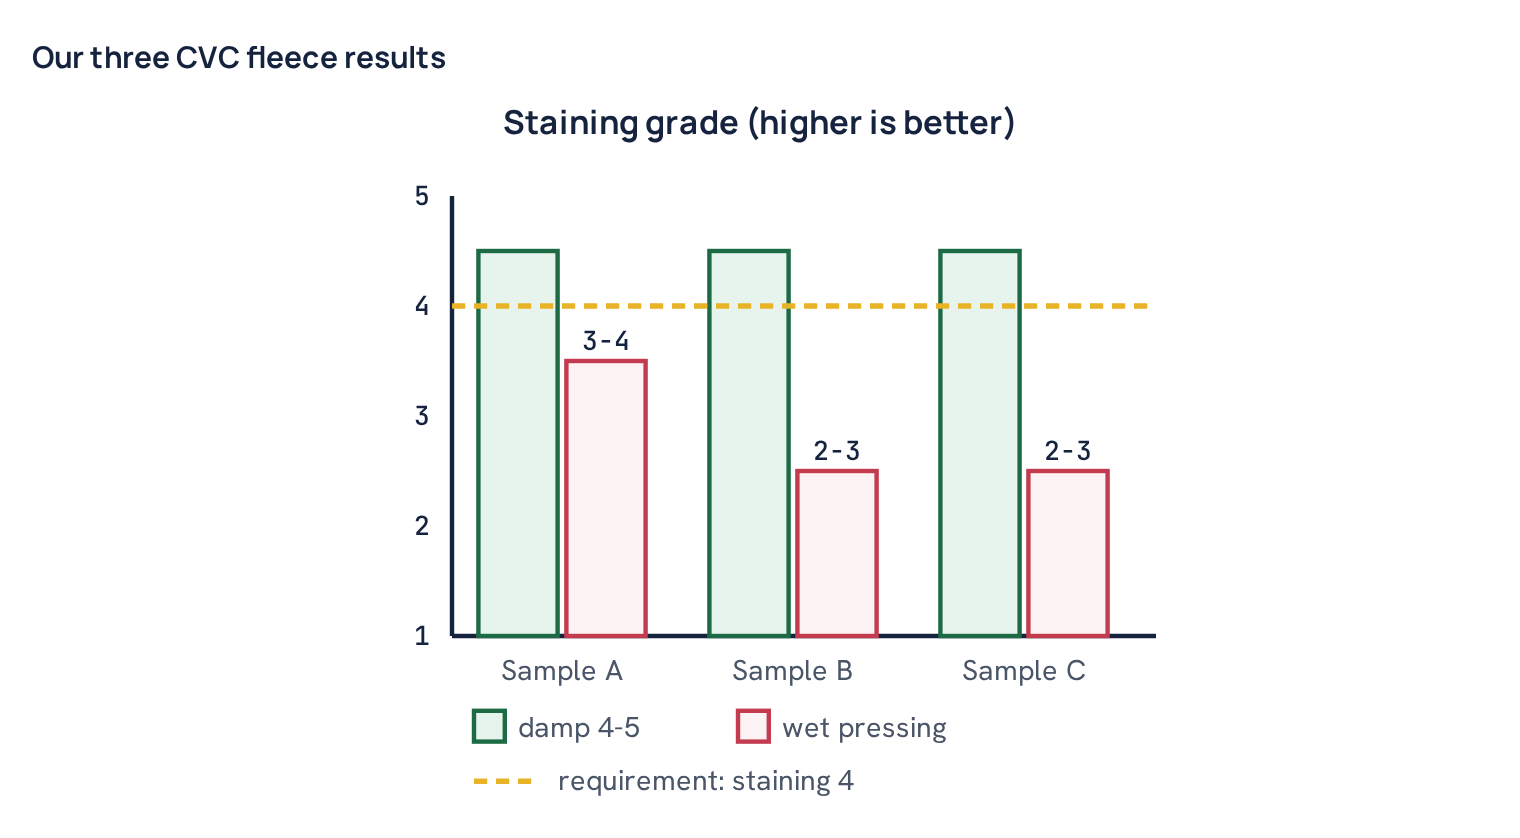
Worked example. One of our reports reads: CVC fleece, 320 GSM, 200°C for 15 seconds, graded immediately and after 4 hours conditioning. Colour change 4-5 in dry, damp and wet pressing. Staining damp 4-5, wet 2-3, the same immediately and after 4 hours. Requirement: change 4-5, staining 4. Verdict: fail. How do we read this? First, colour change is 4-5 everywhere, so the dye is stable in the fabric and the shade is not burning or shifting. Second, damp staining is 4-5, so the dye does not move much when only the cloth is wet. Third, wet staining drops to 2-3, so when the fabric itself is wet and pressed at 200°C, a visible amount of colour moves into the cotton cloth. Fourth, the grade is the same before and after conditioning, so this is real dye transfer, not a temporary effect. The fabric is losing very little colour, but the colour it loses is strong enough to stain. That pattern points to loose or mobile dye on the fibre surface, carried out by hot water and steam. The next step is to find out whether it is disperse dye from the polyester, reactive dye from the cotton, or both.
The other two reports followed the same pattern: change 4-5 in all modes, damp staining 4-5, and wet staining of 3-4 on one sample and 2-3 on the other. Three fails from three samples of the same fabric type, all on the same point, is a consistent message even if the set is small.
Why knit fabric fails hot pressing
To understand the fail, you need to look at what heat does to disperse dye inside polyester. If you need a refresher, see how disperse dyes work on polyester.
Disperse dye is held by solubility, not by a bond
Disperse dyes are small, non-ionic molecules with very low solubility in water. In the dyebath at about 130°C, the polyester structure is open, and the dye dissolves into the fibre like a solute in a solid solvent. On cooling, the polymer chains close up and trap the dye. There is no chemical bond. The dye stays in place only because, at room temperature, it cannot move through the tight polymer.
Polyester has a glass transition temperature of roughly 70–80°C when dry, and lower when wet. Above this temperature the amorphous regions start to move, and dissolved dye can diffuse again. At 200°C the fibre is far above its glass transition. For 15 seconds, the dye in the outer layer of the fibre is mobile.
Thermomigration
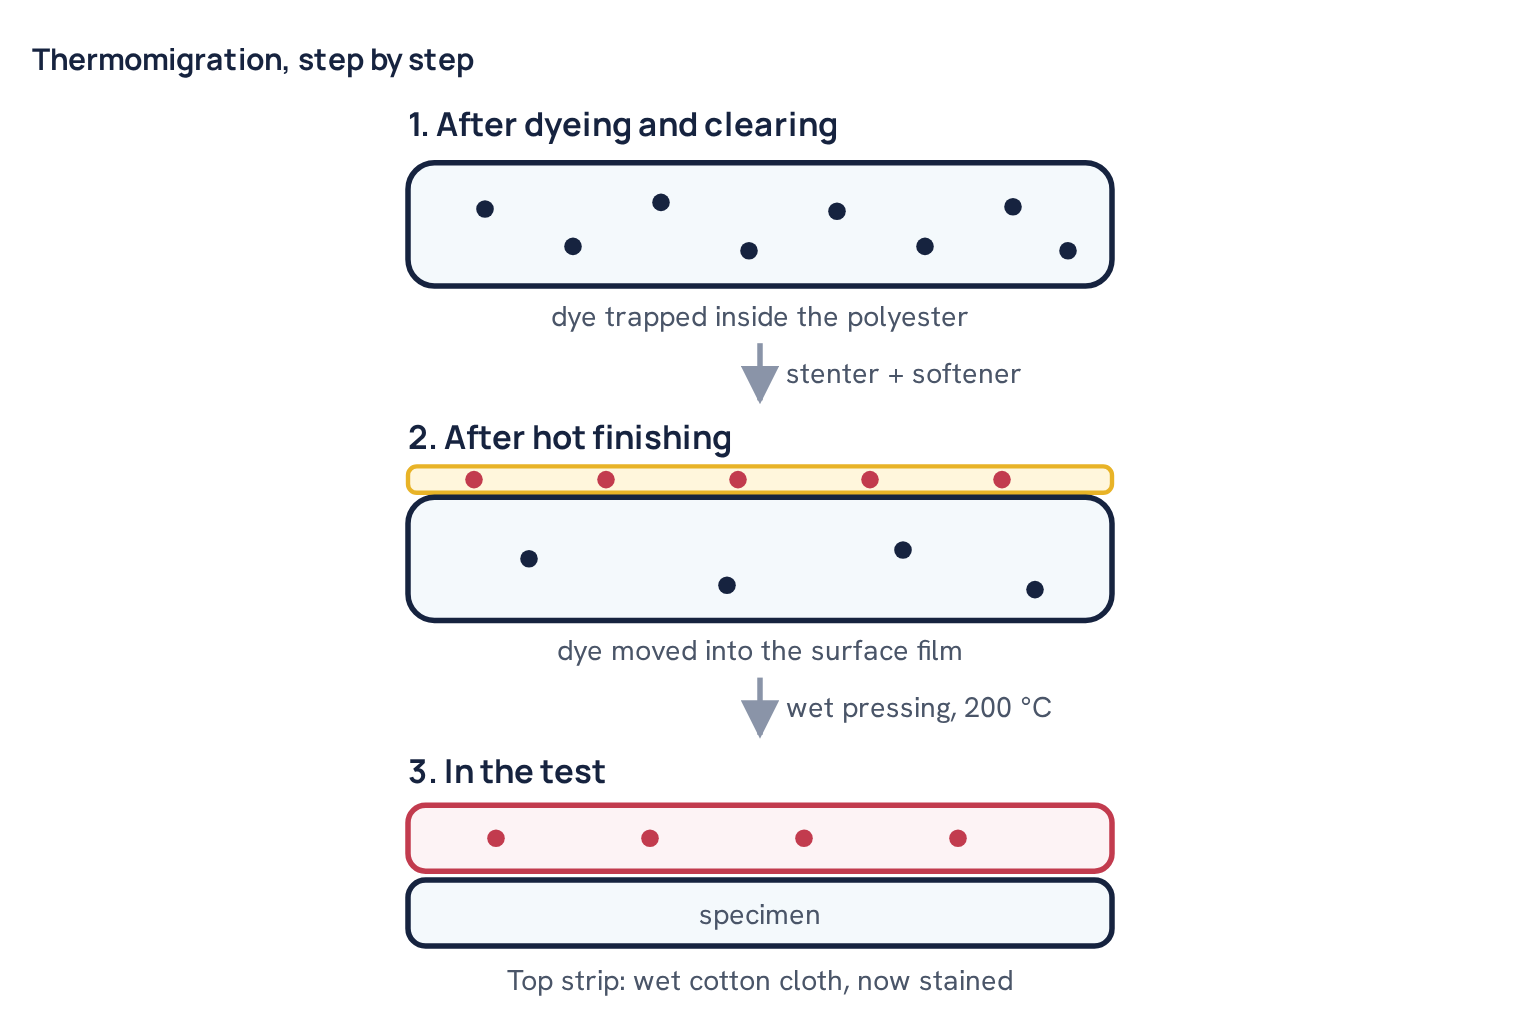
Thermomigration is the movement of disperse dye from the inside of the polyester fibre to its surface during heat treatment. It happens most strongly when something on the fibre surface can dissolve disperse dye better than polyester can. That “something” is usually a finishing chemical: a softener, the emulsifier that keeps the softener stable in water, a wetting agent, or leftover dispersing agent and surfactant from dyeing.
The mechanism is a kind of extraction. Many surfactants and softeners have long hydrophobic chains. Disperse dye is also hydrophobic, so it dissolves in that oily surface film. When the fabric is heated above the glass transition, dye diffuses outwards from the polymer into this film. When the fabric cools, the dye is no longer inside the fibre. It sits on the surface, held only by a thin layer of chemical. In a rub test or a wash test it comes off easily. In a wet pressing test, hot water and steam dissolve the surface film and carry the dye straight into the cotton cloth.
Thermomigration does not need the pressing test to start it. It often begins in the stenter, when the fabric is dried and set at 150–190°C with softener already on it. The fabric may leave the dyeing machine with good fastness and lose it during finishing. The hot press then simply adds a second dose of heat and finds the dye already sitting at the surface.
Sublimation
Sublimation is when a solid turns directly into vapour without melting. Disperse dyes are small enough that some of them sublime at ironing temperatures. In dry pressing, dye vapour can leave the polyester and condense on the cooler cotton cloth. This is the same effect that sublimation printing uses on purpose.
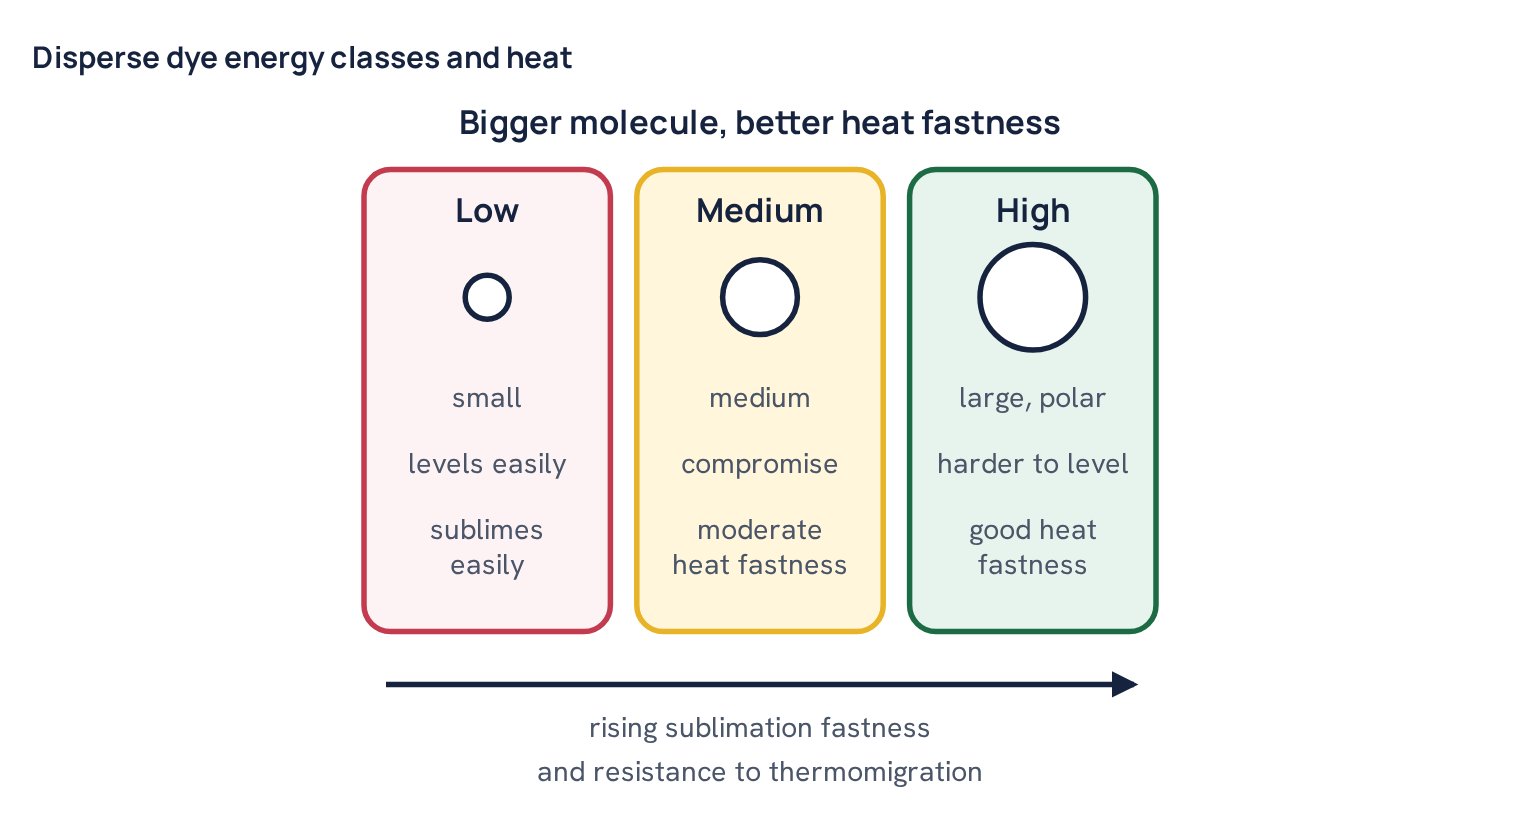
How easily a disperse dye sublimes depends on its size and polarity. Dyers group disperse dyes roughly into energy classes:
- Low-energy dyes are small molecules. They dye quickly at lower temperatures and level well, but they sublime easily and have poor heat fastness.
- Medium-energy dyes sit in the middle and are a common compromise for exhaust dyeing.
- High-energy dyes are larger and more polar. They need higher dyeing temperatures and are harder to level, but they have good sublimation fastness and resist thermomigration better.
Sublimation fastness has its own test, ISO 105-P01, where the fabric is held in contact with undyed fabric at a set temperature, often in the range 150–210°C. Dye makers publish sublimation and heat-setting fastness ratings for each dye. These are useful for selection, though each supplier rates on its own terms and the numbers are not always directly comparable.
The CVC complication
CVC (chief value cotton) fleece is mostly cotton with a smaller polyester share. The cotton is dyed with reactive dyes and the polyester with disperse dyes, to the same shade. That gives two possible sources of staining in a wet pressing test, and they behave differently.
- Disperse dye from the polyester. Thermomigrated or surface dye is carried out by hot water and steam. It also stains cotton cloth well, because disperse dye deposits on the cotton surface even though it does not truly dye it. This source is made worse by high finishing temperatures, unsuitable softeners and poor clearing.
- Hydrolysed reactive dye from the cotton. Reactive dye that reacted with water instead of with the fibre is held only by weak forces. If wash-off was not thorough, it stays in the cotton. Hot water during wet pressing releases it into the wet cloth.
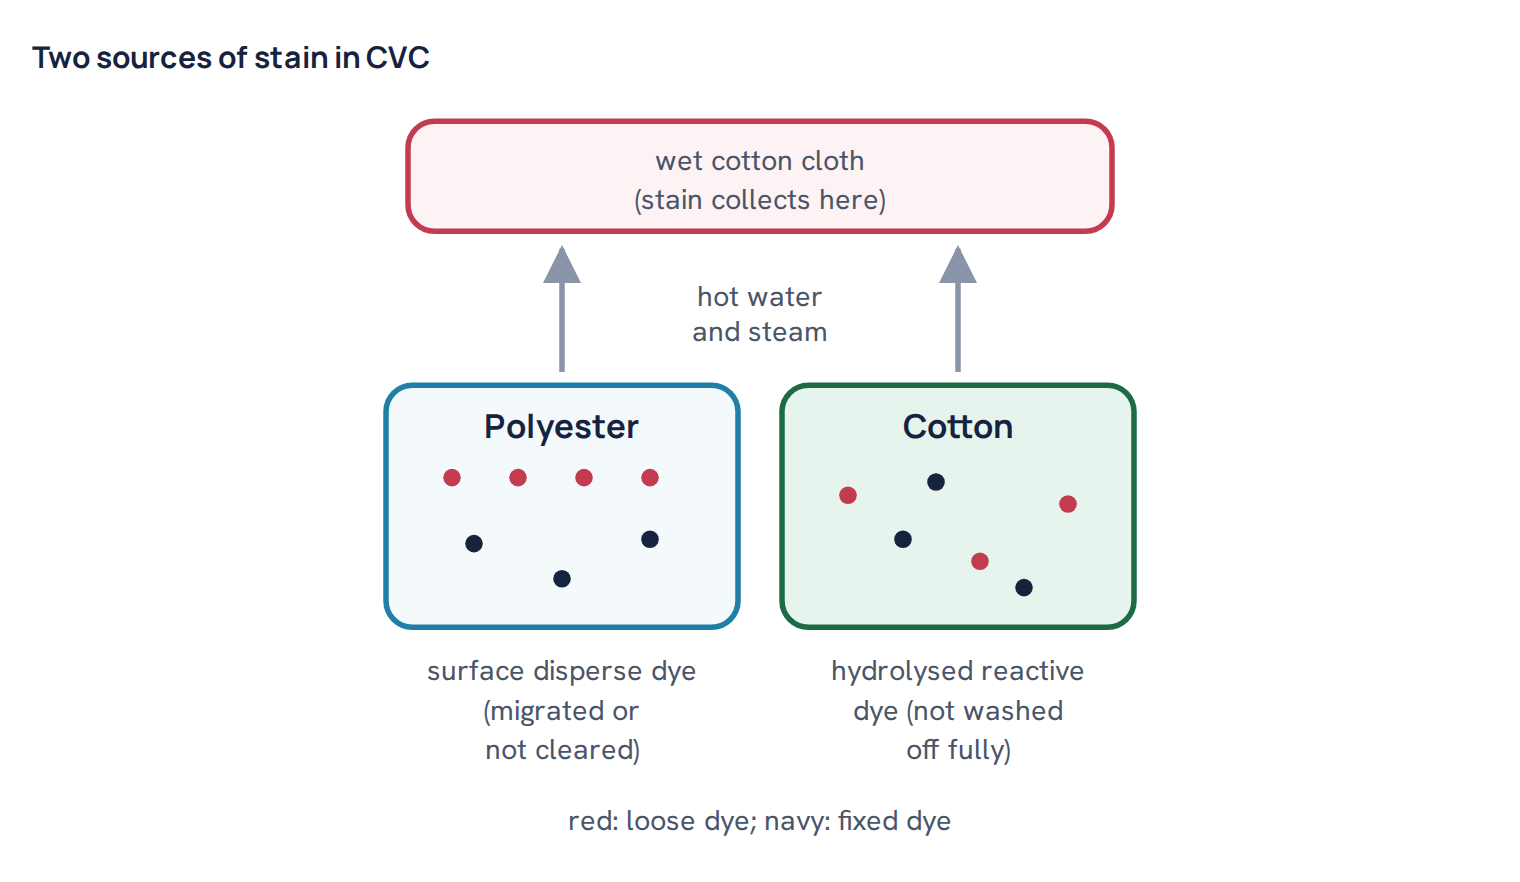
The fact that damp pressing passed and wet pressing failed in all three of our reports fits both sources: in both cases the specimen needs to be wet for the dye to come out in quantity. That is why diagnosis matters before you change the process. For more on how CVC is dyed, see CVC fabric dyeing process.
Why fleece makes it worse
Fleece is brushed, and often sheared, on one side. Brushing breaks and lifts fibres, which greatly increases the fibre surface that touches the cotton cloth. Fleece is also heavy and thick, so it holds a lot of water after wetting, and that water turns to steam under a 200°C plate. Brushed fleece often gets a generous softener dose to give a soft hand, and it may be finished at high stenter temperatures to control width and shrinkage. All of these push in the same direction. The fleece fabric development guide covers the construction side.
Common mistake: Assuming the fabric passed in the dyeing department, so the problem must be in the lab. A fabric tested straight after dyeing, before softener and stenter, can show good fastness and then fail after finishing. Test the fabric in the state it will be shipped.
Causes at a glance
| Cause | What you see | How to check |
|---|---|---|
| Thermomigration from softener or surfactant | Wet staining fails, dry and change pass; rubbing may also be weak | Compare finished fabric with the same lot finished without softener |
| Poor or skipped reduction clearing | Staining in wet pressing and washing; wet rub low | Hot-water extraction or wash test on the polyester part; check process record |
| Low-energy disperse dyes | Staining even in dry pressing; shade change on deep colours | Check dye supplier’s sublimation rating |
| High stenter temperature or long dwell | Fastness drops between dyeing and finishing | Test before and after the stenter |
| Unfixed reactive dye on cotton | Wet staining, also cotton staining in wash and water tests | Hot soaping of a sample: if staining improves, the reactive side was loose |
| Test temperature above the fibre setting | Fail only at 200°C, pass at 150°C | Run both temperatures for information |
| Deep shade with heavy dye load | Navy, black, dark red fail most often | Compare with lighter shades in the same quality |
How to find which dye is staining
Before changing recipes, find out whether the stain on the cotton cloth comes from the polyester or the cotton. A simple sequence works in most labs:
- Look at the stain closely. If the shade on polyester and cotton was matched with slightly different tones, the stain colour can sometimes show which side it came from.
- Do a wash fastness test with a multifibre strip. Staining mainly on the polyester and acetate strips points to disperse dye. Staining mainly on the cotton strip and other cellulose strips points to reactive dye. See how to test colour fastness to washing.
- Test in three states. Take samples after dyeing and wash-off (dried at low temperature, no softener), after the stenter without softener, and after full finishing. If wet staining is good in the first two and bad in the third, the softener is the main driver. If it is bad after the stenter even without softener, heat and clearing are the issue. If it is already bad after dyeing, look at clearing and reactive wash-off.
- Try a hot soaping on a lab sample. If a hot soap and rinse lifts the wet pressing grade, a large part of the stain was loose reactive dye.
Common mistake: Adding a cationic fixing agent to cure every staining problem. A fixing agent can hold loose reactive dye on cotton, but it does nothing for disperse dye on polyester, and some fixing agents carry surfactants that can make thermomigration worse. They can also change the shade and lower light fastness.
How to prevent a hot pressing fail
Dye selection
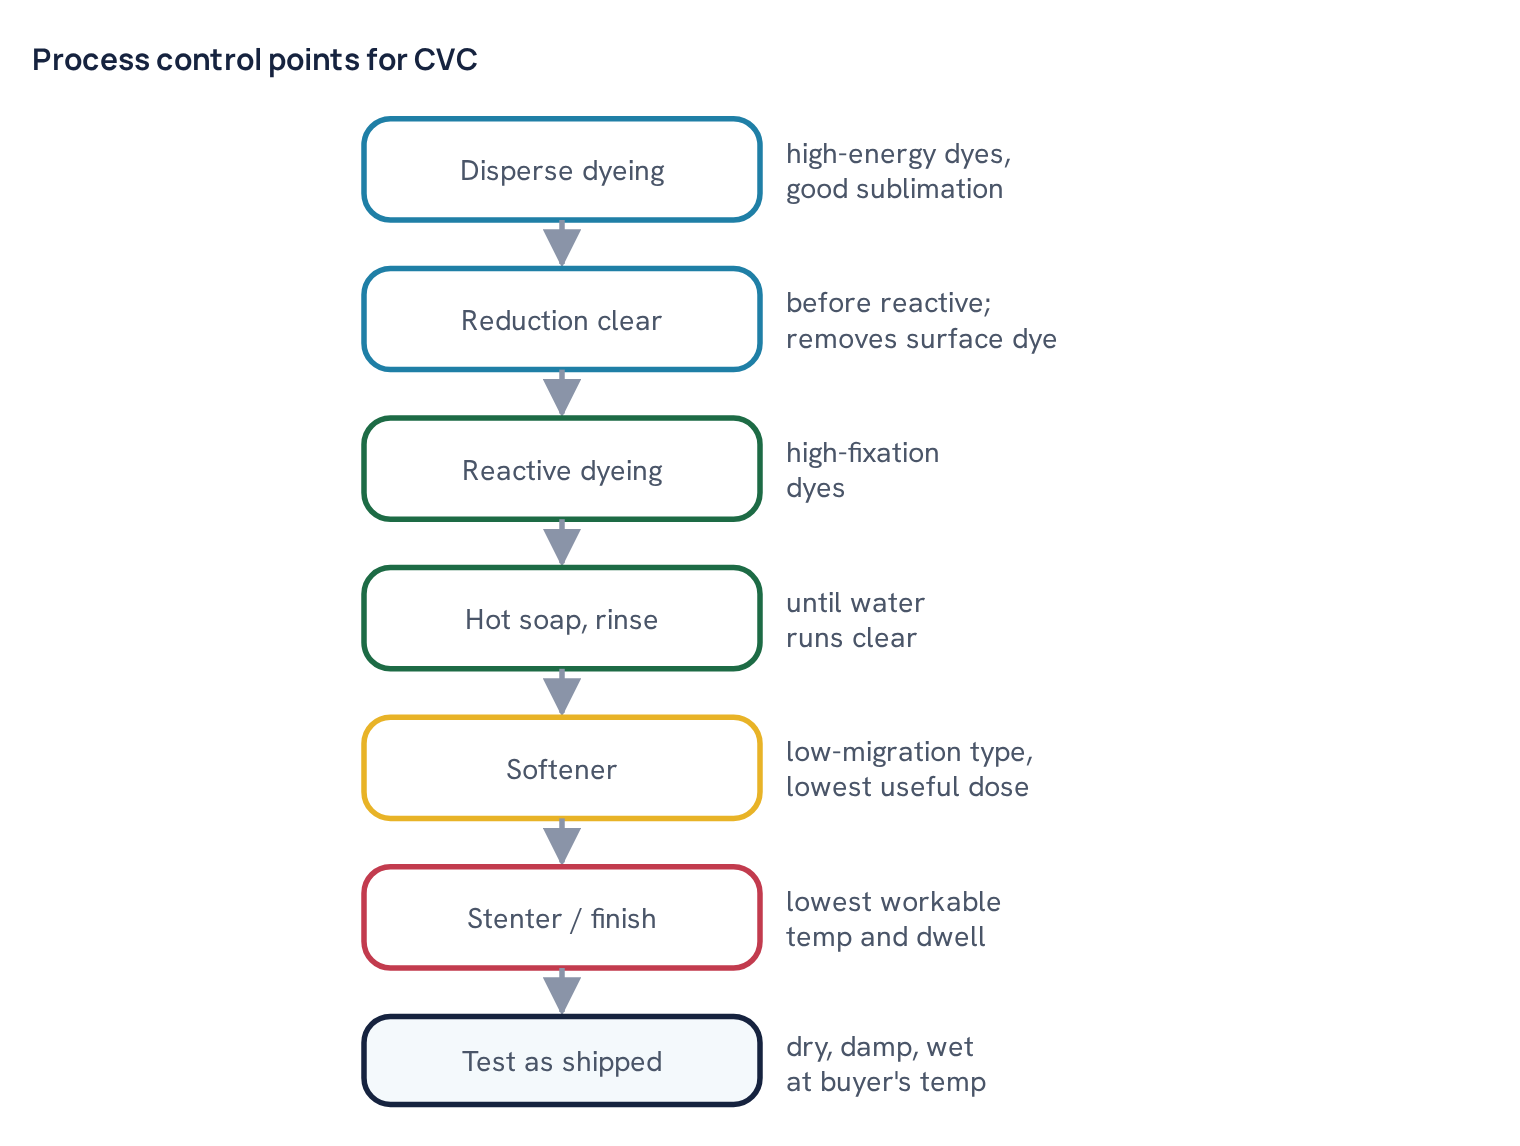
For any polyester or blend that will be ironed, heat pressed or printed with heat transfers, choose disperse dyes with good sublimation and thermomigration fastness. In practice that means high-energy or carefully chosen medium-energy dyes. Avoid low-energy dyes in deep shades. Check the dye supplier’s data for sublimation fastness and fastness after heat setting, and ask for a thermomigration rating if one is available. Black and navy are the hardest shades; they use the most dye, so there is more of it to move.
On the cotton side, choose reactive dyes with high fixation and good wash-off properties, so less hydrolysed dye is left to remove.
Reduction clearing
Reduction clearing removes the disperse dye that is lying on the polyester surface after dyeing, without removing the dye inside the fibre. A typical recipe uses sodium hydrosulphite and caustic soda at about 1–2 g/L each, at 70–80°C for 15–20 minutes, followed by rinsing and neutralising. Exact conditions vary by mill, shade and dye supplier. Medium and deep shades usually need it.
On CVC, there is a catch. Sodium hydrosulphite in alkali destroys many reactive dyes too. So reduction clearing must be done after the disperse stage and before the reactive dyes go on, as in a two-bath process. In one-bath or shortened processes, full reduction clearing is often skipped, and the polyester surface stays loaded with loose disperse dye. That fabric is at higher risk in hot pressing, wet rubbing and washing. Where a full clear is not possible, a well-planned hot wash-off and dyes with good fastness become more important.
Reduction clearing does not stop thermomigration later. It only removes the dye already on the surface. Dye that moves out of the fibre during the stenter is a new problem, and it is controlled in finishing.
Thorough reactive wash-off
For the cotton part, rinse, soap at or near the boil, and rinse again until the wash-off water runs clear. The aim is to remove hydrolysed reactive dye before softener goes on. Hard water and high salt carry-over slow wash-off, so control water quality and drain well between baths.
Finishing temperature
Thermomigration rises with both temperature and time. Keep stenter temperatures and dwell times as low as the fabric allows. For CVC fleece, many mills dry and finish in roughly the 140–170°C range, but the right setting depends on the machine, speed, moisture and the shrinkage and width targets, so it varies. If heat setting at a higher temperature is needed for dimensional stability, consider doing it before dyeing, on the greige or prepared fabric, so that the dyed fabric sees less heat afterwards. Avoid a second pass through the stenter at high temperature to correct width or hand; each pass moves more dye.
Softener choice
Softener is the most common driver of thermomigration on blends. Not every softener behaves the same.
- Cationic fatty softeners and some non-ionic softeners can dissolve disperse dye well and are frequent offenders on polyester blends.
- Silicone softeners vary widely. The type of silicone and especially the amount and type of emulsifier in the product decide how much dye it pulls out.
- Use the lowest dose that gives the required hand. Overdosing is common on fleece.
- Ask suppliers for softeners that they have tested for low thermomigration on polyester, and confirm with your own trial on your own shade.
See dyeing auxiliaries explained for what each class of chemical does.
Common mistake: Raising the stenter temperature to save time on heavy fleece. Faster drying at higher temperature can turn a passing fabric into a failing one. Fleece holds a lot of water, so it is tempting, but the dye pays the price.
Prevention checklist
- Confirm at development stage whether hot pressing is required, which modes (dry, damp, wet), and at what temperature.
- Select disperse dyes with good sublimation and thermomigration ratings, especially for dark shades.
- Run a full reduction clear after the disperse stage on medium and deep shades of CVC and PC, before reactive dyeing.
- Wash off reactive dyes until rinse water is clear; check soaping temperature and number of rinses.
- Choose a softener tested for low thermomigration, at the lowest useful dose.
- Set the stenter temperature and speed for the fabric, record them, and avoid repeat high-temperature passes.
- Do an in-house wet pressing check on the finished fabric before sending to the lab, using the buyer’s temperature.
- Check wet rubbing and wash staining at the same time; they often fail for the same reason. See wet rubbing fastness fail causes and remedies.
- Keep the results of each finishing route so the next order of the same quality starts from a proven setting.
What to do with a failed batch
A fail on hot pressing staining, with colour change still at 4-5, is usually a surface problem. The dye inside the fibre is fine; the dye on the surface is not. That gives you some options.
- Confirm the result. Check that the test temperature, modes and requirement on the report match the buyer’s sheet. Run your own wet pressing check on a retained sample.
- Diagnose the source. Use the steps above to decide whether the stain is mainly disperse or mainly reactive dye.
- If reactive dye is loose: rewash the fabric with a hot soaping and rinses, then refinish. This often gives a clear improvement on the cotton side.
- If softener-driven thermomigration is the cause: strip or wash out the softener with a hot detergent wash, then refinish with a lower-migration softener, a lower dose and a lower stenter temperature. Run a lab-scale trial first on a cut from the batch.
- If the polyester surface was never properly cleared: a true reduction clear is usually not possible on finished CVC because it would strip the reactive dye. A hot wash-off can remove part of the loose disperse dye. Trial it on a sample and check the shade after, because it may lighten the polyester side and cause a two-tone effect.
- Retest before shipping. Test the corrected fabric in the shipped state, all three modes.
- Discuss the requirement if the method is harsher than the fibre setting. If the buyer tests a polyester-containing blend at the cotton temperature, share data at both 150°C and 200°C and ask whether the care label and end use support a lower setting. Do this openly; it is a discussion, not a way around the test.
Common mistake: Reprocessing a whole lot on a guess. Every rewash and refinish costs shade, hand and shrinkage control. Diagnose first on a small cut, then treat the bulk once.
Hot pressing staining is closely related to other wet fastness problems on blends. If your fabric also shows staining in wash or water tests, read staining in wash, perspiration and water fastness. The root causes overlap, and one good fix often lifts all of them together.
Questions
What is colour fastness to hot pressing?
It shows how a dyed fabric resists ironing. A specimen is pressed with a hot plate against undyed cotton cloth, then graded for colour change and staining on the grey scales.
What is the difference between dry, damp and wet pressing?
In dry pressing everything is dry. In damp pressing a wet cotton cloth is placed on the dry specimen. In wet pressing the specimen is also wetted, which makes it the hardest test for staining.
Why is colour change graded again after 4 hours?
Many dyes change shade temporarily when hot and dry. Grading after conditioning in the standard atmosphere shows whether the change is permanent.
Why does CVC or polyester fabric fail hot pressing staining?
Disperse dye in polyester becomes mobile above the glass transition temperature. Softeners and surfactants pull it to the surface, and some dyes sublime, so hot water or vapour carries it onto the cotton cloth. Loose reactive dye on the cotton side can add to the stain.
How can hot pressing fastness be improved?
Use disperse dyes with good sublimation fastness, reduction clear before reactive dyeing, wash off reactive dye thoroughly, choose a low-migration softener at a low dose and keep finishing temperatures as low as practical.

Textile engineer with 14+ years in dyeing and fabric development. He writes every guide on Dyeing Solution from real production work. Full profile