Dark specks, light dots, greasy halos, white dust, tar and rust marks each have a typical look and a simple bench test. Here is how to identify them, what causes them, how to prevent them and when correction is still possible.
At a glance
5 testsRub, solvent, wash, hue and back check sort most spots
DissolvePaste, dissolve fully and filter every dye
Drain hotLimits oligomer and disperse specks on polyester
Jar testCheck softener with the last rinse water before bulk
A batch can have a perfect shade, perfect levelness and good fastness, and still be rejected for a handful of small marks. Dark specks, light dots, greasy halos, white dust, sticky tar spots and brown rust marks are some of the most common reasons a roll is held at inspection. They are small, but a buyer’s inspector will find them, and on a garment front panel one spot is enough to make the piece a second.
The good news is that spots and stains are usually easier to trace than uneven dyeing. Each type has a typical look, a typical place it appears, and a simple test that points to its source. This article explains how to recognise each kind of spot, how to tell it apart from faults that look similar, what causes it, how to prevent it with practical settings, and what you can and cannot do once a batch is already spotted.
What dye spots and stains look like
The word “spot” covers several very different faults. Before you look for a cause, describe the spot carefully. Ask four questions: is it darker or lighter than the shade, is it the same hue or a different hue, is it sharp-edged or does it have a soft halo, and does it sit on the surface or go through the fabric?
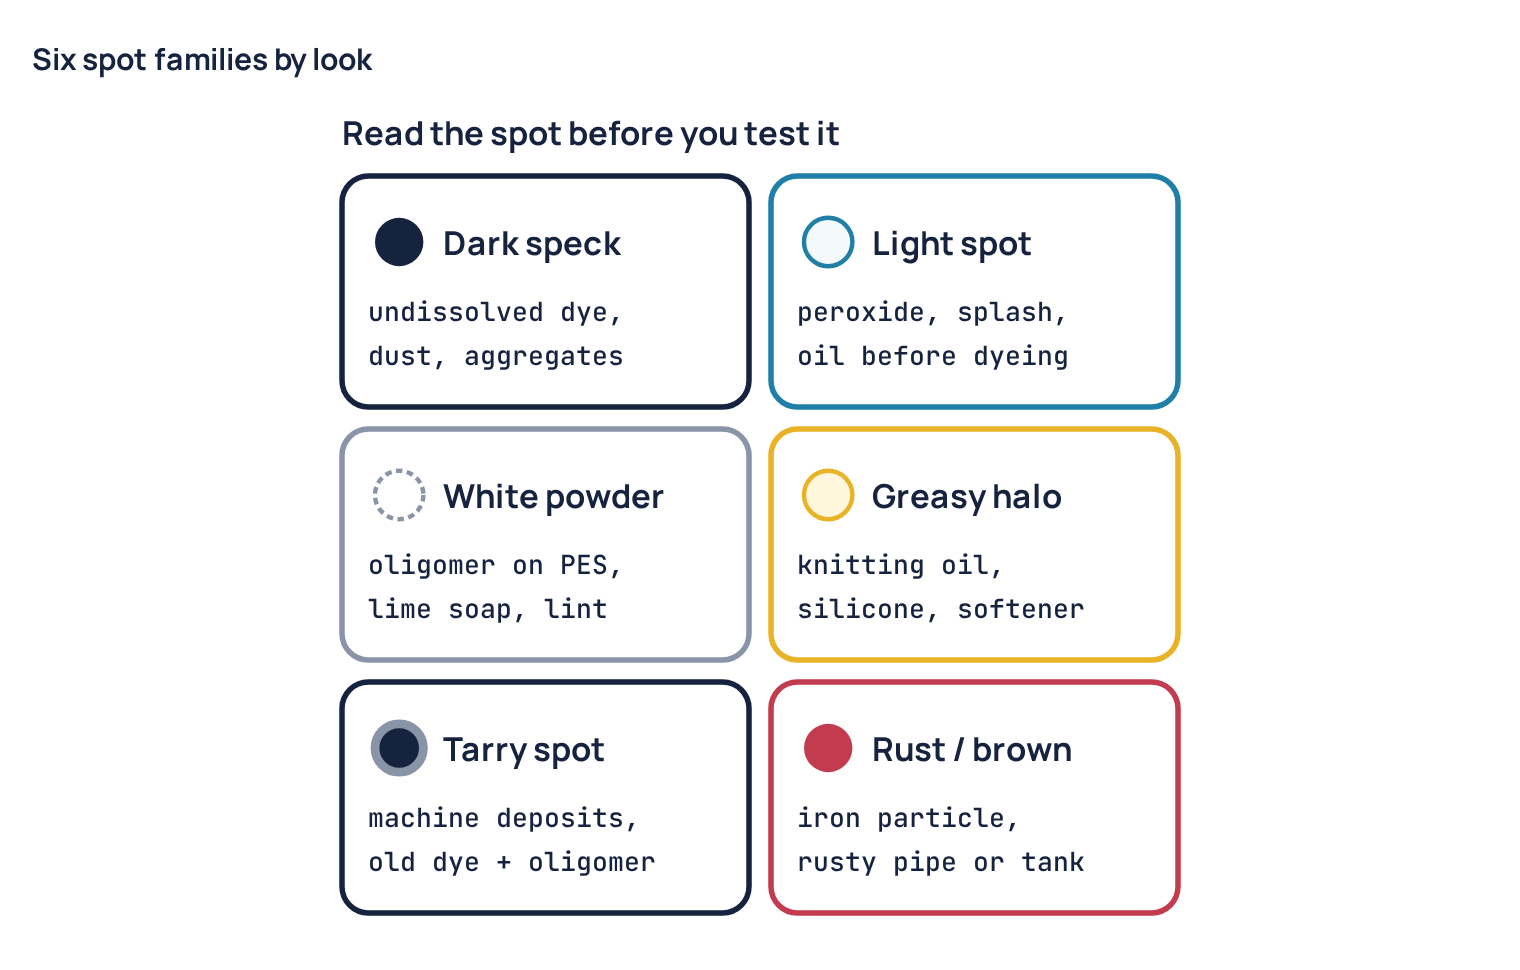
- Dark specks are small points, often less than a millimetre, darker than the shade and usually the same hue. They come from undissolved dye particles, dye dust or dye aggregates that settled on the fabric and fixed there.
- Coloured spots of a different hue, for example a red dot on a grey, usually mean contamination: dust from another dye, a splash, or a deposit from an earlier batch.
- Light spots are lighter than the shade. Something stopped the dye from going on (oil, silicone, a resist) or destroyed it after dyeing (peroxide, a reducing agent, a chemical splash).
- Greasy or shiny stains often have a darker centre and a soft halo. Knitting oil, grease, silicone and broken softener emulsions give this look.
- Tarry spots are sticky, dark, sometimes raised. They are usually lumps of old dye, oligomer, oil and lint that broke loose from the machine.
- White specks or white powder on dyed polyester are usually oligomer. On cotton they can be lime soap or undyed fibre.
- Rust or brown spots come from iron. In bleaching, an iron particle can also burn a small hole.
How to confirm and map the spots
Inspect the whole roll or batch, not just one sample. Use the light box or inspection table with good, even light, and look at both the face and the back. A dye speck that settled from the liquor is often stronger on the side that faced the flow. A spot that goes clean through both sides was usually there before or during dyeing; a spot only on the face may have come later, in finishing or handling.
Mark where the spots are. Random spots spread over the whole batch point to the liquor: dye, auxiliaries, water or softener. Spots that repeat at a fixed distance point to a roller, a guide or a knitting machine part. Spots only at the start or end of the rope point to loading, a dirty nozzle, or the last liquor left in the machine. Spots only in one roll of a multi-roll batch point to that roll’s history in knitting or storage.
Cut a piece that contains several spots and keep it as a reference. Look at it under a magnifier or a counting glass. Check it under daylight and under a second light source, because a contaminant dye can look the same as the shade under one light and clearly different under another.
Simple bench tests that identify the spot
You do not need a full laboratory to sort most spots. A white cloth, a few drops of solvent, warm water with detergent, a magnifier and a good light will answer most questions in a few minutes. Always test on a cut sample, never on the roll you might still deliver.
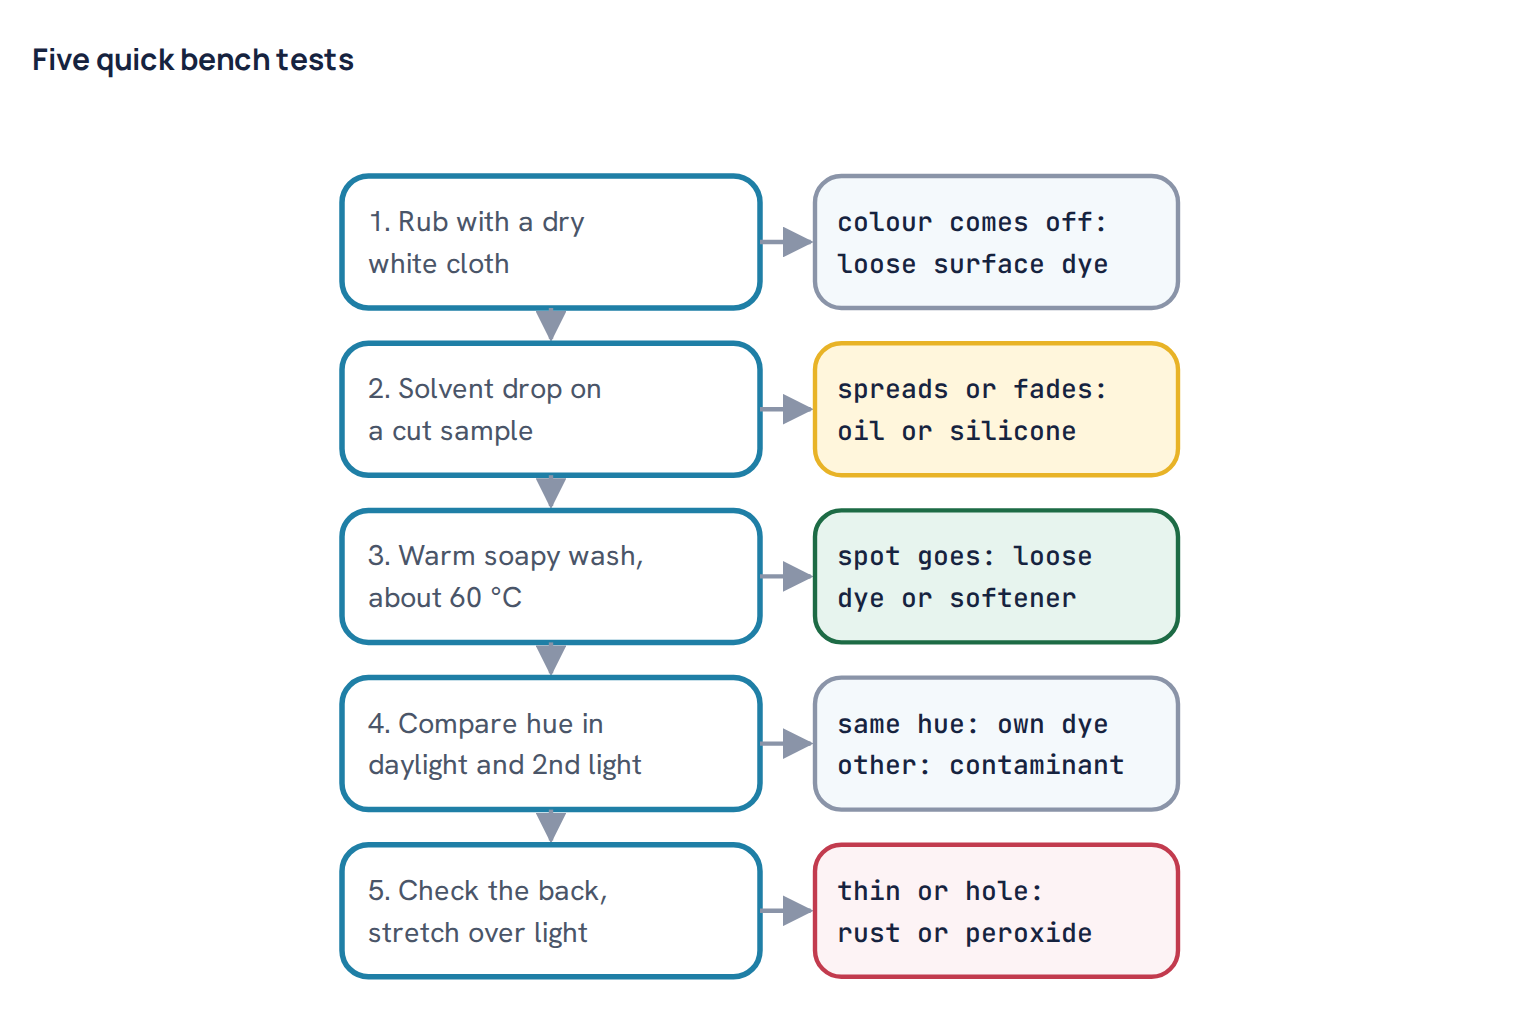
- Dry rub test. Rub the spot gently with a clean white cotton cloth. If colour transfers, the spot is loose dye or a surface deposit. This is common with disperse dye agglomerates on polyester and with tarry machine deposits.
- Solvent drop test. Put one or two drops of a mild solvent, such as white spirit or a dry-cleaning solvent, on the spot and blot with white paper. If the spot spreads, fades or leaves an oily ring on the paper, it contains oil, grease or silicone. Work in good ventilation and keep solvent away from heat.
- Warm wash test. Wash the cut piece in water at about 60 °C with a little detergent for ten minutes. Loose dye, softener lumps and lime soap often reduce or disappear. A fixed reactive dye speck will not move at all.
- Hue and magnifier check. Under a magnifier, a dye speck looks like a tiny solid point of colour, often with a sharp edge. Compare its hue with the shade. Same hue but darker means one of your own recipe dyes. A different hue means dust or a deposit from another shade.
- Back and strength check. Look at the back and stretch the spot over a light. A thin area or a pinhole inside a light or brown spot means chemical damage, usually iron with peroxide.
| Spot type | Typical look | Quick test result | Most likely cause |
|---|---|---|---|
| Dark speck | Tiny sharp point, same hue, darker | Does not wash out (reactive) | Undissolved dye, dye dust, aggregates |
| Coloured spot | Point or blotch of another hue | Hue differs from shade | Dust or deposit from another shade |
| Light spot | Paler round area, soft or sharp edge | No oil; may be thin if damaged | Peroxide, splash, resist |
| Greasy stain | Darker centre, soft halo, shine | Spreads with solvent | Knitting oil, silicone, softener |
| Tarry spot | Sticky, raised, dark | Rubs off colour, partly solvent-soluble | Machine deposits from earlier batches |
| White powder | Fine white dust on polyester | Rubs off, shows on dark shades | Oligomer |
| Rust spot | Brown or yellow mark, may have hole | Thin or broken fibre | Iron with peroxide |
Faults that look like spots but are not
Several other faults are reported as “spots” at inspection. Ruling them out early saves time and stops you from changing a recipe that was never the problem.
- Neps and dead cotton. Immature cotton fibres take up much less reactive dye and show as small white or pale specks, mostly on dark shades. Under a magnifier you see a tiny tangled knot of fibre, not a stain. The cause is the yarn, not the dye house.
- Foreign fibre contamination. A polypropylene or polyester fibre spun into a cotton yarn stays undyed in reactive dyeing. It looks like a white or pale fleck that you can pull out with a needle.
- Mélange and slub effects. These are intended. Compare with the greige or the approved standard before calling them a fault.
- Patchy dyeing. Uneven patches are larger, cloudy areas with soft edges, not points. See the guide to uneven and patchy dyeing.
- Crease and rope marks. These are lines or streaks along the rope, not round marks. These need a different fix, mainly in loading and machine running.
- Knitting holes and drop stitches. A hole with a clean edge and no colour change around it is usually mechanical, not chemical. Chemical holes from iron and peroxide often have a weak, brownish or pale ring around them.
Causes, ranked from most common to least
Every dye house has its own pattern, but in knit dyeing the usual order of suspects is roughly this:
- Poorly dissolved dye, dye dust and dye aggregation.
- Oil and grease from knitting, and oily spots from handling.
- Softener and silicone spots in finishing.
- Disperse dye agglomerates and oligomer on polyester and blends.
- Machine deposits, tar and lint balls from earlier batches.
- Defoamer spots.
- Peroxide spots, chemical splashes and iron (rust) damage.
The sections below group these causes by stage: fabric and yarn, pretreatment, dyeing recipe and process, machine, and finishing.
Fabric and yarn
Knitting oil and grease. Circular knitting machines use needle oil, and spindles and cams need grease. Most modern knitting oils are made to wash out in scouring, but old oil, dirty oil, over-oiling, oil mixed with fly and metal dust, or grease dropped from the machine can leave stains that a normal scour does not fully remove. Where oil is still on the fabric, dye cannot penetrate evenly, so the stain shows as a light or a dark ring after dyeing. Oil stains often appear as lines or repeated marks along the length because they come from one feeder or one part of the machine.
Lint and fly. Loose fibres collect in the machine, the filters and the fabric rope. They can roll into small balls, pick up dye from the liquor and stick back on the fabric as dark fuzzy specks. This is worst with fleece and brushed fabrics, which shed a lot of fibre.
Pretreatment
Peroxide spots. Hydrogen peroxide is the normal bleaching agent for cotton knits. If concentrated peroxide is added too fast or lands directly on the fabric, it can bleach small areas unevenly. More often, residual peroxide that was not removed after bleaching attacks reactive dye during dyeing and leaves pale spots or a weaker shade. Many reactive dyes are sensitive to oxidation, so peroxide must be removed by rinsing and a peroxide killer (a catalase enzyme or a reducing agent) before dyeing starts.
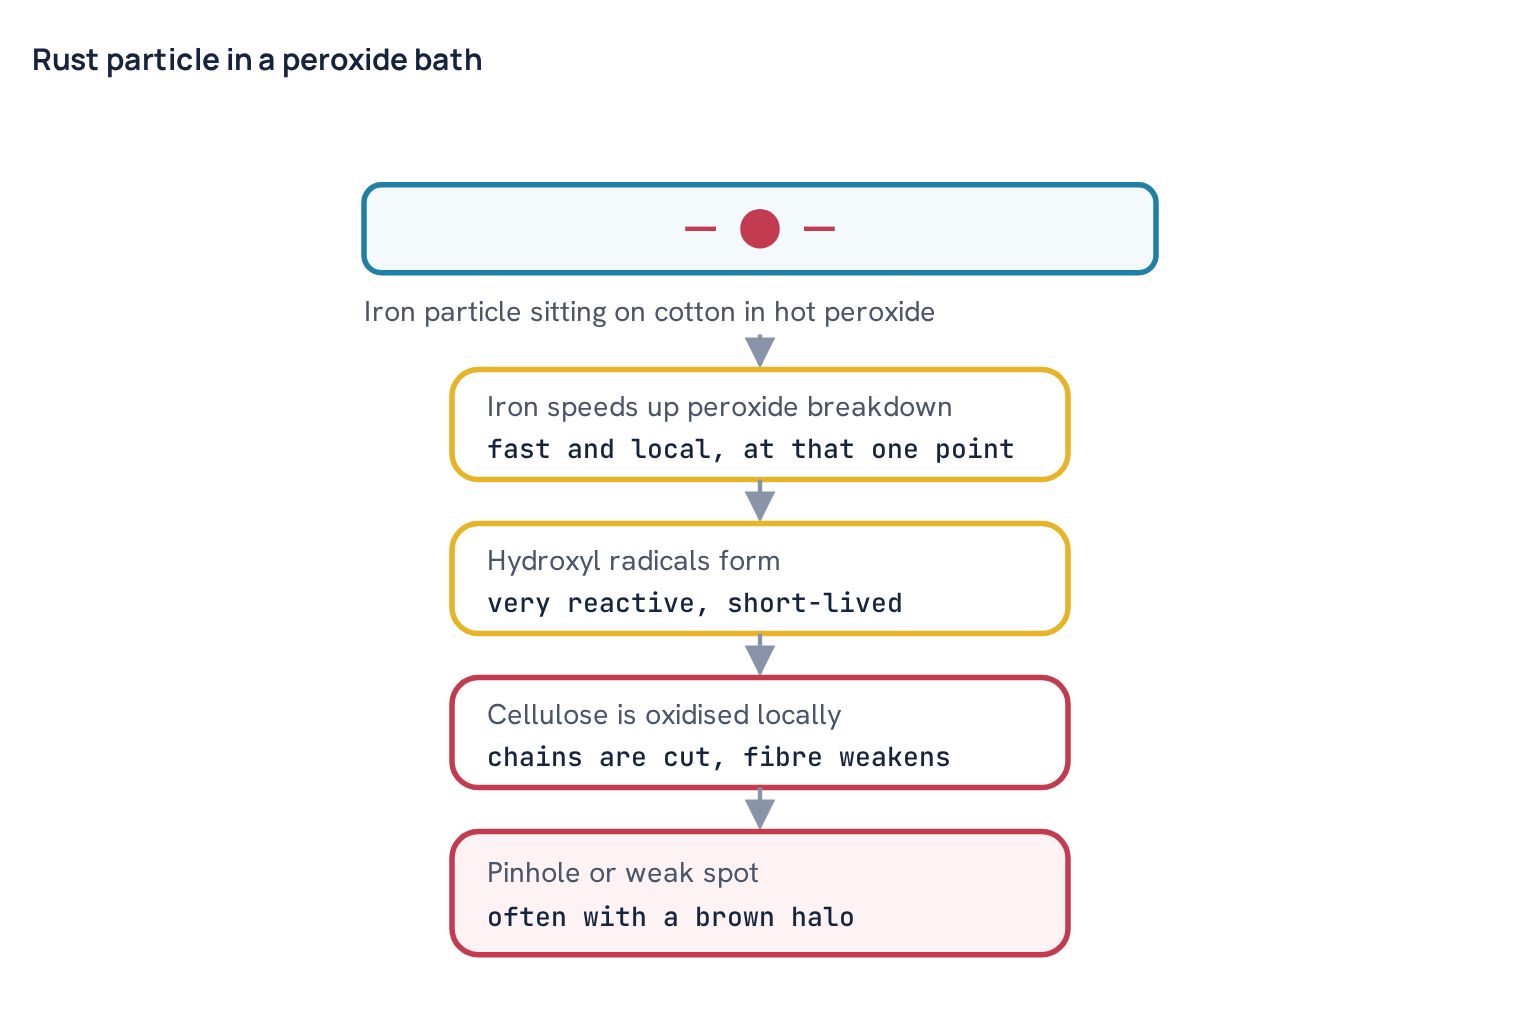
Rust and iron catalytic damage. Iron particles from rusty pipes, tanks, trolleys or the water supply can settle on the fabric. In the hot alkaline peroxide bath, iron speeds up the breakdown of peroxide at that one point. The result is a brown stain, a weak spot, or a pinhole. This damage cannot be repaired.
Chemical splashes. Drops of caustic soda, acid, peroxide, hydrosulphite or bleach on fabric waiting for dyeing, or on dyed fabric waiting for finishing, give light or discoloured spots. They often appear near dosing points, chemical stores or on the top layer of trolleys. A reducing agent splash on a reactive shade can leave a sharp pale spot because it destroys some dyes.
Dyeing recipe and process
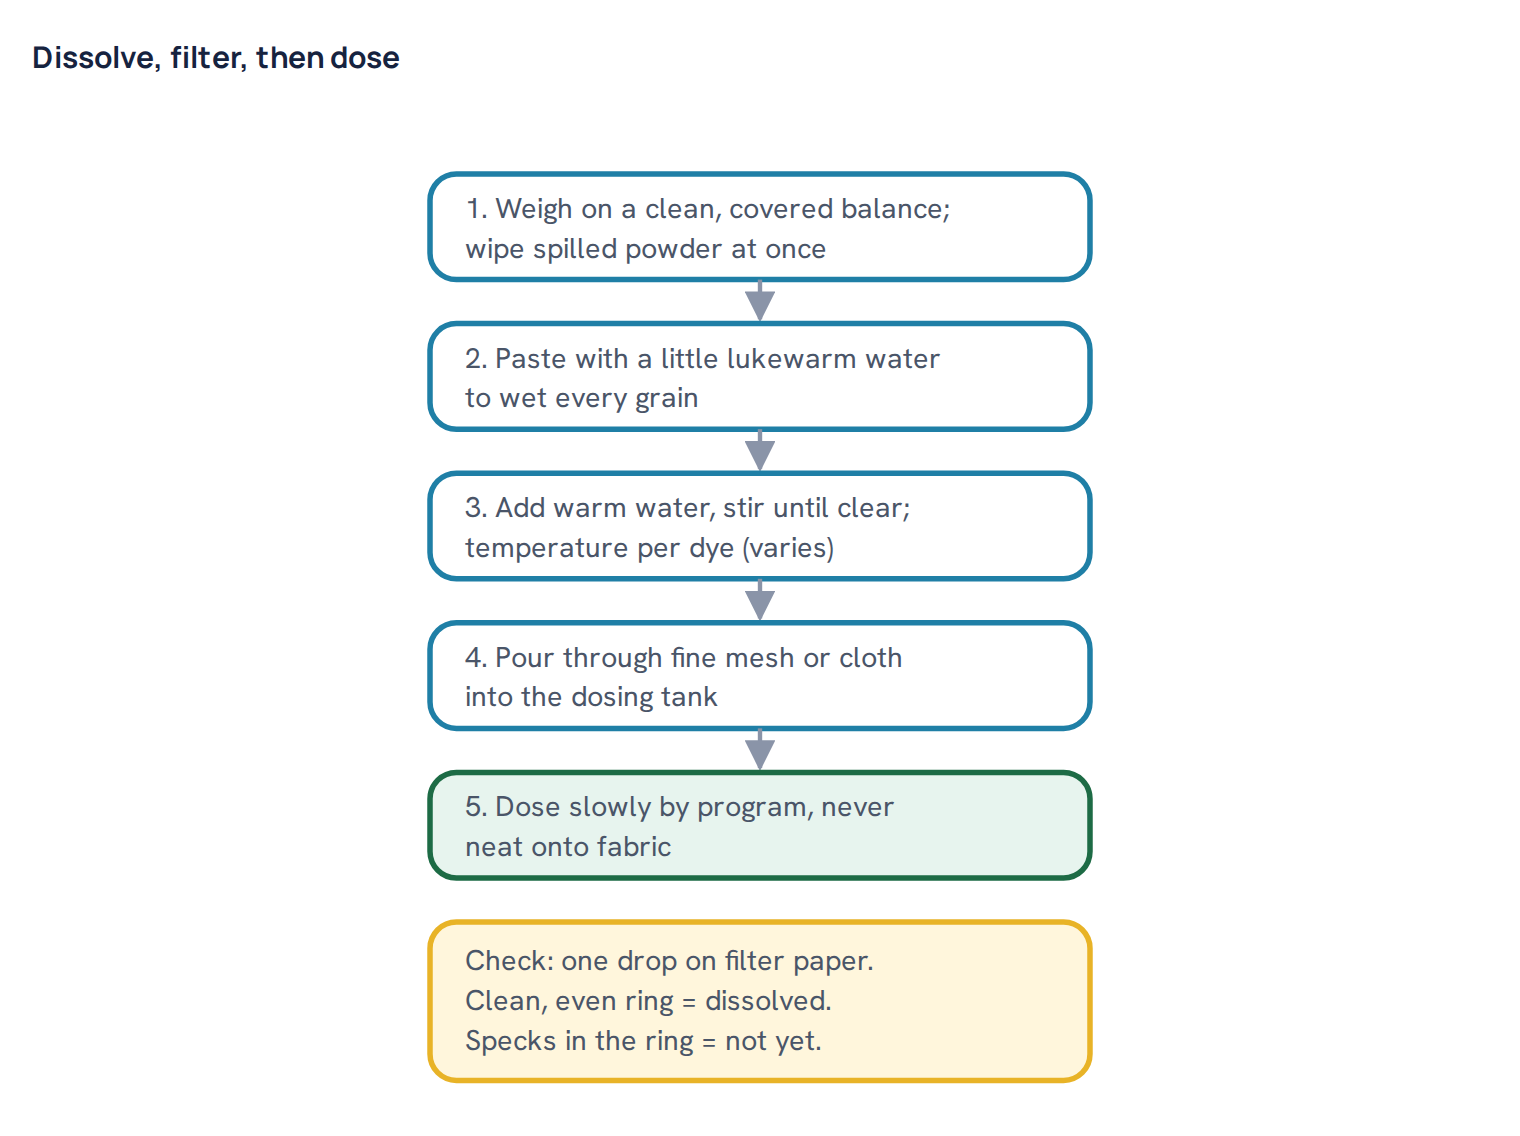
Undissolved or poorly dissolved dye. This is the most common source of dark specks. Reactive dye powders, especially at high depth, need enough water, the right temperature and enough stirring to dissolve fully. If dye is stirred into cold water in a hurry, or dissolved in a salt or alkali solution, small particles stay undissolved. They enter the machine, settle on the fabric and fix as dark points. Some dyes also form lumps if hot water is poured onto the dry powder without pasting it first.
Dye aggregation with hard water or high salt. Dye molecules in solution tend to stick together into aggregates. Hardness ions and high electrolyte push this further. Large aggregates can no longer diffuse into the fibre and deposit on the surface as specks or a dull, bronzy film, which also lowers rubbing fastness. This is worse with dyes of low solubility, deep shades at short liquor ratio, and when salt is added too quickly or before the dye is well distributed. Calcium and magnesium can also form insoluble salts with some dyes. See water quality in textile dyeing for typical hardness targets.
Dye dust in the dispensing area. Fine dye powder floats in the air when containers are opened, scooped or emptied. It settles on benches, trolleys and even on fabric waiting nearby. A few grains of a strong red or blue dust on a white or pale batch give coloured spots that are a different hue from the shade. In our dye house records, about 14% of batches are whites, and whites and pale shades show every grain of stray dust, so the dispensing area must be kept well away from fabric waiting for dyeing.
Dispersion breakdown of disperse dyes. Disperse dyes are not dissolved; they are fine particles held apart by a dispersing agent. If the dispersion breaks down, particles join into larger agglomerates that settle on the polyester as dark spots. Common triggers are hard water, a heating rate that is too fast, long holding at high temperature with too little dispersing agent, incompatible auxiliaries, especially cationic products, and poor quality or old dye. See how disperse dyes work on polyester. About a quarter of the batches in our records contain polyester, so this is a regular risk, not a rare one. In our lab reports, CVC shades that failed staining tests mostly stained the nylon and polyester strips; that is the same loose disperse dye sitting on the surface that also forms specks when it agglomerates.
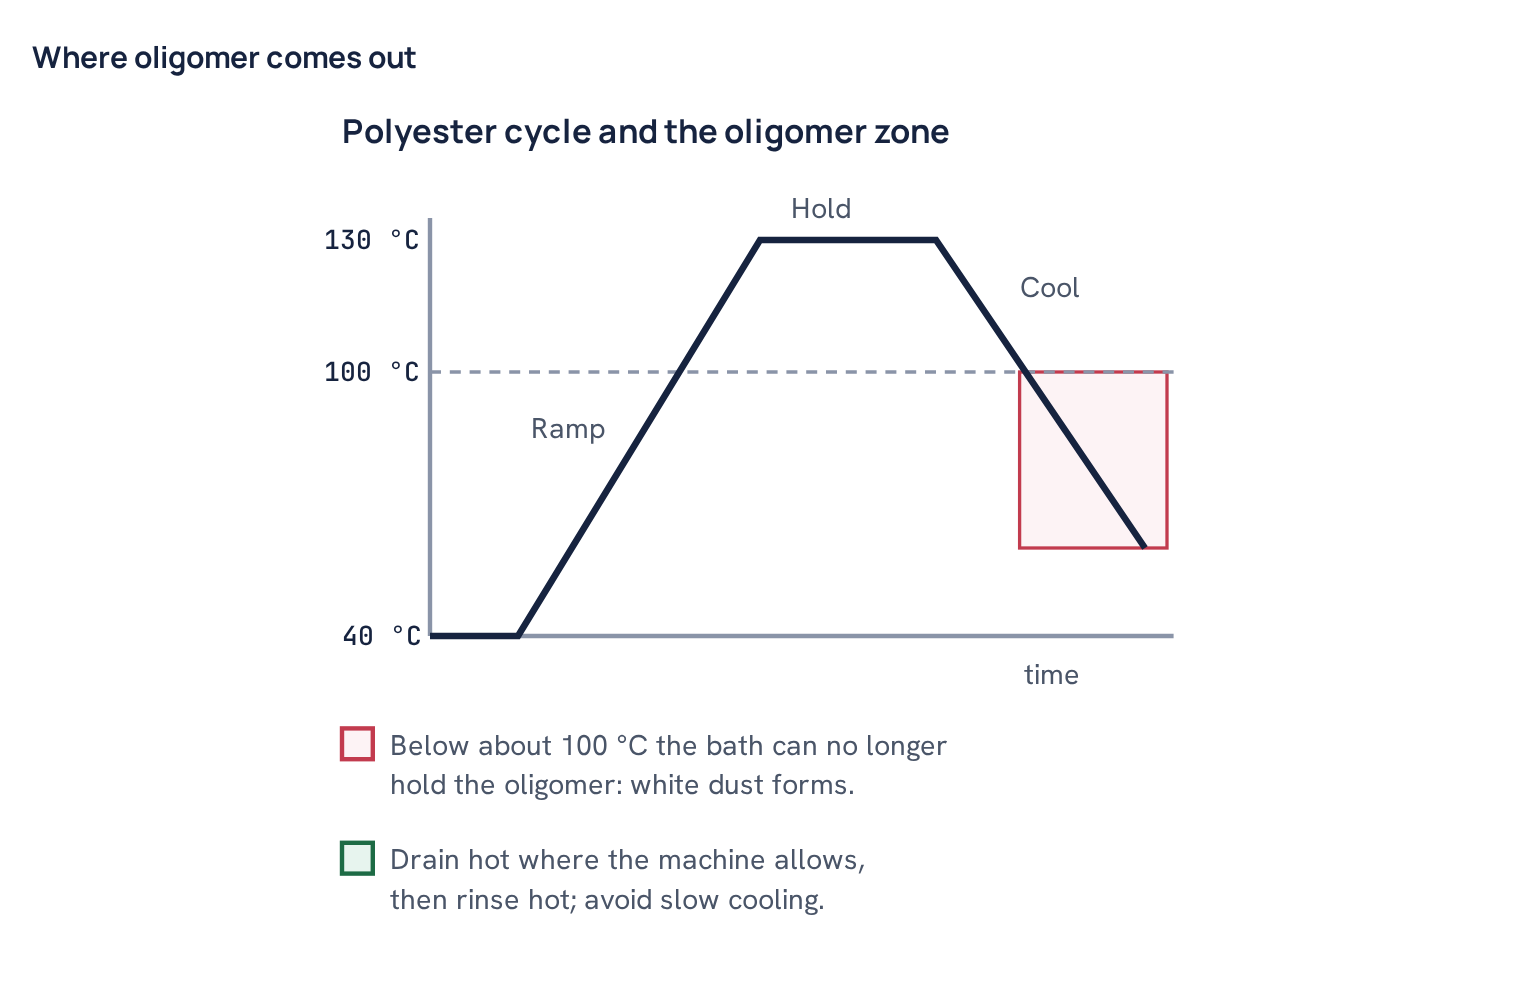
Oligomer. Polyester contains a small amount of short-chain oligomers, mostly cyclic trimer. At high dyeing temperatures they move out of the fibre into the bath. When the bath cools, they crystallise as a fine white powder on the fabric and inside the machine. On dark shades this shows as white dust or a greyish bloom, and the powder also traps disperse dye, giving dark specks. The longer and hotter the cycle, and the slower the cooling before draining, the more oligomer comes out.
Defoamer and silicone spots. Silicone defoamers are very effective, but if they are overdosed, added neat, or used with an incompatible product, the silicone can separate as tiny oily droplets. These droplets stick to the fabric and resist dye, giving light spots, or attract loose dye, giving dark greasy spots. Silicone stains are among the hardest to remove.
Common mistake: Dissolving reactive dye in a salt or soda ash solution to save a step. Salt reduces solubility and alkali starts fixation and hydrolysis in the dissolving tank. Dissolve dye in plain water, and dose salt and alkali separately.
Machine
Deposits and tar from earlier batches. Inside a jet or overflow machine, layers build up on the walls, the heat exchanger, the nozzle and the filter: oligomer, disperse dye, oil from knitting, defoamer, lint and lime soap. These layers soften at high temperature and break off as sticky, dark, tarry lumps. They are a classic fault after a run of dark polyester shades, when the next batch is a pale shade or a white.
Lint balls and dirty filters. A blocked or damaged lint filter lets fibre balls circulate. They collect dye and redeposit as fuzzy specks.
Rust from the machine and pipework. Older machines, carbon steel pipes, worn stainless welds and rusty dosing lines can shed iron particles. These cause brown spots in dyeing and holes in peroxide bleaching.
Finishing
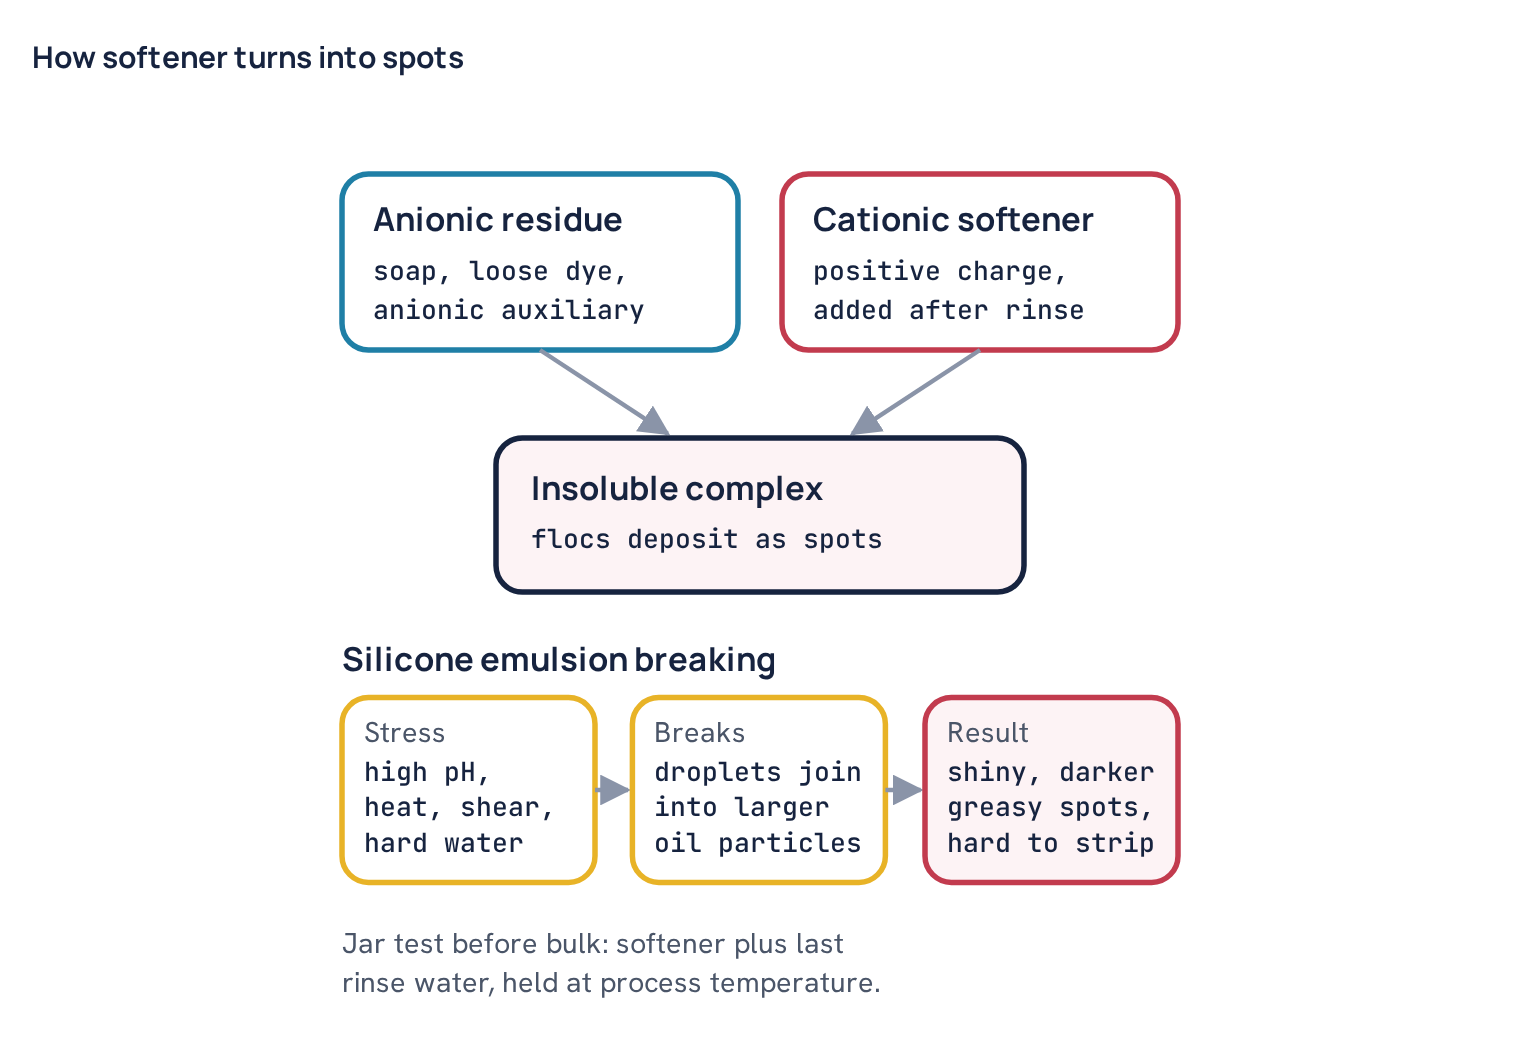
Cationic softener reacting with anionic residues. Most knit softeners are cationic (positively charged). Soaping agents, many detergents, loose hydrolysed reactive dye and some levelling agents are anionic (negatively charged). If the fabric is not rinsed well after soaping, the two meet in the softener bath and form an insoluble complex. It deposits as sticky spots that may be darker because they hold loose dye. See dyeing auxiliaries explained for how ionic character affects compatibility.
Silicone emulsion breaking. Silicone softeners are emulsions: tiny silicone droplets held in water by emulsifiers. High pH, hard water, high temperature, strong shear in the machine or the padder, or mixing with an incompatible product can break the emulsion. The droplets join into larger oily particles that stain the fabric with shiny, darker spots.
Quick diagnostic checklist
- Describe the spot: darker or lighter, same or different hue, sharp or soft edge, face only or both sides.
- Map it: random over the batch, repeating at a fixed distance, at rope ends, or only in one roll.
- Run the bench tests: dry rub, solvent drop, warm wash, hue under two lights, back and strength.
- Check the greige: are there oil marks, neps or foreign fibres before dyeing?
- Check the dye kitchen record: how was each dye dissolved, at what temperature, was it filtered, and in what order were salt, dye and alkali dosed?
- Check water: hardness and iron on the day, and whether the softener plant was due for regeneration.
- Check the machine: what was the previous batch, when was the last boil-out, is the lint filter clean?
- For polyester and blends: heating rate, holding time, drain temperature, and whether reduction clearing was done.
- For finishing: rinse after soaping, pH before softener, softener type and how it was diluted.
- Compare with other batches dyed the same day with the same dyes, water and softener.
Worked example. Suppose a pale reactive shade on cotton single jersey shows small dark specks of the same hue, spread randomly over the whole batch, on both face and back. The solvent drop does nothing and a warm wash does not move them, so oil and loose dye are ruled out. The specks are the same hue as the shade, so contamination from another shade is unlikely. The dye kitchen record shows the dyes were dissolved in cold water and dosed without filtering. A drop of a freshly made solution of the same dyes on filter paper shows small dark points inside the ring. The likely cause is undissolved dye. The fix for the next batch is pasting, warm water, full dissolution and filtering, and the spotted batch has to be judged for stripping, re-dyeing darker or rejection.
Prevention: practical settings that stop spots
Dissolve and filter every dye
Good dissolving prevents the most common spot of all. Paste the powder with a little water first, then add more water while stirring, then filter. The right water temperature depends on the dye class and the individual dye. Many reactive dyes dissolve well somewhere around 40–60 °C, while some vinyl sulphone types should not be dissolved too hot; always follow the dye maker’s data, because the safe range varies. Never dissolve reactive dyes together with alkali.
- Dosing order. Add levelling agent and sequestering agent first, then dye, then salt in portions, then alkali by progressive dosing. For disperse dyes, add dispersing agent and acid before the dye. Never pour concentrated chemicals into the machine where they can hit the fabric directly.
- Keep the dye kitchen clean. Use covered containers, close lids at once, use a local dust extraction hood if possible, and keep fabric trolleys away from weighing benches. Clean benches between shades.
- Control water. Keep hardness low, typically below about 50 ppm as CaCO₃ and lower for pale and bright shades; mills set their own limits. Keep iron very low, often below 0.1 ppm. Use a suitable sequestering agent when hardness cannot be fully controlled.
Common mistake: Adding silicone defoamer neat into the machine or straight onto the fabric rope. Always dilute it first, add it into the bath through the dosing tank, and use the smallest dose that controls foam.
Polyester and blends
- Use a good dispersing agent and a heating rate that suits the dyes; a typical rate in the critical range is around 1–2 °C per minute, but it varies by dye and machine.
- Avoid very long holding times at top temperature where they are not needed.
- Drain hot where the machine allows, then rinse hot. Many dye houses drain at about 80–130 °C depending on the machine; do not let the bath cool slowly with the fabric in it.
- Do a reduction clear after dark disperse shades. A common bath is sodium hydrosulphite and caustic soda at about 70–80 °C for 15–20 minutes, but amounts and conditions vary. On CVC and polycotton, alkaline reduction clearing can affect reactive dyes, so it is normally done before the reactive stage or replaced by an acid reduction clearing agent. See the 100% polyester knit dyeing process for the full cycle.
Common mistake: Cooling a dark polyester batch slowly to 60 °C in the dye bath before draining. This is exactly where oligomer and loose disperse dye come out and settle on the fabric.
Machine cleaning and boil-out
Plan machine cleaning, do not wait for a spotted batch. Clean the lint filter every batch. Do a boil-out after a run of dark polyester or blend shades and always before whites and pale shades. An alkaline reductive boil-out with caustic soda, hydrosulphite and a detergent at high temperature removes dye and oligomer deposits. A separate acid cleaning removes scale and lime deposits. Concentrations, temperatures and frequency vary; follow the machine and chemical supplier guidance and set your own rule by experience.
Pretreatment and fabric
- Check greige fabric for oil marks before loading, and spot-clean them before scouring with a suitable stain remover.
- Ask the knitting section to use washable knitting oil and to clean machines that drip grease.
- After peroxide bleaching, rinse well and use a peroxide killer, then check the bath with peroxide test strips before adding reactive dye.
- Keep pipes, tanks and trolleys free of rust, and check iron in water regularly.
Softener compatibility jar test
Before using a new softener, or when a softener spot appears, take the last rinse water from the machine, add softener at the bulk concentration, adjust the pH as in bulk, and hold the jar at the process temperature for 20–30 minutes with stirring. Watch for cloudiness, flocs or oily droplets on the surface. If you see any, rinse more, neutralise better, check the pH, or change to a compatible softener. Always dilute softener before dosing, and do not add it to a very hot bath with strong shear unless the product data allows it.
Correction once a batch is spotted
Spots are harder to correct than uneven shades. Many spots are fixed in the fibre or are physical damage, and no amount of re-processing will hide them. Decide early, based on the type of spot.
- Oil and grease stains before dyeing. Spot-clean with a stain remover or a solvent spray, then re-scour. This is the cheapest stage to fix them.
- Oil stains after dyeing. A solvent may remove the oil but often leaves a ring, and the shade under the oil is usually lighter. Small, isolated stains may be accepted after cleaning if the buyer allows; otherwise the batch needs stripping or re-dyeing darker.
- Fixed reactive dye specks. These cannot be washed out. The options are stripping and re-dyeing, or re-dyeing to a darker shade that hides the specks. See stripping reactive dyed cotton knit. Stripping weakens the fabric and costs time, so judge the value of the batch first.
- Disperse agglomerates and oligomer. A fresh reduction clear, or a hot alkaline wash, often removes much of the surface deposit. Spots that are inside the fibre will stay. Re-dyeing darker is sometimes possible.
- Softener spots. Strip the softener with a detergent wash, often around 60–70 °C, then re-soften with a compatible product. Cationic softener spots usually respond; broken silicone spots often only partly do.
- Silicone defoamer spots. Special silicone removers or emulsifying scours may help, but results are often poor. Test on a cut sample before treating the batch.
- Peroxide spots. The dye in the spot is destroyed. Topping can sometimes even out a slightly weak area in a medium or dark shade, but sharp pale spots usually stay visible.
- Rust spots and holes. A mild acid or reducing treatment can lighten the brown colour, but holes and weak spots are permanent. Reject damaged fabric or sort it so damaged areas are cut out.
If two corrections have not worked, stop. Each extra cycle costs strength, handle and shade stability. Sort the batch, cut out the affected parts if the garment layout allows, sell it as a lower grade, or reject it. A clear decision is cheaper than a third re-process.
What to record so it does not repeat
Spots repeat when nobody connects one spotted batch with the next. Record enough to see the pattern:
- The spot type, colour relative to the shade, size, and where it appeared (face, back, random, repeating).
- The results of the bench tests.
- Dye dissolving details: water temperature, time, filtering, who prepared it.
- Water hardness and iron on the day.
- Machine number, previous batch shade and fibre, date of last boil-out and filter check.
- For polyester: heating rate, top temperature, hold time, drain temperature, reduction clear.
- For finishing: softener type, dilution, pH and rinse before softening.
- The correction done and whether it worked.
After a few months these records show which machine, dye, softener or shift gives most spots. That is where to spend your effort. Read this with the guide on staining in wash and perspiration tests, because the same loose dye and poor dissolving that cause spots also cause fastness failures.
Questions
What causes dark specks on dyed cotton knit fabric?
Most often undissolved or poorly dissolved dye, dye dust from the dispensing area, or dye aggregates formed in hard water or high salt. Paste, dissolve fully and filter each dye before dosing.
How can I tell an oil stain from a dye spot?
Put a drop of mild solvent on a cut sample and blot with white paper. An oil, grease or silicone stain spreads, fades or leaves an oily ring; a fixed dye speck does not change.
Why do white specks appear on dark polyester fabric?
They are usually oligomer, short polyester chains that leave the fibre at high temperature and crystallise when the bath cools. Draining hot, rinsing hot, reduction clearing and regular machine boil-outs reduce them.
Can softener cause spots on dyed fabric?
Yes. Cationic softener can react with anionic residues such as soaping agent or loose dye and form sticky deposits, and silicone emulsions can break under high pH, heat or shear. A jar test with the last rinse water shows the risk before bulk.
Can dye spots be removed after dyeing?
Loose surface deposits and softener spots can often be washed or stripped off. Fixed reactive dye specks need stripping or re-dyeing darker, and rust holes or peroxide damage are permanent.

Textile engineer with 14+ years in dyeing and fabric development. He writes every guide on Dyeing Solution from real production work. Full profile